
Classroom science centers
By Mary Bigelow
Posted on 2014-08-29
 One of my goals this year is to focus more on science. I teach at the elementary level (third grade), and I’m thinking of setting up a science corner in the classroom with materials and activities for students. Rather than reinventing the wheel, do you have any ideas?
—Kate, Davenport, Iowa
In a school I visited, the second grade classes were doing lessons on butterflies. Each classroom had a cage with chrysalises and students were to observe how the adult butterflies emerged. In one classroom, the teacher had created an elaborate and colorful bulletin board about butterflies, but the cage was on a table with unrelated materials in a back corner of the room. In another classroom, the cage was an integral part of a science center. There were books on caterpillars and butterflies, pictures of common local species, a hand lens, a ruler, and student drawings. The center was labeled with questions for students to consider as they made their observations. Students were invited throughout the day to observe the chrysalises and record their observations, drawings, or questions in a log that was part of the center. Both teachers referenced the butterfly activity during the morning meeting, but I suspect that the classroom with the interactive center fostered more student involvement and interest.
Some classroom science centers (also called science stations or tables) include activities for students to do on a rotating basis. This is useful when there are not enough materials for an entire class, when you want to provide a choice of activities, or for providing alternative or more advanced activities for interested students. These centers include directions, and the activities should be safe enough for students to do independently. You should have procedures in place for how and when students access the center.
Creating centers for each unit can be time-consuming for the teacher, especially during the first year. An alternative is to have students contribute to them, giving students ownership in the project. Blogger and retired educator John Paull describes a science table as an integral part of his teaching:
The science table, placed close to a wall that is covered with display paper and has an electrical outlet near the floor, has always been a significant area in my elementary and middle school classrooms.
Why? Because a science table helps me create and sustain the appropriate environment in which to build a community of active, inquisitive learners. A well-displayed, interactive science table appeals to students’ sense of curiosity and promotes interest, discussion and research.
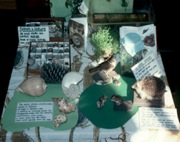
What is a science table? It’s a table space first owned by me, then maintained and owned by the class. It’s a table on which to display Mother Nature’s delights from the first day of school on. The items (rocks, fossils, shells, feathers, bones, plants, whatever catches one’s eye) are carefully displayed, labeled, and accompanied with questions, pictures, reference books, magnifying glass and binocular microscope.
From the first day of school, I start the day with a science table ritual. On Day One, I tell everyone what’s on the science table, inviting the students, at the appropriate time, to take a closer look. I then invite them to volunteer to look after the table.
Once a routine has been established, I ensure the table’s contents constantly change, either by me or the students bringing in different interesting delights.
(Pictures of his table can be found here and his blog has more suggestions for elementary teachers.)
I had a science table in my seventh grade classroom, in addition to the tables at which students worked. Students who “had nothing to do” could go to the table and explore what was there. The table always had some basic components, such as a dissecting microscope and metric rulers. At the beginning of each unit, I assigned several students to go to the library and find six to eight books related to the topic (the librarian was alerted ahead of time). Over the years I amassed a collection of pictures and specimens, but I invited students to contribute. For example, in the fall, we did a unit on fungi. Many of my students went hunting in the local gamelands. As a result, we usually had a great collection of mushrooms, puffballs, bracket fungi, and lichens to explore. Each was tagged with where it was found and who brought it in, just as in a museum.
There are no hard and fast rules, and the size or complexity of your “corner” depends on the space you have. Even a small table can be effective. Start small and give students opportunities to contribute and make suggestions.
Related blogs:
Photo: John Paull
Disclaimer: The views expressed in this blog post are those of the author(s) and do not necessarily reflect the official position of the National Science Teaching Association (NSTA).