
Observing closely—bubbles!
By Peggy Ashbrook
Posted on 2010-10-10
 Bubble blowing is a favorite activity of young children. Two-year-olds, who often have difficulty blowing a stream of air, may have more success by waving a bubble wand. The process is moderately difficult for 3 and 4 year olds and can be made more challenging for older children by providing a variety of bubble “wands” and tasks such as blow a bubble within a bubble, or blow the largest bubble. Yet children with experience blowing bubbles may not be able to recall the shape of, or say the name of, all free-floating bubbles—a sphere.
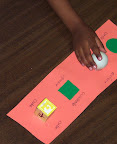 Bubble blowing is a good time to talk about the difference between two dimensional “round” objects and three dimensional “round” objects and to have children practice careful observation. Use familiar classrooom objects such as, balls and marbles, cube blocks and boxes to compare to paper cut-outs of the 2-D shapes, a circle and a square. Read the October 2010 Early Years column about how repeated bubble observations can develop this understanding. The word “sphere” is difficult to pronounce. Maybe that is why it isn’t used very often in everyday speech. One class I work with surprised me by incorporating the word into their classroom conversations about marbles and balls. All it took was for one member of the class to begin to use the new vocabulary word frequently, and then it caught on with the rest of the children—and teachers! It isn’t just a new word for a familiar object; it is a way of recognizing the distinction between flat objects and 3-D objects and a beginning to think spatially.
Here are some resources about bubbles and shapes.
Books for children
Is It Rough? Is It Smooth? Is It Shiny? by Tana Hoban. 1984. New York: Greenwillow Books.
Cubes, Cones, Cylinders and Spheres by Tana Hoban. 2000. New York: Greenwillow Books.
Pop!: A Book About Bubbles by Kimberly Brubaker Bradley with photographs by Margaret Miller. 2001. New York: HarperCollins Publishers.
Books for teachers
Soap Bubble Magic by Seymour Simon, illustrated by Stella Ormai. 1985. New York: Lothrop, Lee & Shepard.
The Nature and Science of Bubbles by Jane Burton and Kim Taylor. 1998. Milwaukee, Wis.: Gareth Stevens Pub.
Bubble Festival (grades K-6) Great Explorations in Math and Science (GEMS) guide on bubbles (and companion free online training video) available online http://www.lhsgems.org/GEM132.html
Bubble-ology (grades 5-8, or for early childhood teachers) GEMS available online http://www.lhsgems.org/GEM240.html
 Non-messy bubble Discovery Bottles* can intrigue children and encourage them to expand on their ideas about bubbles. Make the bottles using clear plastic bottles with tight-fitting lids, vegetable oil, water, food coloring, corn syrup and a hot glue gun (for adult use) to seal the lids. I use mayo jars, bottles for corn syrup, and other relatively strong plastic bottles. * Also see Sandy Watson’s article, Discovery Bottles, in the July 2008 Science and Children.
- For the first one, fill a small, clear plastic bottle almost to the top with vegetable oil, leaving space for about two tablespoons of colored water. (A few small objects may be added for interest.)
- Add food coloring to a small cup of water.
- Add this colored water to the bottle, filling it completely.
- Carefully wipe the lip of the bottle with a paper towel.
- Seal the bottle by putting a small amount of hot glue inside the lid before tightly screwing on the lid. Tape around the lid afterwards as a symbol to show that the lid should not be removed.
- After the glue cools, turn the bottle upside down to watch the water bubble move. Some questions to ask the children include: Does the bubble move up or down? What shape is the bubble?
- Make a second bottle by filling it with corn syrup, leaving a small space for a tablespoon of air at the top. (A few small objects may be added for interest.)
- Carefully wipe the lip of the bottle with a paper towel.
- Seal the bottle by putting a small amount of hot glue inside the lid before tightly screwing on the lid. Tape around the lid afterwards as a symbol to show that the lid should not be removed.
- After the glue cools, turn the bottle upside down to watch the air bubble move. Some questions to ask the children include: Does the bubble move up or down? How fast does it move? What shape is the bubble?
What bubble experiences happen in your classrooms? How do your students record their observations? What kind of questions have they raised in discussions? Tell us all, Peggy
Disclaimer: The views expressed in this blog post are those of the author(s) and do not necessarily reflect the official position of the National Science Teaching Association (NSTA).