start with phenomena
Shining Light on the Importance of Explore-Before-Explain Experiences for Early Childhood Learners
Science and Children—January/February 2022 (Volume 59, Issue 3)
By Patrick Brown
Any early childhood teacher appreciates their classes are bursting with knowers and wonderers. Investigating real-world phenomena in a playful, exploratory environment is a natural process for young children. Regardless of the accuracy of their beliefs, children use logic, reasoning, and their experiences to explain their observations. While many preschool classrooms provide young children with hands-on opportunities, systematic investigations can be challenging because preschoolers need help linking what they observe with essential scientific concepts.
This article shares an illustrative example of how to use explore-before-explain lessons with children ages 4–5. The lesson targets developing children’s abilities to “plan and conduct investigations to determine the effect of placing objects made with different materials in the path of a beam of light” (NGSS Lead States 2013; 1-PS4-3). So, for example, if the end goal of the learning is for students to make evidence-based claims about how light influences what they see through experiential experiences, then student experiences with phenomena such as shining flashlights and making shadows would help ground their activity in familiar territory. While this lesson draws on first-grade science standards, the powerfulness of explore-before-explain teaching illustrates young children have remarkable capabilities if the content is sequenced appropriately. This lesson shows that preschoolers are ready to learn at high levels if instruction is sequenced in ways that: (1) prior experiences are related to new ideas, (2) new ideas are entrenched in firsthand experiences with data, (3) data and evidence allow children to form accurate scientific claims, and (4) teachers connect new ideas with more sophisticated understanding (Brown 2018).
Engaging Students in the Context
First, I asked the class to draw a picture of themselves and their shadow. The purpose was to elicit children’s ideas and situate the learning context. Their drawings revealed exciting insights into their knowledge. For instance, they had some ideas about what their shadow would look like from experience without having completely accurate understandings. Many children realized shadows could be mirror images and created a dark area; however, numerous children also wanted to depict a portion of their shadow in color.
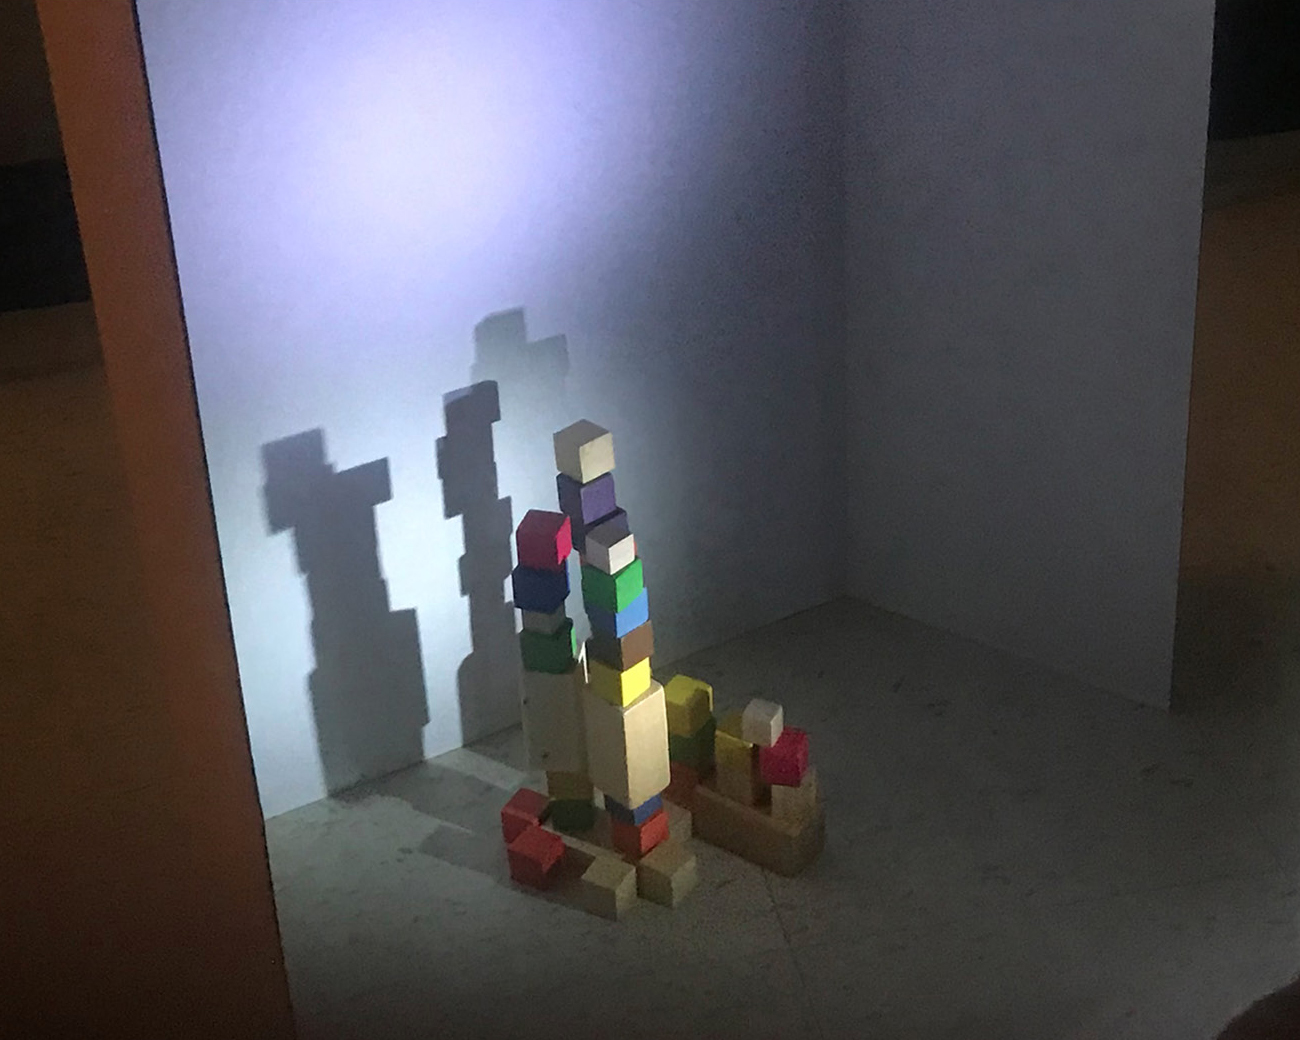
The second portion was designed to set the context for exploring shadows. See Figure 1 for safety, classroom management, and differentiation notes. I wanted to capitalize on children’s curiosity to build scientific ideas as they engaged in predicting, investigating, observing, comparing, and contrasting. I began by having children work in groups of two to build a tower out of solid blocks that are different shapes and sizes as well as different colors (see Figure 2). To ensure we were addressing children’s diverse interests and experiences, I allowed them to build any structures they found interesting. Once all groups had a structure, I asked: “How are the blocks the same and different?” I circulated and elicited children’s responses that included descriptions of the different shapes and colors of blocks used to build towers.
Classroom management tips.
Safety
- I ensured the materials did not present choking threats and spread the children out to prevent tripping hazards.
Classroom Management
- Our class included two teachers and one para-professional, so we were able to have a ratio of one adult for five to six children.
- The adults decided all of the groups with the primary grouping criteria being whether students could work together and share materials.
- Most students could build structures on their own in pairs; however, some need help constructing specific parts of their buildings and a reminder to let all group members contribute to the building.
- Teachers should emphasize it is not testing time yet. While students had verbal instructions, all adults had to remind students only to shine their flashlights when instructed.
- Teachers should foster unsolicited descriptions and allow student ideas, observations, and understandings to develop over time.
Differentiation
- Some students benefited from rotating in and out of stations and working with multiple groups.
- Students used both whole-class dicussions, think-pair-shares, and individual discussions of the content to participate in explaining their scientific ideas.
- Some students benefit from a quiet space where they could take a break from hands-on explorations and create pictures of their learning.
- Some students benefited from telling the teacher how to build structures and shine the flashlight versus them physically completing these activities.

Student towers with solid blocks of various colors.
Next, I placed a white poster board behind their structures and I gave all children a flashlight. I asked them to make predictions about what they thought would happen when they shine their flashlight on the tower. I had the class turn and talk with a partner about what they think they will see on the white poster board. Also, I asked them for a reason for their thinking. Some students had a whole host of ideas. Charlie thought, “I’ll see my building on the wall” reasoning “it will be like looking in a mirror.” Aiden believed it would create a “dark building on the wall.” Once children shared ideas, it was time to explore and generate initial evidence-based understanding.
Data-Producing Experiences
Evidence-Based
I started by having the groups shine their light on their structures to create shadows and told the students that we would begin the exploration when I said “ready, set, go!” Once we started, I had to help many students position their flashlights and shine them on their structures to create a shadow. After they created a shadow, I asked them whether they can change how the shadow appears. Students needed some help thinking through how they could change their shadows. I found myself frequently kneeling to help model my thinking and investigative questions. I would ask students how they could change the shape of the shadow and where they would need to move the flashlight to make a shadow bigger or smaller. Students eagerly showed me how they could move their flashlights closer to their buildings to make bigger shadows and farther away to make smaller shadows. In this way, children quickly learned there is a cause-and-effect relationship, as Charlie explained when he placed the light closer to the object, “the bigger the darkness.” I wanted to encourage scientific vocabulary so I repeatedly defined the darkness and black areas in my discourse as the shadow.
Science discourse was woven into the lesson as preschoolers talked with each other and the teachers. Specifically, I used science practice vocabulary (e.g., observe, predict, and explain), terms related to core ideas (e.g., shadow, light), thinking and reasoning strategies associated with the crosscutting concepts (compare and patterns). As the activity progressed, I differentiated instruction by building on children’s varying levels of content knowledge. I asked what, why, how questions and used descriptive words (e.g., in front, behind, larger, smaller) to foster reflection about the relationship between the position of the light source, the structures children built, and the shadows created. I knelt down and asked how a shadow might look different when the flashlight is pointed directly at their structures versus at an angle to their buildings.
As we continued with our exploration, children learned the difference between pointing the light source directly and indirectly on their structure. For instance, a pair exchanged the following conversation:
Lennon: “If I shine the light right at it (referring to the triangle), the shadow is the same.”
Finley: “Watch this, when I shine it over here (indicating shining the light at an angle), I can make it (referring to a triangle) really pointy.”
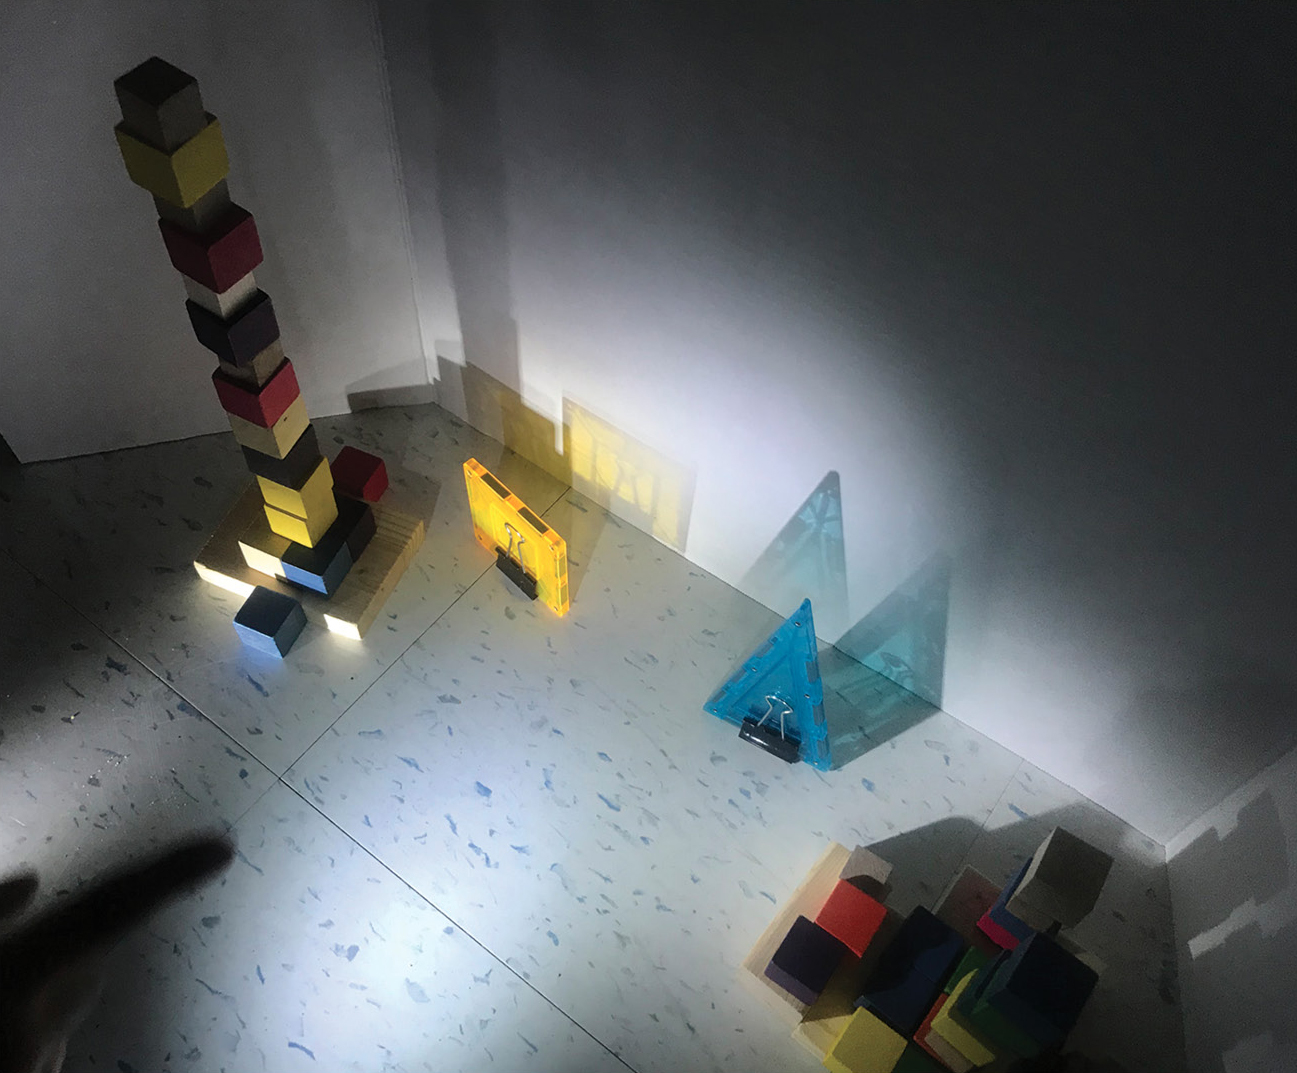
Thus, children were learning that directly positioning the light source creates a mirror image, while indirectly pointing the light source can cause shadows to stretch (see Figure 3).

Exploring the shadows created by different-colored solid blocks.
The children were eager to explore on their own and many learned they could position two lights at different angles to create more than one shadow of the object. In Skyler’s words, “point your light over here (indicating pointing both lights at different angles) and we can make two appear (referring to square shadows) when there is really just one.” They positioned their flashlights at all possible angles around their structures and made shadows on the floor. Some of the shadows stretched further and were more distorted than others, depending on the positioning of their flashlight. Nearly all students pointed their flashlights directly at the whiteboards with nothing in between the flashlight and the whiteboard. They realized that they did not create a shadow. My assessment at this point was all based on children’s verbal ideas and scientific ideas about the position of the light sources and shadow created.
With a basic understanding at hand, it was time to explore similarities and differences between their buildings and the shadow created. I had the class think about the different colored blocks and the shadow created. I asked whether colored blocks resulted in a shadow that has different colors. Many children noticed an immediate similarity between the colored blocks. “The shadow is black,” one child said, while pointing out the light containing red-colored blocks. Another child suggested, “All blocks make a black shadow.” Students’ conversations were my assessment of children’s developing knowledge of the types of shadows different solid materials created.
Evidence-Based Experience 2
The second experience was about introducing new and different material to students, expanding their budding ideas of the properties of light. I placed a translucent object near their structures and asked them to predict what they thought would happen when light was shined on it. Children were surprised that unlike the colored blocks that produce a dark area that is indistinguishable from other colored blocks, light transfers through the translucent object. For instance, Bailey said, “I see the color and shape of the triangle.” I asked the pairs to turn and talk to a partner about the similarities and differences between their structures and the translucent object (I used the phrase partly see-through to mean translucent). As partners talked to each other, I frequently heard them say that “partly see-through objects shine colored light to the board” (referring to letting light through to the other side that is the object’s color) (Figure 4).

Introducing translucent objects.
Next, I placed a colored piece of paper in front of student’s whiteboard. I asked the class to predict the image they will see when they shine their light on it. I also asked them to compare and group the objects (solid building blocks, translucent shape, paper shape). The students were surprised by the findings. For instance, Kennedy said, “both the paper and see-through shapes create color, but the blocks create dark.”
Evidence-Based
With ideas developing and students having fun learning about shadows, I wanted to help children test their understanding with an irregular shaped object. I added to each group’s station a plastic toy animal (Figure 5) and asked students the following discussion questions: Predict what will happen when light is shined on the animal. Will the animal create a shadow or an image that is colorful like the toy? Many children demonstrated their developing understanding and correctly predicted, as shown by Kelly, who said, “the toy creates a dark area.” They enjoyed making elongated animal shapes and showed their knowledge about the positioning of the light source, object, and how a shadow is created.

Students explore the image created by a plastic toy.
Authoritative Explanations
Following the explorations, the children and I huddled in a small circle on a rug and read What Makes a Shadow (Bulla 1994). Each page contains pictures and explanations so students develop a more sophisticated understanding and scientific vocabulary. While students looked closely at the colorful and vivid illustrations, I made sure to frequently stop to have them connect their prior and new experiences. The first opportunity to join the reading with their experiences occurred when the book discussed the position of the Sun relative to the object and the resulting shadow (p. 7). The children eagerly answered questions about how the Sun, like their flashlights, can make a shadow if properly placed. Through interactive reading, I invited children to make connections to new ideas, such as a shadow is “the dark place behind you where the sun does not shine. The darkness is your shadow” (Bulla 1994, p. 9). We thought of the darkness and blackness of a shadow as the absence of light (I said, “no light in the area”) instead of the addition of these colors. As we continued, the text became a springboard for discussions and opportunities for children to reflect on their firsthand experiences. We carefully examined a picture in the book and thought about the text that described a partially illuminated Earth (p. 22). Up until this point, we mostly used whole-group questions and reflection, so I had them turn and talk to allow all children to share ideas. I asked how their structures were similar or different than a partially illuminated Earth. I pointed to the picture of the Earth and had students think about the illuminated side versus the side of the planet that does not receive direct sunlight. Many children realized their buildings were like the Earth, as one child said, “only part of the buildings lights up.” As I continued the reading, we stopped and thought how to make shadows with our hands bigger and smaller as a result of the position of the light source (pp. 24–26). Children resonated with these ideas, as Dakota recalled making a shadow of a dog using his hand and a flashlight and Charlie recounted that as long as you have a light source, you can create shadows in dark rooms. The children all were excited to use their new ideas to make shadows at home. The result of using the reading is students have another source of knowledge to verify their evidence-based experiences as well as promoting more elaborated understanding that builds on and extends their learning.
Summative Evaluation
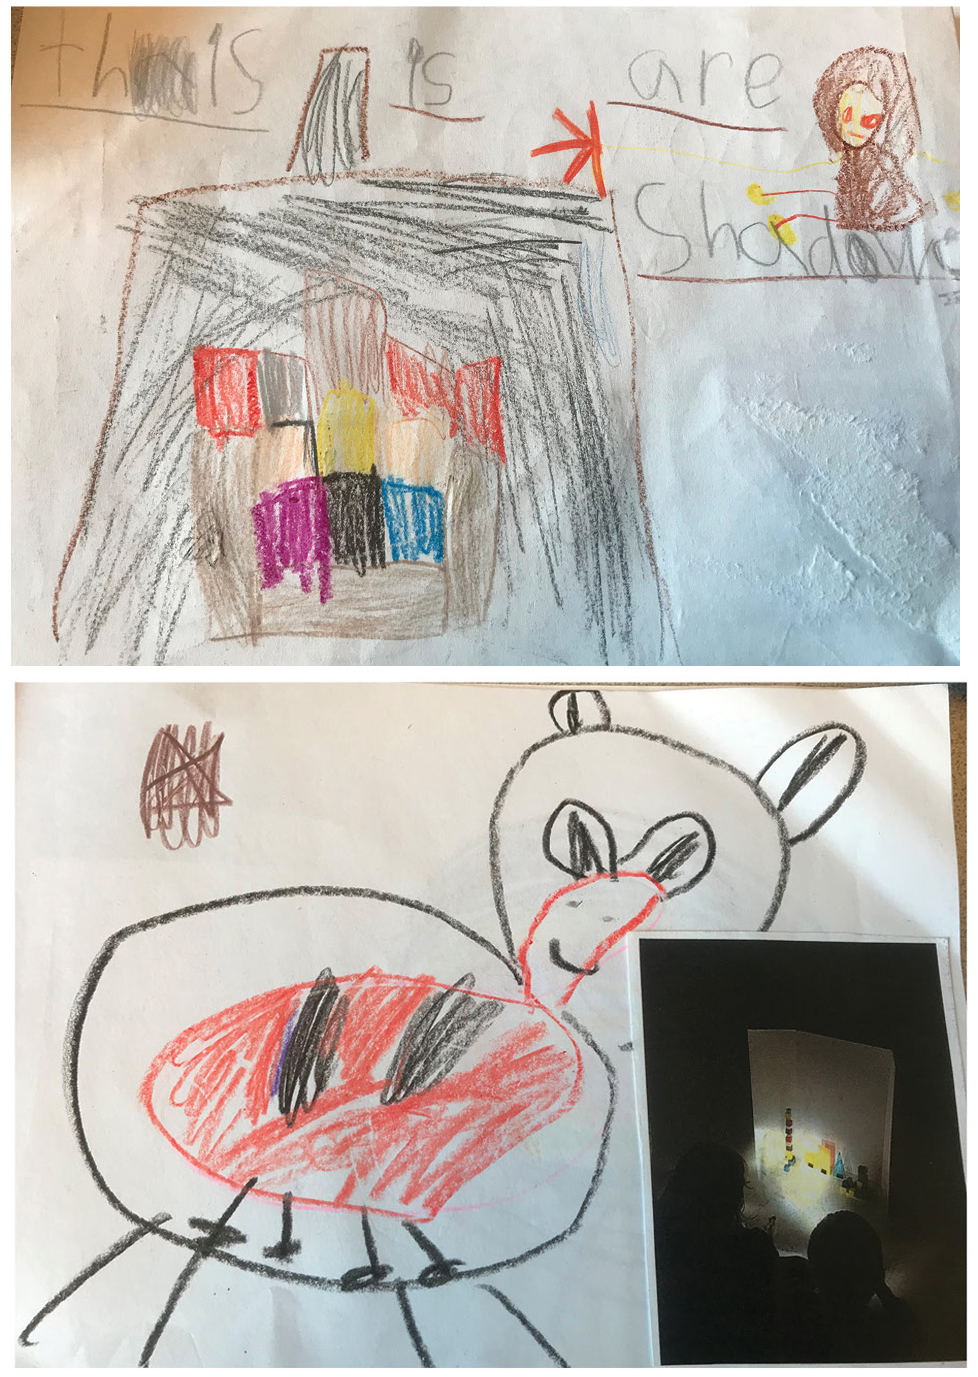
To address the needs of young learners who were mostly pre-readers and developing basic writing skills, I had children create a colorful picture book about shadows. My guidance was minimal and I kept the task open-ended and told children “to create a shadow book showing what you learned today.” I was pleasantly surprised by what students drew. For example, one child showed her colorful building that created a shadow that was black and larger than her structure (Figure 6a). Another page showed how she created a shadow of her colorful animal (note the shadow is not in black or color) that was bigger than the original (Figure 6b). These books were a way for students to describe phenomena and for me to elicit their understanding.

(upper) Child’s picture of her structure and its shadow. (lower) Child’s picture of her animal and its shadow.
Conclusion
All children, regardless of age, are ready to learn at high levels if instruction is sequenced in ways that build appropriately on prior knowledge and allow for firsthand explorations. Explore-before-explain teaching creates conceptual coherence for students by allowing them to construct knowledge using scientific practices and crosscutting concepts. While hands-on experiences are inherently engaging for students, this approach ensures that students develop conceptual science understanding of both content and practices and engage in the type of learning by doing that is the backbone of the Next Generation Science Standards. The experiences in the lesson also highlight critical attributes of explore-before-explain learning. The exploration activities help contextualize preassessments and ground the unit of study in phenomena. Also, the explorations set up opportunities to discuss disciplinary core ideas that validate students’ firsthand experiences and even expand on them to help develop fuller understanding. The result of using explore-before-explain approach is that students begin to construct structures for understanding science built around evidence-based experiences. Essential concepts, ideas, and facts are connected in meaningful ways to students’ frameworks for understanding.
Patrick Brown (plbtfc@gmail.com) is executive director of STEAM at Fort Zumwalt School District in O’Fallon, Missouri, and the author of the NSTA book series Instructional Sequence Matters.
Phenomena Physical Science Teaching Strategies


