Feature
Finding the Next Diamond Mine
The Science Teacher—April/May 2020 (Volume 87, Issue 8)
By STEPHEN MATTOX, JESSICA KETELAAR, AND ROBIN VANDERWEL

The unequal distribution of natural resources is the direct result of past geologic processes. Once a promising region is located, geologists use a variety of techniques to find the materials and energy that society consumes. Their tools can be as simple as a hand lens or as sophisticated as a satellite. Along the way, exploration geologists and their companies must stay within budget, exercise patience and common sense, and, in most cases, accept failure more frequently than success. A common exploration method is tracing a material, such as diamonds or gold, back to its source. In this lesson, students will examine the global distribution of diamond deposits, practice identifying grains of common minerals and rocks, and model exploration geology as they search for their own diamond mine.
Geologic background
The availability of diamonds has played a critical role in the development of countries and their economies. However, distribution is uneven and for some countries, such as the United States, all natural diamonds must be imported. Few natural diamonds are gem quality, and most are used in industrial applications, such as computer chips, stone cutting and highway building, or drilling for oil and gas (USGS 2018).
Diamonds form under high pressure at depths of 150 km and temperatures over 1000°C, a combination found only beneath the stable interiors of continents (Shigley et al. 2016; Harlow and Davie 2005). The carbon is likely carried down a subduction zone or from the original accretion of the Earth. To get to the surface, diamonds are transported by magma, so they are found in volcanic rock (visit Volcanoworld at http://volcano.oregonstate.edu/diamonds for details). Volcanic rock that may contain diamonds, called kimberlite, is dark in color and rich in potassium, magnesium, and iron. Kimberlite volcanoes are small, only 500–1,000 m in diameter at the surface, with low rims that are commonly eroded away (see On the Web—Slide 5 in Finding Diamonds PowerPoint). Most of the kimberlite eruptions occurred 150 to 70 million years ago. Frustratingly, not all kimberlite contains diamonds.
Diamonds occur in nature at an incredibly low concentration (parts per billion), so geologists look for indicator minerals that are commonly associated with kimberlite (i.e., garnet, olivine, clinopyroxene, ilmenite, chromite, and zircon), which tell an exploration geologist that she is on the right trail! However, rivers or glaciers can cause these minerals to erode away from the diamond deposit. Tracing these minerals to their source can take years and requires equal amounts of science and tenacity (see Barren Lands (Krejicks 2001) and Hoffman’s (2008) article for examples).
If diamond deposits are small in diameter (about 500 to 1,000 m) and extremely limited in their global distribution, how do geologists find them? While time-consuming and often frustrating, finding a diamond deposit is not overly complicated. Exploration geologists, like your students, only need an understanding of streams and watersheds. Geologists commonly start taking samples at the base of a major river valley. If they find indicator minerals, they know they are in a promising watershed. Samples are collected upstream as the number of tributaries grows. Geologists determine which tributary leads to a potential diamond deposit. If a stream is promising, they take more samples. Eventually, the geologists find the kimberlite in the watershed and drill the deposit for rock cores. The volume of diamond ore is then defined and evaluated against the economic considerations of starting a mine.
During the Finding Diamonds activity, students learn the basics of mineral and rock identification, think scientifically, use evidence, and move up the streams in a hypothetical watershed to find a source of diamonds.
Classroom procedure
Students use the Finding Diamonds Activity Handout (see On the Web) to move through the activity. They begin Part 1 by comparing the global distribution of diamond deposits to a plate tectonic map and a map of bedrock ages of the world to determine that diamonds have an unequal distribution and are only found in the stable, old interiors of continents (see On the Web—Slides 1–4 maps in the Finding Diamonds PowerPoint). The teacher may wish to print the maps as overlays to facilitate comparison of diamond distribution to geologic factors.
Part 2 provides a practice experience in mineral identification before the students start exploring to find the diamond deposit. Students are given a small plastic dish that contains one grain of each rock and mineral (Figure 3). Students use the Mineral and Rock Identification Chart (Figure 4) to focus on key characteristics of the materials.
The minerals for this activity were carefully selected to introduce properties and because they are common; as students continue beyond this activity, they will find identification more challenging. Students must check their identification with the teacher before advancing. Commonly, students will need to be sent back to their desks one or two times before they are efficient at identification. Misidentification, just like the real world, leads to problems and setbacks—teachers must be strict! If the geologist makes too many mistakes, their employer may not stay in business. Part 2 could be done in one class meeting, and Part 3—locating the deposit—can be done in the next class.
During Part 3, students attempt to find a diamond deposit using their mineral identification and critical-thinking skills. This is the main part of the activity and is quite dynamic. Teams of two or four students start at location 1. They send a teammate to the teacher to collect sample bag 1 and return to their desk. A line of students forms quickly and the students must be patient; this is similar to a geologist submitting their sample for chemical assay and waiting for results.
Students must examine and correctly identify the minerals and rocks at that location (Figure 2). They record their data on a table in the activity sheet. When they are confident in their answers, students return to the line and check their answers with the teacher. If they are incorrect, they must return to their desk and recheck their work.
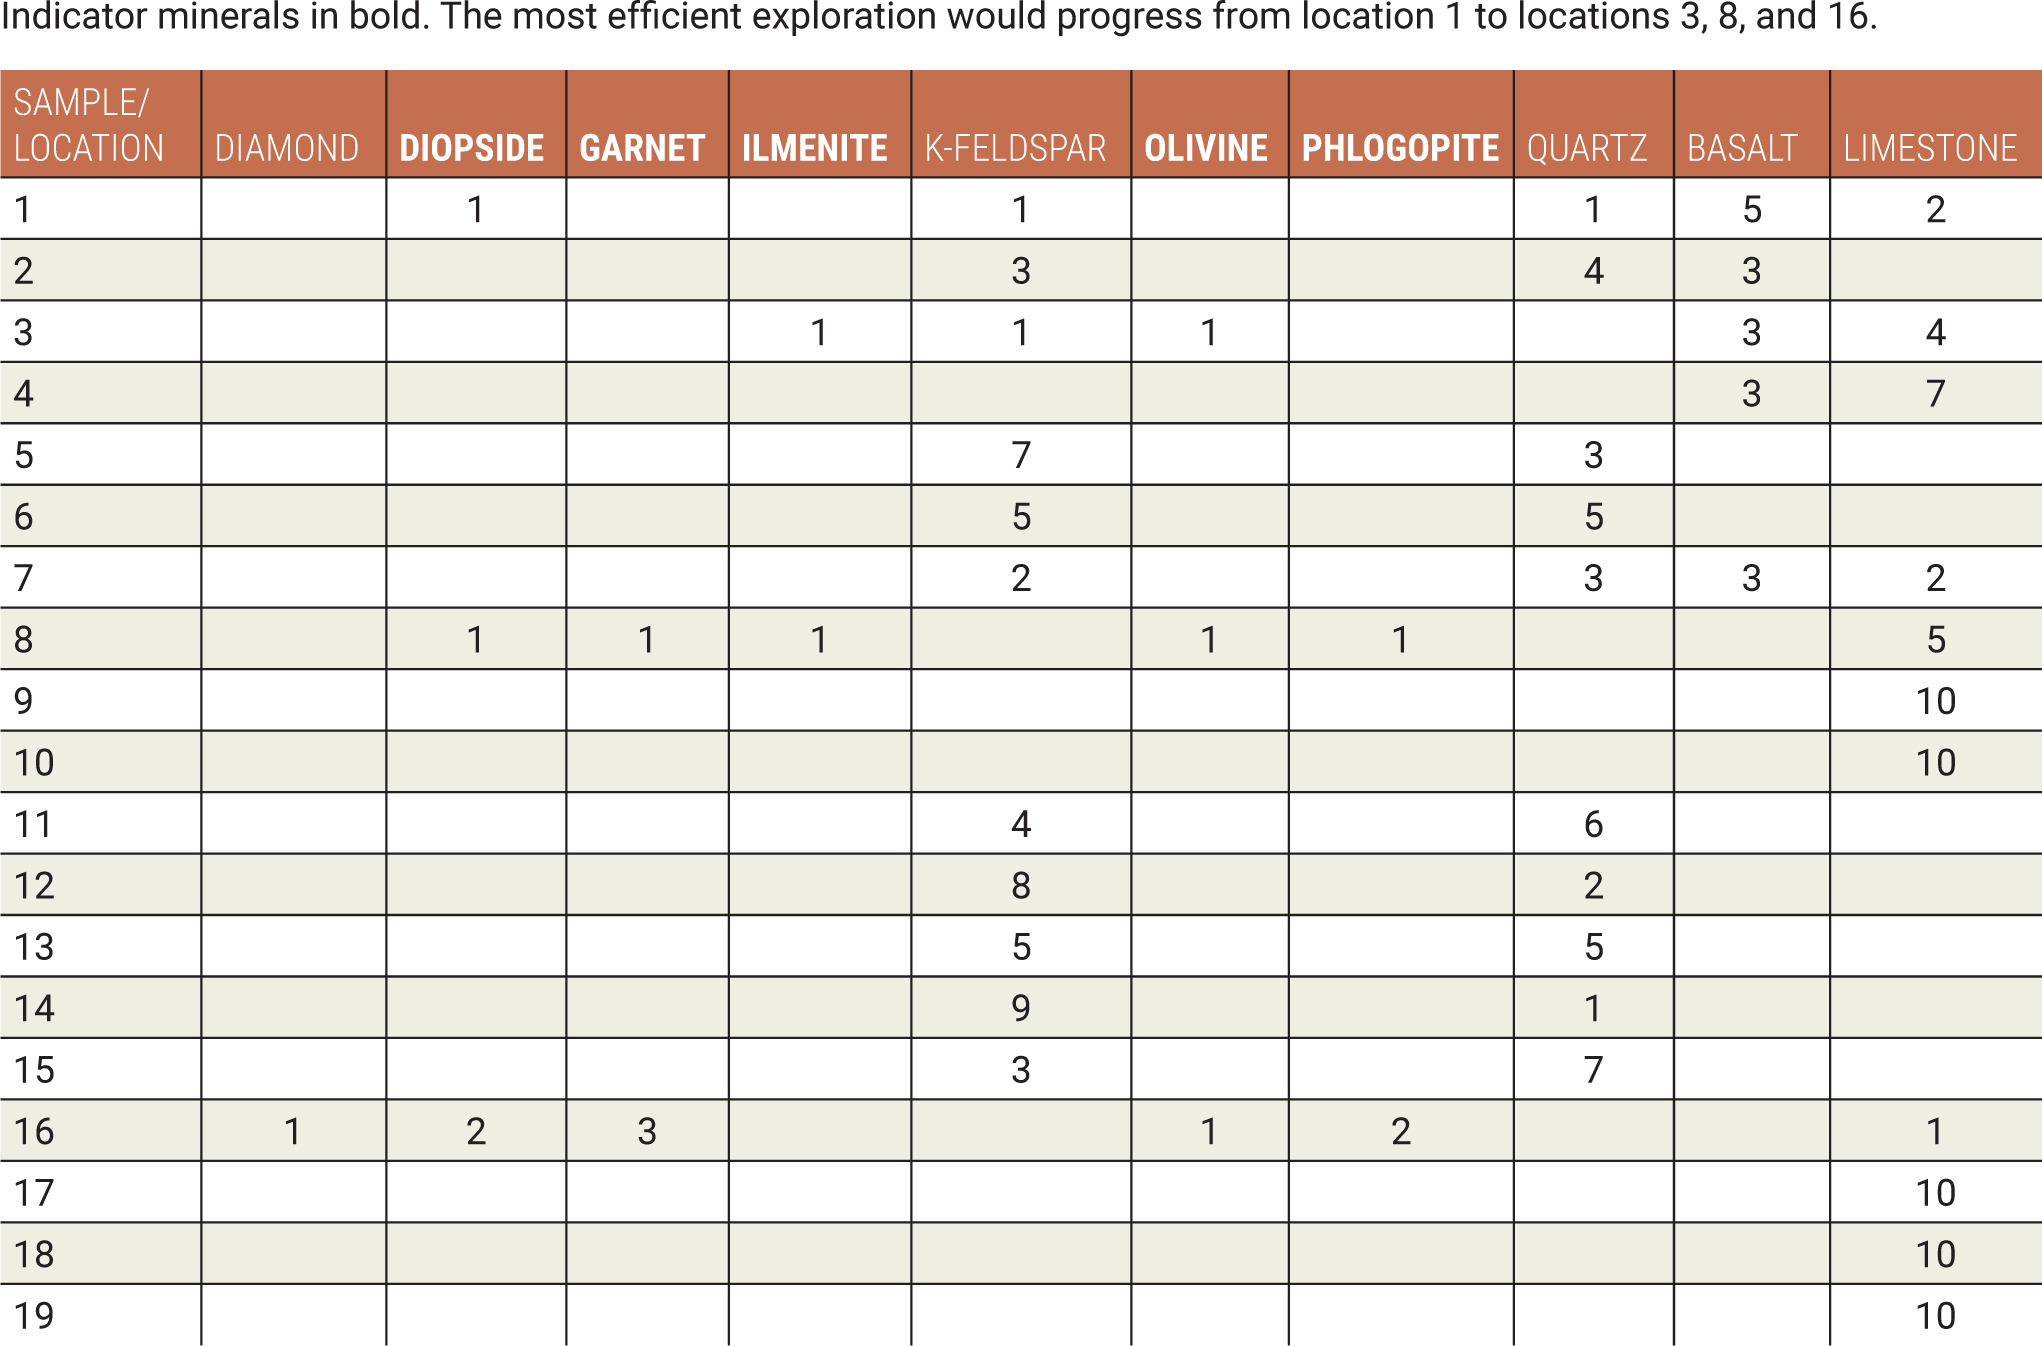
Distribution of minerals and rock fragments by sample and location number for setting up the exercise and for an answer key. Indicator minerals in bold. The most efficient exploration would progress from location 1 to locations 3, 8, and 16.
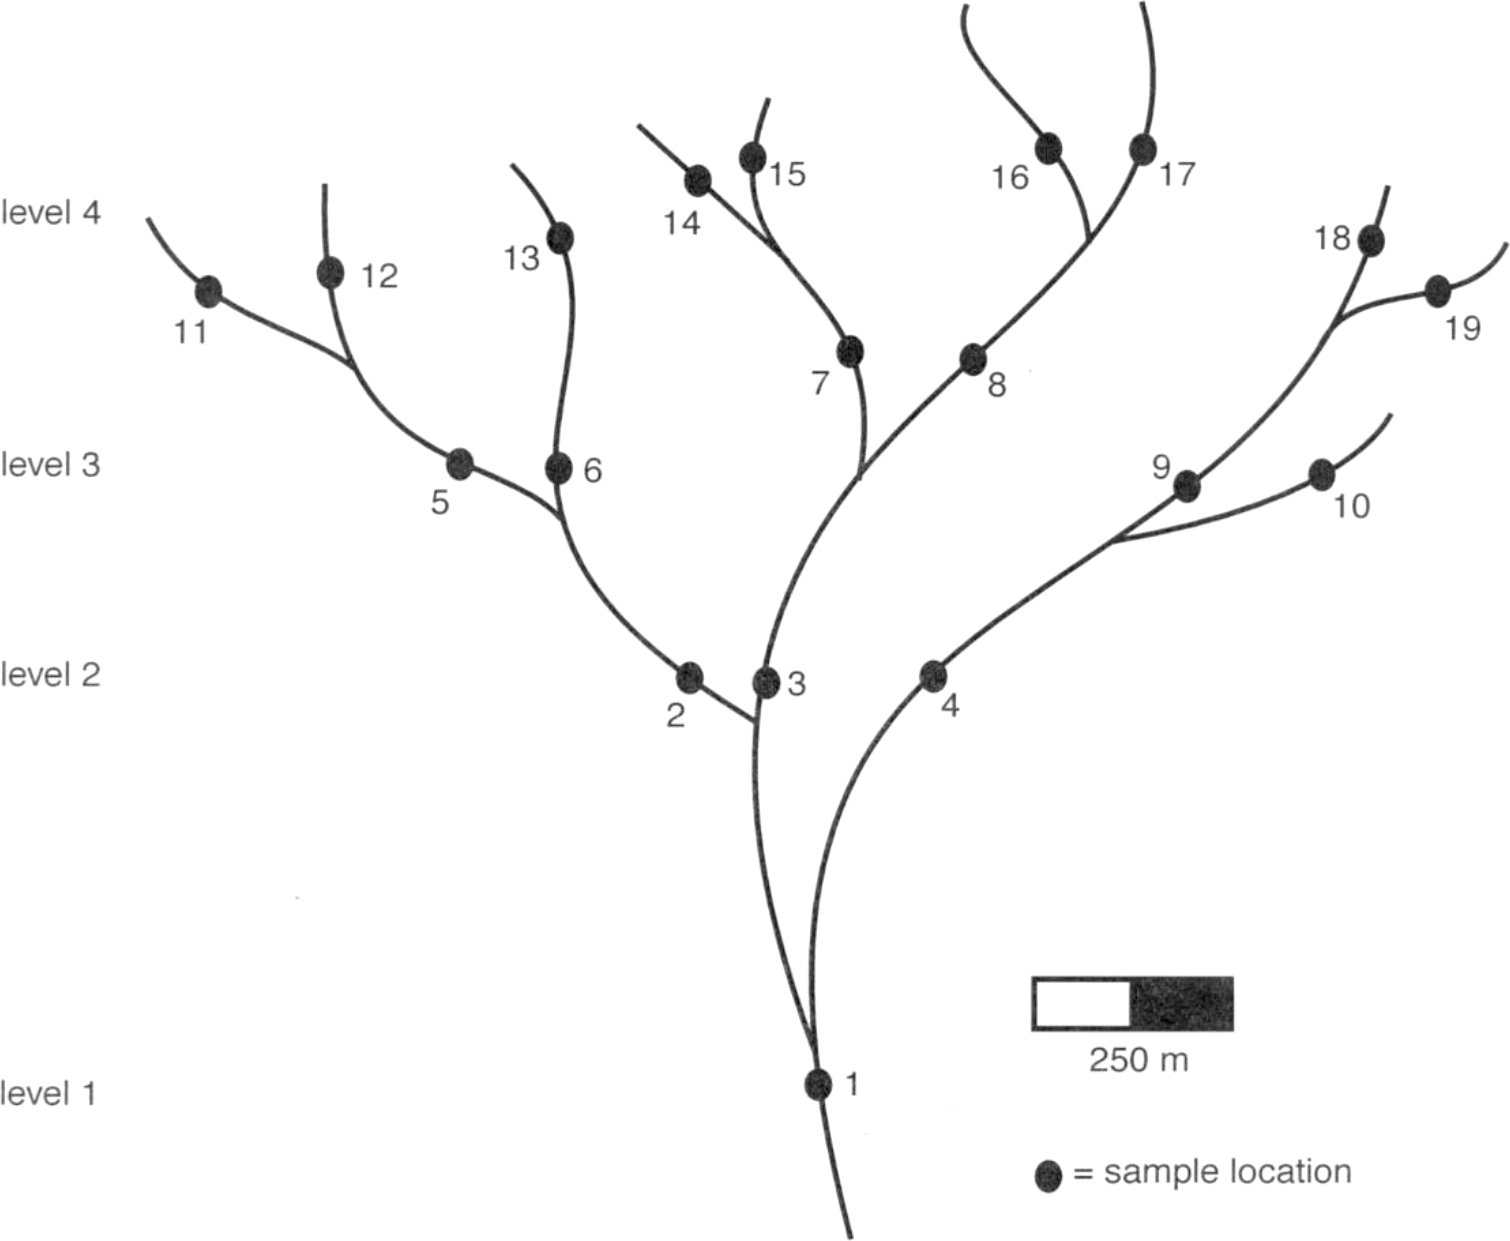
Map of exploration area.
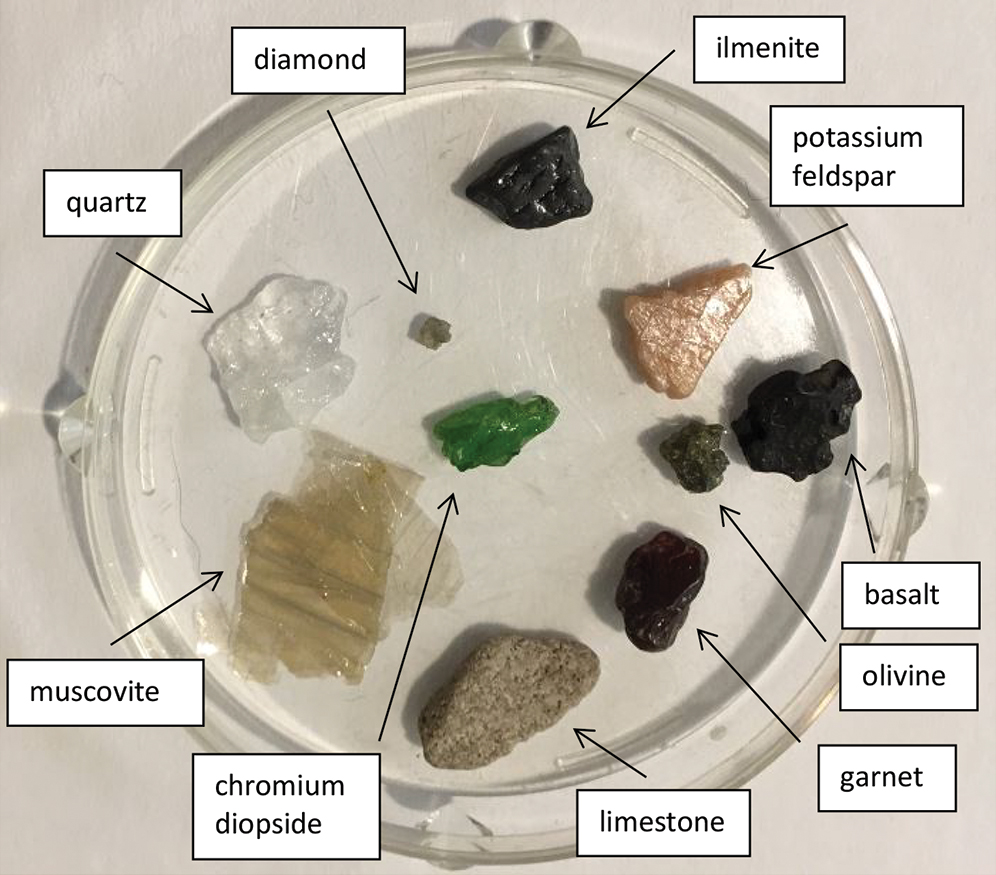
Rock and mineral grains used in the activity.
The teacher facilitates prompt movement through the line by having the samples well organized and clearly labeled. The teacher can tape Figure 1 to the desk to use as an answer key. Companies (i.e., student teams) hold their search successes and failures in secrecy; they do not want to give other companies any advantage. Students can model this behavior by quietly conveying their data to the teacher, in writing or speaking quietly. If a team serendipitously learns that location 2 has no indicator minerals, they can save time and money by skipping that location and advancing to their next sample location.
Once the students have correctly identified the materials at location 1, including the single indicator mineral, they must look at the map and select the next location (2, 3, or 4) to explore. This selection is essentially chance and the least scientific step in the process; however, real geologists will at times need to work with incomplete data and collect material to analyze in the hope they are on the right trail. If the students pick locations 2 or 4, they will not find any indicator minerals. Students choosing these locations must record their data on the activity worksheet (see “On the Web”), explain their reasoning (generate a hypothesis) for what sample they want next, and pay $500 for their next sample.
Eventually, each team should reach location 3 and find the two indicator minerals in that sample. The presence of indicator minerals and the increase in their abundance (2 grains of 10) shows the students they are on a promising path. Teams must sample in order, Level 1, then Level 2, etc. (see activity worksheet, “On the Web”). Students commonly ask to skip a level as their funds get low or other teams seem to be doing better; the teacher needs to be strict to ensure STEM practices.
The process repeats: From location 3 students must randomly select between locations 7 or 8. Sample 7 has no indicator minerals. Sample 8 has five indicator minerals. Again, students must successfully identify all grains in their sample, record their reasoning, and make a payment before advancing.
The successful team is the first team to reach location 16. Students must correctly identify all nine indicator minerals including the single diamond. Educated (and a bit lucky) students can locate the source in four samples (four tries: 1,3, 8, and 16). With $2,500 ($500 per try) they can purchase five samples. The winning team will be excited, but must remain quiet until all teams complete the activity. If a team has exhausted its funds, students can make a sales pitch (to the teacher) to borrow additional funds to continue exploration. Typically, all teams want to continue until they have found the location and have seen the diamond. Teachers can give extra diamonds as prizes.
Preparing Rock and Mineral Sample Bags
Sample preparation is a potential hurdle to this activity. Preparation can be divided into three steps: purchasing materials, crushing rock, and preparing the sample bags. The two rock types and the six common minerals are typically included in an Earth science lab or can be purchased at a gem and mineral show for less than $10 or online for a total of about $80. Biotite or muscovite can be substituted for potassium-bearing mica phlogopite. The less common minerals (i.e., red almandine garnet, green chromium diopside, and industrial diamonds) can be bought online (e.g., on eBay) for less than $100. A rock tumbler can be purchased for about $55.
To make rock and mineral grains, start with thumb-size pieces of sample. (Safety note: Wear safety goggles and heavy lab jackets.) Place sample on a metal plate and smash with a sledgehammer to coarse sand or pebble size. Place plastic bags over the sample while hammering to keep the pieces from moving too far. Gently wash the pulverized material with water to remove dust and tiny pieces. Run the grains in a tumbler for two days to remove the sharp edges and to give the look of being rounded by transport.
Working with one material at a time is most efficient. Figure 1 shows the numbers of grains needed for each rock and mineral for a single set of samples from the 19 locations. The lab runs smoothly if students work in groups of two to four, with 10 sample bags for each location. (The lab requires nearly 700 grains of limestone, about 500 of potassium feldspar, almost 400 of quartz, and just over 200 of basalt. Only a few dozen grains of the less common minerals are needed and only about 26 small industrial diamonds.) Approximately three hours are needed to smash and clean the materials. The tumbling requires brief periods over two weeks.
Next, prepare the petri dishes for Part 2 (inexpensive 5 cm diameter plastic petri dishes work well). Place 10 grains, one of each material, in each dish. Then, prepare sample bags to represent each map location in Part 3, which is easy but slightly tedious. You will need approximately 200 clear, snack-size (about 16 × 8 cm), sealable bags and a permanent marker. Set an array of small cups on a table and place spoonfuls of mineral or rock grains in each cup.
Prepare 10 samples for each location in the proportion shown in Figure 1. Label each bag in the top right corner with the appropriate sample location number. For example, a prepared sample bag at location 1 would have one grain of diopside (an indicator mineral), one of potassium feldspar, one of quartz, five of basalt, and two of limestone. Repeat this step for 10 bags for each sample location. Place the bags in sequential order in a small box and use file cards labeled with sample number as dividers. This organization allows the lab to run smoothly.
You can think of these mineral proportions as percentages but that would be a great exaggeration (see Extensions section). After some training and practice, students can easily identify the grains in only a few minutes.
The activity includes an economic perspective. To generate some “play” money, use $500 bills from a board game and fill an 8” × 11” page with about 10 bills. Copy the page onto green paper and cut out the individual bills. Each team needs $2,500, or five $500 bills.
Assessment
By the end of the activity, students should be able to
- explain the global distribution of diamond deposits,
- apply physical characteristics to identify common minerals and rocks, and
- construct an explanation based on evidence to explain how mineral deposits are found.
Two formative assessments are incorporated into preparing for exploration. In Part 1, students use simple map skills to deduce that deposits can be found only on ancient cratons. Part 2 serves as a formative assessment of the students’ developing skills in identification. Students should master this skill prior to Part 3. Most of the minerals have unique characteristics, but some commonly take a few iterations to consistently identify.
Summative assessment is provided in Part 3. Students have multiple cycles to develop and demonstrate their level of scientific reasoning, identification skills, and collaboration with a peer to navigate a simple but realistic field scenario.
Teacher feedback
A local Earth science teacher used the activity in his high school classrooms and provided feedback. He stated that overall the activity was engaging, easy to run, and useful in closing the gap between minerals and sediments (eroded particles). The students were engaged and liked solving the problem. The students spent one hour preparing (parts 1 and 2) and two hours running their search in the second period (Part 3). He noted students can be impatient waiting in line and that Figure 4 is critical. The dollar limit guided students toward disciplined thinking, not random guessing.
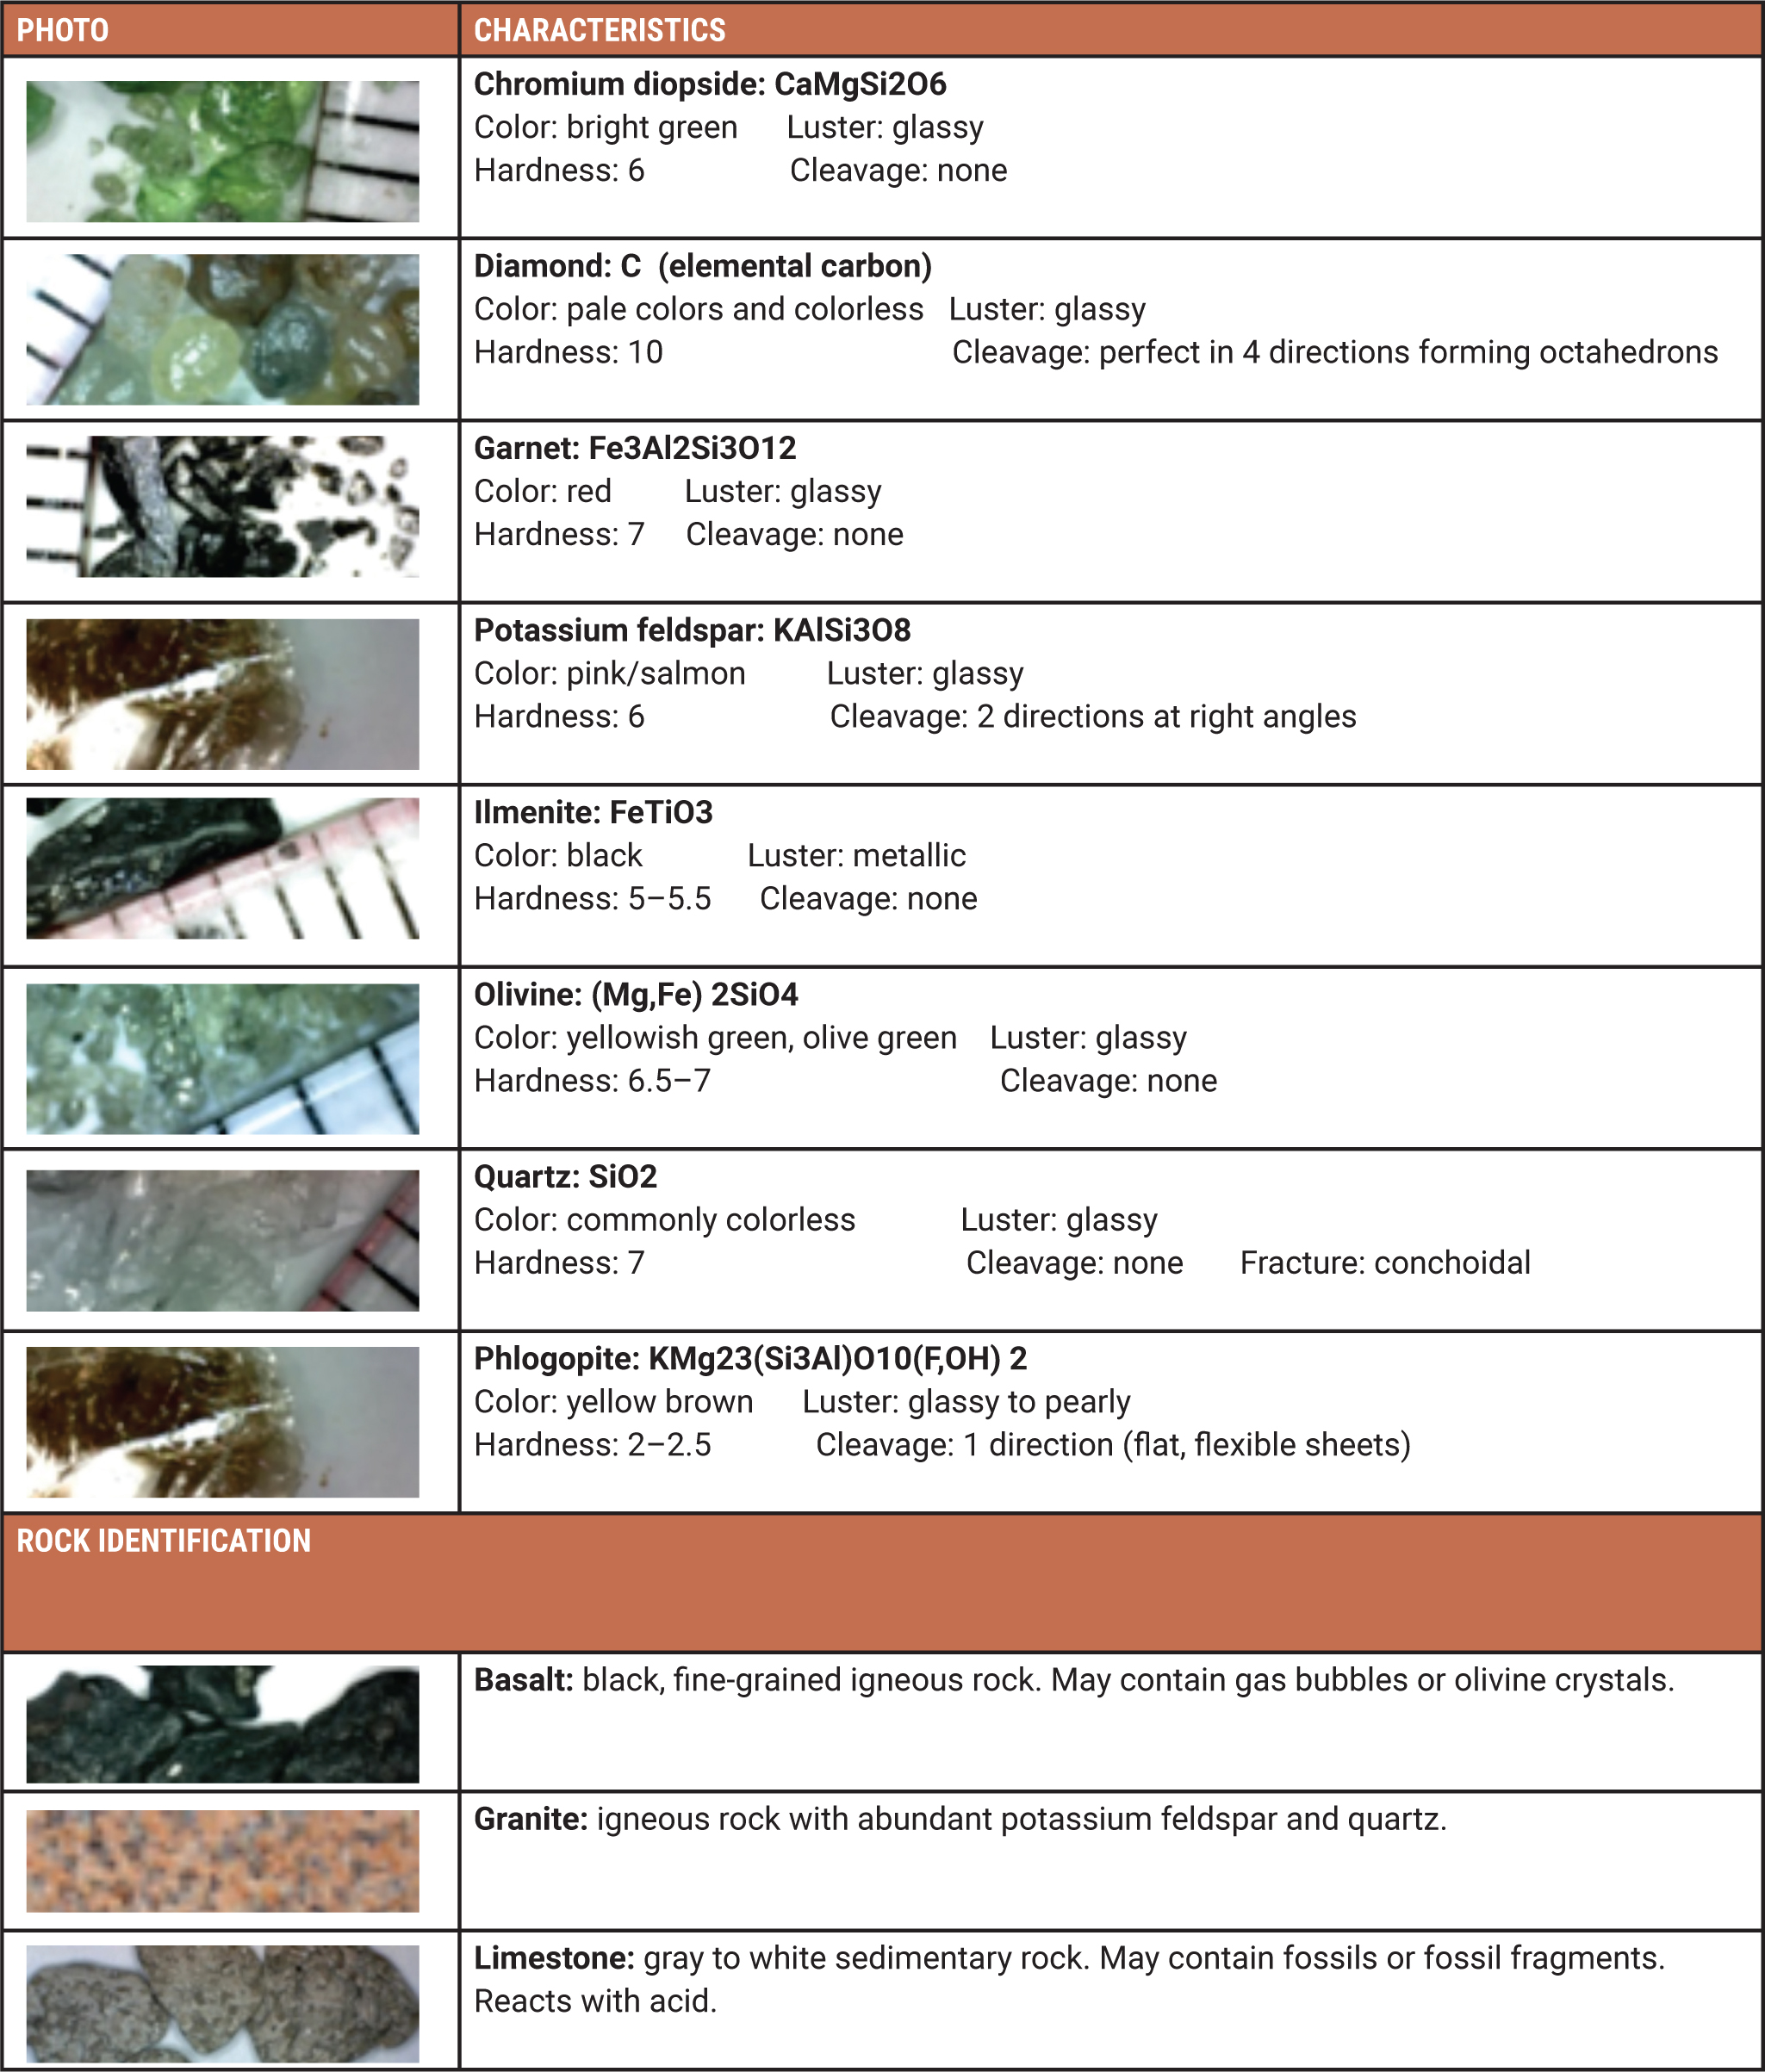
Rock Fragment, Common Mineral, and Indicator Mineral Identification (Scales in mm).
This activity was initially tested with 24 preservice teachers in a geology methods course. The activity was completed in two hours and served as an introduction to mineral exploration, the characteristics of minerals, and the nature of science. Abbreviated versions were presented at the 2012 NSTA national conference and a 2011 state science teachers meeting. One teacher noted that the activity “allows students to identify minerals and check in to ensure understanding. The money adds a competitive twist that most students would enjoy.” Additional feedback included having a microscope at every station or passing around hand samples of each mineral, which is now part of the activity. Other teachers liked the collaboration but “didn’t like running out of money.” Lastly, one teacher noted the activity served as a “great introduction” to the scientific method.
Extensions
Teachers can try the following extensions to apply learning and add other learning targets.
- A literacy component can be added by having students examine the uses of diamonds, major global producers, and the relative roles of natural and synthetic diamonds (USGS 2018). The Hoffman (2008) article describes the history of exploration for the Diavik mine in Canada.
- How Big Is Your Target? Diamonds are rare (parts per billion) and harder to find than a needle in haystack (searching entire continents for something the size of two football fields). Using Google Earth, students can measure the diameter of two recently discovered diamond deposits in Canada. The mines (kimberlite volcanoes) are about 0.7–0.9 km in diameter. Finding such a small area compared to the great expanse of Canada is impressive. The teacher could guide the students through this part by projecting a Google Earth image (see On the Web—Slide 15 in the Finding Diamonds PowerPoint).
- How much diamond do you need in your lifetime? Consider that an average American uses 0.4 g of diamond per year. Assuming an average life expectancy of 78 years, each American needs about 31 g of diamonds in their lifetime. A penny weighs about 2.5 g, so placing 12 pennies in students’ hands is equivalent to the amount of diamonds they will use in a lifetime.
Earth & Space Science Instructional Materials Labs NGSS High School