A REVERE Award Winner, PreK-12 Learning Group, Association of American Publishers!

“Children are continually developing ideas and explanations about their natural world. … Some of these ideas are consistent with the science children are taught; others differ significantly from scientific explanations. Many of these ideas will follow students into adulthood if they remain hidden from the teacher and unresolved. The challenge for teachers is to find ways to elicit these ideas and then use appropriate strategies to move students’ learning forward.”

What Are They Thinking? Promoting Elementary Learning Through Formative Assessment

REVERE Award Winner, PreK-12 Learning Group, Association of American Publishers!

“Children are continually developing ideas and explanations about their natural world. … Some of these ideas are consistent with the science children are taught; others differ significantly from scientific explanations. Many of these ideas will follow students into adulthood if they remain hidden from the teacher and unresolved. The challenge for teachers is to find ways to elicit these ideas and then use appropriate strategies to move students’ learning forward.”

Using Physical Science Gadgets and Gizmos, Grades 6-8: Phenomenon-Based Learning

What student—or teacher—can resist the chance to experiment with Rocket Launchers, Sound Pipes, Drinking Birds, Dropper Poppers, and more? The 35 experiments in Using Physical Science Gadgets and Gizmos, Grades 6–8, cover topics including pressure and force, thermodynamics, energy, light and color, resonance, and buoyancy.

The authors say there are three good reasons to buy this book:

1. To improve your students’ thinking skills and problem-solving abilities.
2. To get easy-to-perform experiments that engage students in the topic.
 

Students as peer-editors (p. 2)

By Mary Bigelow

Posted on 2014-03-31

A previous question from a teacher related to using the peer-editing process in science class. Jaime Gratton follows up with a summary of her experiences:
I would love to share what I did. I also received some responses and helpful resources from members of the NSTA email lists. For example, Jani replied with “My favorite thing to do is to provide colored pencils and then assign a meaning for the color.  For example, anything underlined in red = facts or questions, blue = spelling, green=grammar. So I just have a quarter sheet of what the colors mean. Give them colors and they will edit. Just be careful with special needs kids and who edits their papers. It also makes you see really quickly if someone told the student prior to turning in their final paper they needed to fix things.”
What I ended up doing was taking pieces from each of the responses and resources. I made a peer edit sheet that I thought would work best with the research paper my students were working on.
One thing I did emphasize was the importance of using praise comments, but also making sure that there are suggestions/questions because their goal as a Peer Editor is to make the person’s paper they are editing the best paper they can. I had really good feedback from my students after we did the editing. They really liked using the colored pencils to mark the sections they were reading. They said it was a great visual to see exactly where their mistakes/topic sentences were, as well as other suggestions to improve.
Thanks to Jaime for sharing her Peer Edit sheet. Here are some additional resources:

I also compiled these links and Jaime’s Peer Editing Sheet into the NSTA Resource collection “Peer Editing.”
 

A previous question from a teacher related to using the peer-editing process in science class. Jaime Gratton follows up with a summary of her experiences:


Students as peer-editors

By Mary Bigelow

Posted on 2014-03-29

My students are working on research papers about inventions or chemical processes set mostly during the Industrial Revolution. I was wondering if you had any suggestions about peer editing.
—Jaime, Goffstown, New Hampshire
Examining and commenting on each other’s writing can be a meaningful learning experience for students. By looking at others’ writing, students can get insights into their own work. I’m sure we’ve all experienced writing something we thought was very clear only to have someone else raise questions or point out errors and inconsistencies. For those who struggle to write well, this is an intermediate step (formative) before the teacher’s evaluation and feedback (summative).
Peer editing is not about students correcting assignments or giving “grades” to each other. It can and should go beyond the simple process of proofreading. Peer editing (sometimes referred to as peer review, but not in the same context as a scholarly journal) is part of a formative process in which students provide feedback and suggestions on written work (and the process can be used for other types of projects or displays). Students have an opportunity to read each other’s work to see other ways of writing and communicating and then reflect on and revise their own, using the feedback they receive. Having one’s work reviewed by someone other than the teacher provides a wider audience for the work.
This is not a timesaver for teachers! The teacher has to introduce the project, use class time for the review process, monitor the students, and provide an opportunity for students to revise their work. And the teacher still has to read the final versions. But I found that this authentic type of collaboration worthwhile.
This could be a challenge if your students have not done this before or did so in a superficial manner (“I liked it. You did a good job.”). Some students may hesitate to offer suggestions to peers. And some students may have never received specific feedback from their teachers—just a letter grade and a generic “good job” or “needs work.”

You’ll need a rubric emphasizing the science content and processes rather than a focus on neatness or formatting (not that these are unimportant!). Keep it simple to start; I used a simple checklist rather than a four-level analytic rubric. This also removes any temptation for students to grade one another.
Before students try this, display several examples of writing (these can be from previous years, other classes, or your own writing). One example should be well written and others should need some revisions. Have the students read the writing first before commenting. Model with the class how to respond and ask for their suggestions. Provide examples of words to avoid, such as boring, bad, or stupid. The ReadWriteThink website (see below) suggests three components to guide the editing process along with ideas for feedback. It helps to have some “sentence starters”:

  • Commendations (compliments)—“The way you organized the data is effective because…” “The labels on the diagrams are….” “Here’s how your evidence supports your argument or conclusion:…”
  • Suggestions (recommendations)—”Have you thought of…?” “Could you explain why you said this?” “Instead of the word ____, you could use ____ to be more accurate.”
  • Corrections—Here’s where the reviewer points out errors in spelling, punctuation, or usage.

It may take a while for students to become comfortable with the process. Monitor the class to determine what works best: pairs or groups of three or four, having students put their comments directly on the documents or use a separate form. I suggested student-reviewers read the work out loud to uncover awkward sentences or incomplete thoughts. On hearing their work, the writers often would say, “That’s not what I meant.”
After the editing session, model how to revise with the examples you used in the introduction and provide students with time to make revisions. On the final version, you could ask students how their peer(s) helped them revise their work. (This would be an interesting action research project).
If you have students who struggle with writing or are English language learners, choose students who understand their situation as their partners, sit in on the discussions to assist the students, or use the time to provide extra guidance for them.
 
Photo: http://www.flickr.com/photos/jimmiehomeschoolmom/6260676953

My students are working on research papers about inventions or chemical processes set mostly during the Industrial Revolution. I was wondering if you had any suggestions about peer editing.
—Jaime, Goffstown, New Hampshire


Scope on the skies

By Mary Bigelow

Posted on 2014-03-28

When I was in elementary/middle school, the earth and space sciences were largely ignored in the curriculum. We looked at some rocks and learned the names of the planets and a few constellations, but that was about it. In high school, earth and space science was not offered, even as an elective! Even though this time was the beginning of space exploration, we students were largely unaware of this incredible branch of science, unless we were independent learners.
In college as a science major (chemistry), I had to take some earth science electives for my teaching certificate. My eyes were opened in the geology, meteorology, and paleontology classes I took. It was a little late then to change my major, but I’ve made the earth and spaces science a lifelong avocation. I attend NSTA sessions on the topics, visit museums and planetariums, participate in professional development activities in the subject, joined the earth science teacher’s association in my state, and subscribe to newsfeeds, blogs, tweets, and Facebook sites from NASA and other organizations.
I also really enjoy reading the Scope on the Skies column in NSTA’s Science Scope middle school journal. In each issue, Bob Riddle writes on seasonal astronomy topics, using graphics, a user-friendly writing style, and suggestions for further study. These articles could be shared with students, too. Bob also has a website Qué tal in the Current Skies (What’s up).  And I just discovered that he also has a blog- Bob’s Spaces -which he updates several times a week. I’ve  added these to my “must-reads.”
As an NSTA member, you have online access to his columns even if you subscribe to the elementary, high school, or college journal. Just go to the Science Scope page and click on “Full table of contents” to get to his article each month. You can read the article there as a PDF file or download it to your NSTA library.
Bob also participates in listserve discussions, sharing his expertise and experiences. Thank you!


When I was in elementary/middle school, the earth and space sciences were largely ignored in the curriculum. We looked at some rocks and learned the names of the planets and a few constellations, but that was about it. In high school, earth and space science was not offered, even as an elective!


So what is a “must do” at an NSTA Conference?

By Christine Royce

Posted on 2014-03-26

This month we are looking for comments and recommendations on what you are most looking forward to at the upcoming conference on science education in Boston! Help our fellow educators by highlighting your “must do” session along with the reason why you put it in the “must do” category.
So, what is my “must do?” Well, that is NOT an easy question in my book! I look forward to the NSTA Conference on Science Education each and every year. I have often been heard to state the phrase “I just need to go be with my own kind for a while.” Being with fellow science educators at this annual conference is a way to rejuvenate my spirit and continue to engage in professional development. So, I offer a few of the following items that I try to never miss at a conference.
As a person who works with children’s trade books in the science classroom, I make it a point to always find something related to children’s literature. This has become more important in recent years with the use of nonfiction texts as part of the ELA Common Core Standards. So, I always try and find sessions given by friends (and co-authors) Karen Ansberry and Emily Morgan. One of their sessions “Picture-Perfect Science Lessons: Using Picture Books to Guide Inquiry” will be held Friday at the conference. Another “must do” on my list involves seeing the newly released list and hearing about the Outstanding Science Trade Books which are always featured in the exhibit hall.
An organization that I am involved with – NSELA – has several workshops and sessions that help to build professional development tools for science leaders. Download a schedule of events (pdf) so you don’t miss out on one of these sessions. NSELA and NSTA will also be co-presenting an extended session on NSTA/NSELA Leadership Standards Forum: NGSS: Using Standards as Leverage to Build Science and Language Literacy which is Friday afternoon.
The exhibit hall is absolutely somewhere that needs to be scheduled in to your time at the conference. If you are interested in seeing who will be there and where they will be, you can plan your visit to the exhibit hall by previewing volume four of the program which includes exhibitor information. A new aspect to this year’s conference that is going to be a “must see since its new” item is visiting the NSTA Expo which is part of the exhibit hall. The announcements indicate giveaways, live presentations and more.
There are so many things that I can add to my “must do” list of recommendations –
• attending an NSTA Press session with featured authors such as Page Keeley, Brenda Wojnowski and Susan Koba, Steve Rich, and many more
• searching by content information in one of the program books to find sessions on a particular subject such as physics, chemistry, etc.
• picking out a short course or field trip to participate in as a half or full day experience.
These are just to name a few. I guess what makes the most sense is to add something as a “must do” to your list that will help meet your professional development goals!
So, if someone new to the conference asked you “what should I do?” – what would you recommend to them and suggest that they add to their “must do” list?


This month we are looking for comments and recommendations on what you are most looking forward to at the upcoming conference on science education in Boston! Help our fellow educators by highlighting your “must do” session along with the reason why you put it in the “must do” category.


Going Wild with the Go Wireless Temp Sensor

By Martin Horejsi

Posted on 2014-03-26

iPad and Sensor

The sensor is fairly small compared to an iPad Air.

The new Go Wireless Temp sensor is a welcome addition to the suite of Bluetooth tools produced by Vernier that are available for the iPad. While not much larger than the business end of the traditional, wired temperature sensor, the Go Wireless Temp has onboard power and a radio transmitter all nestled in a thumb-sized, water-resistant housing. Although the device’s temperature range is  a little narrower on the upper end due to its plastic and electronics, it still  safely measures molecular motion from -40°C to 125°C. While the merits of digital temperature probes are well known, and the benefits of wireless peripherals have promoted collaboration and creativity in the science classroom, the Go Wireless Temp has added a new dimension with its light weight, free accompanying app, and 30-meter range. I took the Go Wireless Temp for a spin, looking for ways to leverage the wireless potential of the sensor.

The Go Wireless Temp must be used with a mobile device. To use the sensor with an iPad, you can download either the Go Wireless Temp app, available for free through the iTunes store, or the Vernier’s Graphical Analysis app, available for $4.99, for more powerful data collection and analysis.
sensor hanging on string

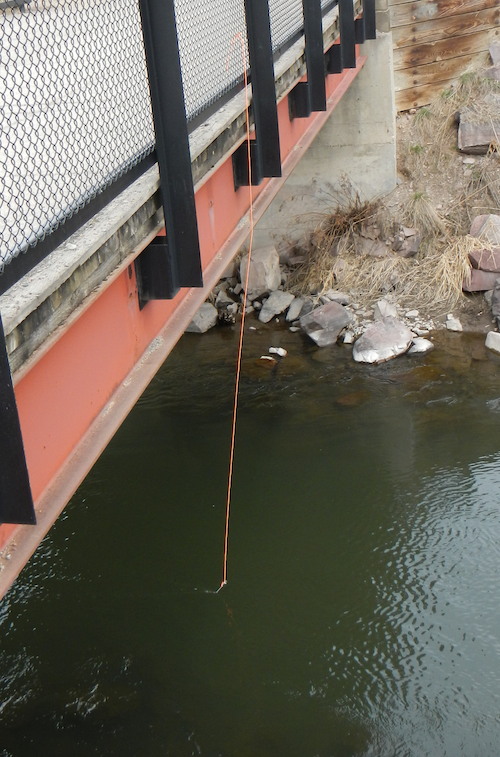
The sensor is hanging on a 6-meter cord with its tip in the current.

To test the sensor, I attached it to a paracord harness  and lowered the sensor off a bridge and into the center of a stream. Once the Go Wireless Temp was tied to a railing, the iPad interface could pair with the sensor and record the temperature anywhere within radio frequency sphere with a 30-meter radius.

Temperature data

A screenshot of the Go Wireless Temp app’s autoscaled presentation of the data.

Numbers export

The data from the Go Wireless Temp app can export directly into an iPad spreadsheet app called Numbers. This is a screenshot of the river data, as exported.
Sensor on branch

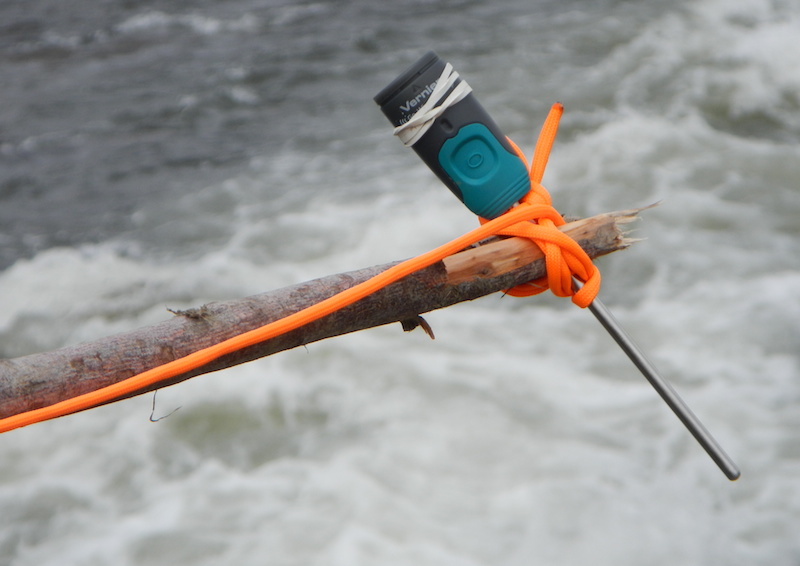
The sensor is tied to a branch.

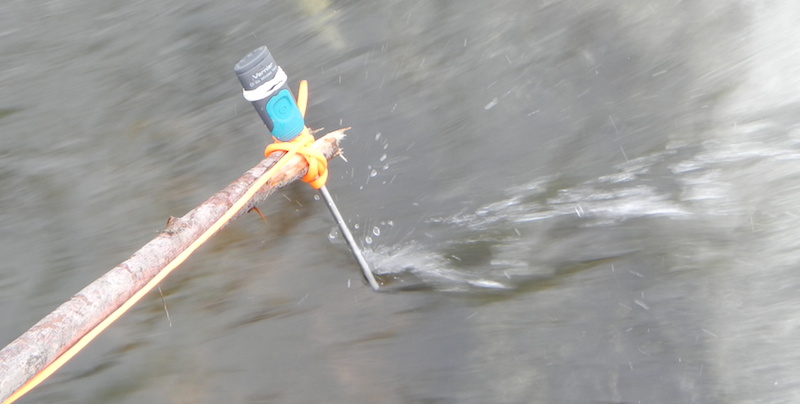
Next, the Go Wireless Temp was tied to a branch so it could be inserted precisely into various water pools. First, it was lowered into a fast-flowing current, then into a nearby still pool, and finally into the water collected inside an old tire.

Based on my tests, it will take at least 10 seconds to get the reading into the ballpark of its final value. The Go Wireless Temp is submersion-rated to 1 meter for 30 minutes.
Probe in current

The sensor at the end of a branch being dipped into the strong current.

Temp in a tire

Using the stick method, the sensor takes the temperature of the tire. It is warmer than the surrounding water.

Temperature in and around the tire.

The three temperature readings of the air, the water near the tire, and the water in the tire.

But the coup de grâce of my afternoon adventures was duct-taping the sensor to a quadcopter drone and flying it. At first, the merits of mounting a sensor with a limited range on something with a much larger range seemed questionable, but the temperature would be recorded as long as the sensor was in range, and the drone wouldn’t fall to the ground when the sensor lost communication.
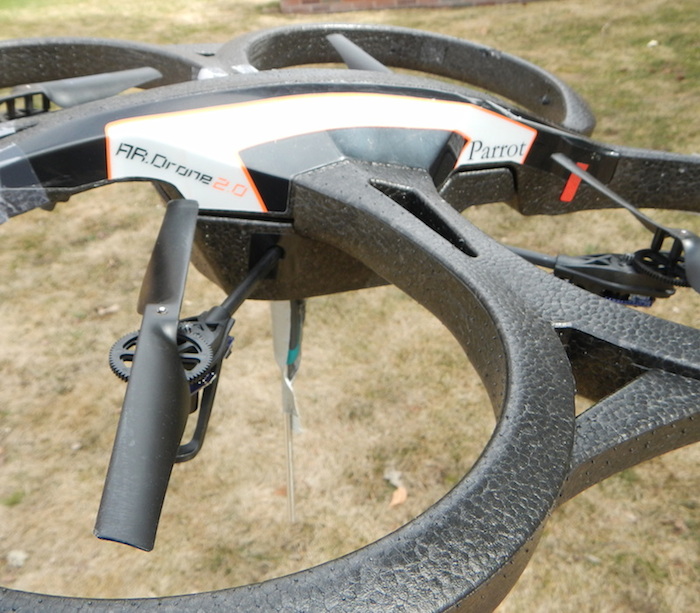
Sensor on a drone

The sensor is duct-taped to the underside of the drone.

So, why did I put a Go Wireless Temp on a drone? I guess the easy answer is because I could. But in reality, I saved answering that question until after it was flying. One reason was to measure the temperature radiating off of various roof surfaces, roads, and foliage areas. Another reason was to suspend the probe on a harness, like noted above, and dip it into bodies of water or locations in the water that are normally inaccessible.

One hundred vertical centimeters might be a challenge to fly, but the real issue is the weakened radio strength when the probe is underwater. One solution, which I’ve yet to build, is a personal flotation doughnut, or PFD, for the Go Wireless Temp probe. A small disk of expanded polystyrene (Styrofoam) with the probe poked through the center would allow plenty of slack to build the vertical buffer for safer flight and a much greater margin for error. Stay tuned for that one!

So what would you do with a Go Wireless Temp sensor?

Share your creative ideas in the comments.


the sensor on the drone.

The drone can easily carry the sensor far beyond its 30m range.

iPad and Sensor

The sensor is fairly small compared to an iPad Air.


Earth Day

By Mary Bigelow

Posted on 2014-03-21

“Think globally, act locally” is a phrase we hear, and for younger students, thinking locally is important, too. Earth Day is celebrated on April 22, but the activities and investigations described in this month’s featured articles go beyond a single day and encourage students and teachers to consider what happens in their own lives and backyards or neighborhoods.
According to the authors of How Low Can You Go? Interdisciplinary Student-Impact Investigations for Environmental Awareness and Sustainability, students may find it difficult to comprehend global sustainability issues. But younger students can understand local issues and how they affect themselves and their families. In this set of activities, students investigate and analyze their own consumption habits. For example, students study the amount of packaging used in food products, where the ingredients come from, and how food gets from the growers/producers to their homes. An activity on waste generation and landfills has students looking at the trash they produce and how this could be minimized. There are suggestions for other activities on consumer habits, too. [SciLinks: Sustainability, Sustainable Development]
What is the value of live trees versus cutting them down for products we desire? The Value of a Tree: Comparing Carbon Sequestration to Forest Products addresses this question. The students determined their own carbon footprint and calculated how much jet fuel (in the form of biofuel) can be obtained from a tree and compared it to the amount of carbon in the tree if it were left standing. The authors include a pre-post assessment and a student activity sheet, as well as several charts of information and options for alternative activities if the school campus does not include trees. [SciLinks: ForestsRenewable Resources]

Invading the Curriculum: Incorporating Service Learning in the Local Community to Enhance Student Engagement focuses on how the topics of biodiversity and invasive ecology can be combined with service learning to engage students in a local effort. The project was designed to connect the school’s curriculum to local environmental issues. Using a service learning model (described in the article), students and teachers worked with experts in their community to do a biodiversity assessment of their school property and the impact of invasive species. The culminating activity was the design of a native garden. [SciLinks: Invasive Species, Biodiversity]
Are you looking for ways to incorporate engineering activities in science classes? Greenhouse Design: An Engineering Unit lists the components of a good engineering unit. Students were given a challenge to design a greenhouse for a particular region. (The article uses the Northern Territory of Australia, but the authors note that the activity could be modified to use anywhere.) Students researched the abiotic factors in their region and determined which type of plants could be grown. They then developed a design and a budget proposal and built a prototype. The article has photos of these along with a rubric and a unit overview of the time required.
During this time of the year, many classes go outside on field trips. Rather than student doing the ubiquitous scavenger hunt, Get Your Students Outside with Technology describes students created an interpretive trail (even if your school does not have a forested campus, a local park could be used with permission). For points of interest, students described them with text, images, or videos, posting their descriptions in a class Google Map and creating a summary for a trail map. They created QR codes to access the information and made signposts with the codes for users of the trail. The author has many suggestions for making this a do-able project with middle-schoolers.
UV or Not UV? That is a question for your sunglasses takes students beyond wearing sunglasses as fashion statements. In this 5E lesson, students test lenses for their ability to filter UV light using UV-sensitive beads. The article has background information on the history of sunglasses and a student activity sheet. I could see how students would find this interesting at this time of the year. [SciLinks: UV Index, Sun Safety]
 

“Think globally, act locally” is a phrase we hear, and for younger students, thinking locally is important, too. Earth Day is celebrated on April 22, but the activities and investigations described in this month’s featured articles go beyond a single day and encourage students and teachers to consider what happens in their own lives and backyards or neighborhoods.


New teacher "nightmare"

By Mary Bigelow

Posted on 2014-03-19

4018106328_d97e79bc1b_mI am looking forward to my first teaching job, but I’m concerned about how parents will react to my being a “newbie” in the science department. Will this be an issue? What can I do to start off the year on a positive note? My nightmare is that all of the parents will request their children be assigned to a more experienced teacher.
—Michael, Richmond, Virginia
First of all, don’t ever apologize for being a first-year teacher. Everyone has to start somewhere, and the fact that you’re concerned means you’re not taking a casual approach to your preparations. Even experienced teachers have nightmares!
I suspect most parents will be very supportive of your efforts. You do have some strong points: you may have new ideas in science instruction and assessment from your college or university teacher training program, you’re probably tech-savvy, and you should be up-to-date on recent science topics in your subject area. It sounds like you’ll be in a secondary situation, so your energy and enthusiasm should connect with students. You don’t have a lot of bad habits to unlearn, either.
Be aware that other adults may play important roles in your students’ lives: guardians, step-parents, grandparents or other relatives, foster parents, and other caregivers. When you use the word “parent” you should consider all of these possibilities.
Communicating with parents early and often is key to developing a positive working relationship. Along with the safety contract you send home at the start of the year, include a course overview and introduce yourself.  Focus on your training, background, and other related experiences you had in your field (internships, research projects, volunteer work, or extracurricular activities) that you’ll draw on to relate science to student interests and career goals.
Also let parents know how to contact you through your school email address and phone number (don’t share your personal phone number unless you really want people calling or texting you at all hours!). Be realistic and upfront with parents: “I am teaching from 8:00 until 3:00. I will be glad to return your calls and respond to emails before or after these times.” And then do so promptly.

Take the initiative and contact parents with good news about their child through a postcard, email, or phone call. Share information about an activity the student is doing in class or a project he or she is working on. Some teachers forward photos of the student engaged in a classroom activity (I’d be cautious about having other students identifiable in the photo because of privacy issues). This may sound like a lot of work, but if you do several each day, it becomes part of your routine. You’ll eventually find that you have several templates for this communication that can be customized for each student.  Parents appreciate hearing good news! And you’ve opened the door for additional communications.
A class website or blog can also be used to communicate with parents.
Save copies of any written communications you have with parents and document any phone or face-to-face conversations. These notes will be helpful if you do run into a situation with a challenging parent.  If you feel that a parent meeting will be confrontational, you can ask your principal, mentor, or another colleague to be present.
Present yourself as a professional in your actions, your appearance, and the way you speak. Find a teacher in your school who has successful relationships with parents and use him or her as a role model.
My recurring nightmare about teaching was showing up on the first day totally unprepared—in a different school with no lesson plans, no materials, no schedule, and no classroom.  Fortunately, this dream never came true, but I worked hard to be over–prepared just in case!
 
For more on working with parents, check out a previous blog on Science and Families.  For more on challenges issues facing beginning science teachers, take a look at the NSTA Press book Rise and Shine: A Practical Guide for the Beginning Science Teachers.


4018106328_d97e79bc1b_mI am looking forward to my first teaching job, but I’m concerned about how parents will react to my being a “newbie” in the science department. Will this be an issue? What can I do to start off the year on a positive note?

Subscribe to
Asset 2