![]()
![]()
A global online science fair?
By Martin Horejsi
Posted on 2011-01-13
I was just reading about Google’s Global Online Science Fair. My first thought was why didn’t I think of that? But even if I had, it would have been mere seconds considering the scale of such a thing to squash any chance of mustering the necessary resources and financial backing.
While there are many upsides to a face-to-face science fair, the potential for an archived, digital, global presentation has some tremendous advantages for giving the projects life beyond the trifold.
Students aged from 13–18 from around the world are encouraged to submit their entries between now and April 4. Having judged more than my share of science fairs, I can only imagine the logistics of something of this magnitude. In fact, it would take a company like Google along with its friends in high places to pull it off with the grace and dignity the students deserve.
But on a side note, think for a moment about the spinoffs including the scope of projects, the communication (There are several blogs), the rubbing digital shoulders with famous scientists, and the career potential.
The unfolding of this science fair will really be something to watch.
[youtube]http://www.youtube.com/watch?v=Z7oJfK4E7RY[/youtube]
I was just reading about Google’s Global Online Science Fair. My first thought was why didn’t I think of that? But even if I had, it would have been mere seconds considering the scale of such a thing to squash any chance of mustering the necessary resources and financial backing.
While there are many upsides to a face-to-face science fair, the potential for an archived, digital, global presentation has some tremendous advantages for giving the projects life beyond the trifold.
Data collection in early childhood
By Peggy Ashbrook
Posted on 2011-01-12
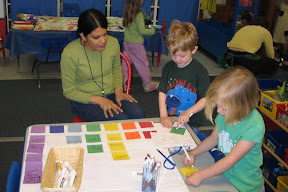
 The January 2011 issue of Science and Children focuses on collecting data. In the Early Years column I wrote that “Young children collect data every day. They note who has pink sparkly shoes and find out who will share the ball on the playground. Children will be interested in collecting data if the topic is important to them, such as recording their favorite color.”
Data collection is an important part of science inquiry. Here are some examples of data collection methods for science investigations by young children:
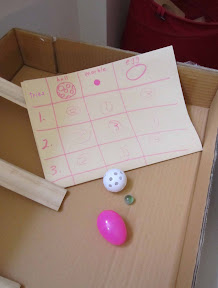
Chart to compare which rolled down the ramp fastest: a marble, a wiffle ball or a plastic egg.
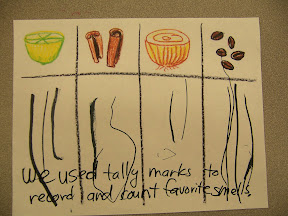
Tally chart counting up the class’s favorite of four smells.
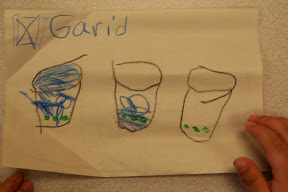
Drawing to record the set up for an experiment.
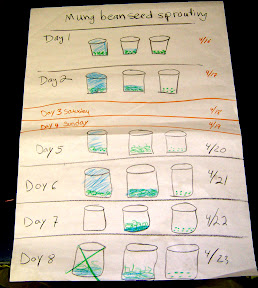
Drawing observations as the experiment progresses.
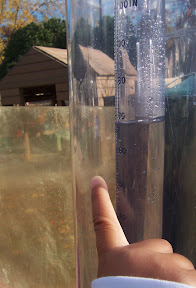
Using photographs to record amount of rain in rain gauge.
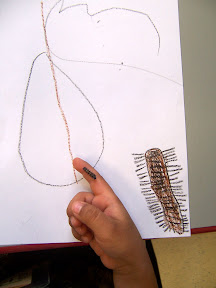
Making drawings of a caterpillar as it grows.
Children graphing their favorite rainbow colors, described in Marie Faust Evitt’s comment below.
Once your students have collected data, what do you do with it?
Hold a conversation with a few students or a discussion with the entire class about any patterns they see; anything they notice in the representation of their observations, and any new questions they might have. Have your students write or dictate their thoughts.
Share the data collection methods your students have used and how they have supported student understanding by commenting below.
Peggy
The January 2011 issue of Science and Children focuses on collecting data. In the Early Years column I wrote that “Young children collect data every day. They note who has pink sparkly shoes and find out who will share the ball on the playground.
Planning a field trip
By Mary Bigelow
Posted on 2011-01-12
 Every spring, our fourth grade does a one-day field trip. The teacher who usually planned the event retired, and I was asked to take over. We’d like to visit a science-related venue this year, but I’ve never organized an event like this.
—Isaiah, Bakersfield, California
Field trips require a lot of planning and organization, but they can be wonderful opportunities for students to have experiences beyond the classroom. You can reinforce or expand on topics and stimulate student interest. It’s interesting to see how students respond to a different learning environment—standing beside a dinosaur skeleton or seeing the ocean for the first time.
What learning goals do you have for the trip? That will help you determine an appropriate science-related destination such as a museum, zoo, aquarium, nature center, or park. If possible, contact your former colleague; she may still have an archive of resources. Ask other teachers who were involved for any input or insights and enlist their assistance. In an era of tight budgets, decide with your colleagues on how far to travel, keeping in mind you could stay close to home and still provide a worthwhile experience.
Ask your principal about school district guidelines for field trips (including templates for permissions slips or release forms) and if you need formal permission from the school board. If so, you’ll need many details ironed-out in advance. Find out if you’re limited to the normal school hours, or if you can leave earlier or return later for a longer experience. Is there a preferred transportation company? Discuss a tentative budget for the trip. Who will pay the transportation costs and entry fees? If individual students are responsible, is there a fund for students who cannot afford the costs? If students on the trip require medications, how should that be handled? Work with the principal to select a date that does not conflict with other events. Determine a contingency plan for inclement weather. If students do remain behind, who will supervise them? What will they do?
After you determine the purpose of your trip and your time frame, visit some possibilities or talk to others who have been there. Is the site appropriate for your grade level? What group facilities are available: meeting rooms, lunch facilities, restrooms, bus parking, handicapped accessibility? Check out the venue’s website or talk to the education coordinator. Do you need to make a reservation? What are their requirements for the group, in terms of adult to student ratio or student attire? They may have resources for student activities or docents/guides to assist your group.
Prepare your students (and parents) for the trip. In addition to the details on the permission slip, provide a handout detailing the location, purpose of the trip, and suggestions for what students need (e.g., lunch, attire for safety and comfort) and what kind of “stuff” students are allowed to bring (e.g., electronics, reading material, cell phones, cameras). Include photos if possible to help generate excitement.
You may need to recruit additional chaperones, especially for a crowded venue such as a zoo or museum. If parents volunteer, do they need to provide clearances or background checks? If possible, have a meeting prior to the trip to go over your expectations and the chaperones’ responsibilities.
In some school groups, the students wear the same color shirt, a school jacket or hat, or a colorful lanyard to identify them. Give chaperones packets with student groups, the names of students in each group, a brief description of the planned activities, your cell phone number and those of other chaperones, and maps showing the location of bus pickup, restrooms, and lunch. Instruct them to count students often, especially before leaving a site. Consider asking one teacher to be a roving chaperone with the student information forms, on call to assist a group that is having problems (my former principal often took on this role). He or she could also take pictures of students doing various activities on the trip.
The logistics will take a lot of effort, but don’t overlook the purpose of the trip: What activities will help students meet the learning goals? Some venues provide guides with planned tours, and their websites may have suggested activities for groups on their own. One common activity is a “scavenger hunt” in which students find specific items. But I’ve seen students racing through a venue just to check off things they see, so any activity should be focused on your learning goals. Perhaps pairs or groups of students could come up with their own questions to explore on their visit. Students could take sketchbooks or notebooks to record their findings, index cards to make their own “postcards,” cameras (if allowed), or pages of a class scrapbook to work on.
After the trip, debrief with the students on the activities they did and continue with any follow-up. Have the students send thank-you notes to the chaperones. Send a note to the venue with feedback from the students and chaperones. Display photographs and student quotes on your bulletin board. Annotate your notes with ideas for next year.
Many times when I see former students, they comment on the field trips we took. Whether the experience was a half-day at a nearby park or a three-day oceanography trip, their memories made it worth the effort.
Examples of guidelines and resources:
- Museum of Science (Boston)
- Smithsonian National Air and Space Museum
- Natural History Museum of Los Angeles
- Exploratorium (San Francisco)
- Saint Louis Zoo
- Audubon Aquarium of the Americas (New Orleans)
- National Park Service
Every spring, our fourth grade does a one-day field trip. The teacher who usually planned the event retired, and I was asked to take over. We’d like to visit a science-related venue this year, but I’ve never organized an event like this.
—Isaiah, Bakersfield, California
Getting to the root of STEM
By Francis Eberle
Posted on 2011-01-11

NSTA Executive Director Francis Eberle
For the last few years I have been conducting my own investigation into the increased interest and expansion of STEM (Science, Technology, Engineering, and Mathematics) in rhetoric, legislation, institutional structures, programs, and materials.
What has intrigued me is the way STEM is used as an acronym for the separate subjects (Science, Technology, Engineering, and Mathematics), or as topics within each of the four subjects (such as biotechnology). Often the acronym is used to depict only one of the four subjects, two of more of the subjects, or some type of an integrated combination of two or more of these four subjects. (I am using the term subjects here to describe STEM, rather than calling them disciplines, because there are some who say that technology and engineering are not disciplines. More explanation is probably warranted for this statement, but I am not going to do this in this post.)
The more variation I found in how STEM was being used, the more curious I became about what this would look like in districts, schools, and classrooms. There are, of course, traditional schools teaching science, technology, maybe engineering, and mathematics separately. There are “STEM” schools where the learning seems to be different from what is provided in existing science and mathematics schools.
There are STEM networks, STEM centers, STEM departments, and STEM teachers. There are STEM programs and STEM instructional materials.
Can you help me in my investigation? How is STEM being implemented in your district, school, or classroom? What do you think should be the learning opportunities in STEM subjects for students?
NSTA Executive Director Francis Eberle
Student-produced videos
By Mary Bigelow
Posted on 2011-01-06
 As part of the quest to find relevant resources for SciLinks topics, I’ve been poking around YouTube, TeacherTube, and other video sites. I’ve certainly seen the good (which are considered for a SciLinks review), the bad (poor design or lots of errors), the ugly (talking-head lectures)—and the inappropriate.
I really enjoy looking at the student-produced ones. I’m amazed by the creativity of our students and their ability to use the video technology. I suspect that many of them learned the skills on their own, but you can tell those that have had some teacher guidance, especially in the science content. Teachers often lament that students “don’t want to learn,” but seeing what some students can do with a challenging and relevant task makes me wonder about that.
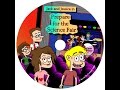
Publishing student work online is a win-win situation. The “producer” learns and integrates content and media skills into a product that “consumers” (other students) can learn from. The teacher can work with the producer to make sure that the information is correct and that the product is appropriate for the intended audience. For example, I was recently made aware of an animated video created by a Florida high school student for a middle school audience: Prepare for the Science Fair by Kevin Temmer. This could be a light-hearted and engaging introduction for younger students to what could be an imposing task. (You might have a teachable moment here to clarify the word “hypothesis.” The video uses the terms “educated guess” and “prediction” which may differ from your definition.)
Of course, it’s ironic that in many schools, video sites are blocked, as are blogs (including the NSTA ones), wikis, and social media sites. I know some teachers who created a Ning site to share resources and information related to a science professional development project, but they have to use it at home! I can understand that schools don’t want students accessing inappropriate material, why are teachers denied access to teaching tools and instructional resources that could enhance student learning? Hmm.
As part of the quest to find relevant resources for SciLinks topics, I’ve been poking around YouTube, TeacherTube, and other video sites. I’ve certainly seen the good (which are considered for a SciLinks review), the bad (poor design or lots of errors), the ugly (talking-head lectures)—and the inappropriate.
Digital photography websites
By Martin Horejsi
Posted on 2011-01-05
Here are some helpful websites addressing digital photography. Instead of an endless list of sites (I call them link dumps), I have provided only one link per category, and that link is a good one IMHO.
Basic improvements to your photography:
Kodak’s Top Ten Tips:
www.kodak.com/global/en/corp/top10tips/index.jhtml
Digital photography course on Moodle:
moodlecommons.org/course/view.php?id=42
Professional photography opinions:
Moose Peterson’s photo blog:
www.moosepeterson.com/blog/
Reviews of digital photography equipment:
Digital Photography Review:
www.dpreview.com/
Free photo editing software and storage:
Google’s Picasa software for PC and Mac:
picasa.google.com/
There about 500 apps in the iTunes store for the iPod, listed under the keyword “photography,” but the one I have used for inspiration is a free iPad app called The Guardian Eyewitness. This app is a collection of stunning images with brief commentary by the photographer who made the image.
Here are some helpful websites addressing digital photography. Instead of an endless list of sites (I call them link dumps), I have provided only one link per category, and that link is a good one IMHO.
Basic improvements to your photography:
Kodak’s Top Ten Tips:
www.kodak.com/global/en/corp/top10tips/index.jhtml
Digital photography course on Moodle:
Displaying science on classroom bulletin boards
By Mary Bigelow
Posted on 2011-01-05
 I teach science to fifth and sixth graders. I have a separate classroom equipped as a lab. It’s an ideal situation, but as a new teacher, I’m struggling to keep up with everything. It may sound trivial, but I am concerned about my bulletin boards. In other classrooms, the teachers have amazing displays. My room looks drab in comparison. Do you have any suggestions for brightening it up?
—Morgan, Charleston, West Virginia
For a new teacher, no concerns are trivial, although some are more important than others. As a departmentalized science teacher, your most important responsibility is to provide inquiry-based learning experiences for your students. These experiences (especially with two grade levels) take time to plan and evaluate. You are also responsible for equipment inventories, lab maintenance, and safety. So you can be forgiven if elaborate bulletin boards have a lower priority.
On the other hand, science is an interesting subject, so your lab does not have to be “drab.” You can set up a table with materials related to your current topics for students to examine (e.g., shell collections, animal bones, rock samples, weather maps, simple machines). Hand lenses and microscopes invite students to explore. A display of science trade books can brighten up a corner and encourage students to browse and learn.
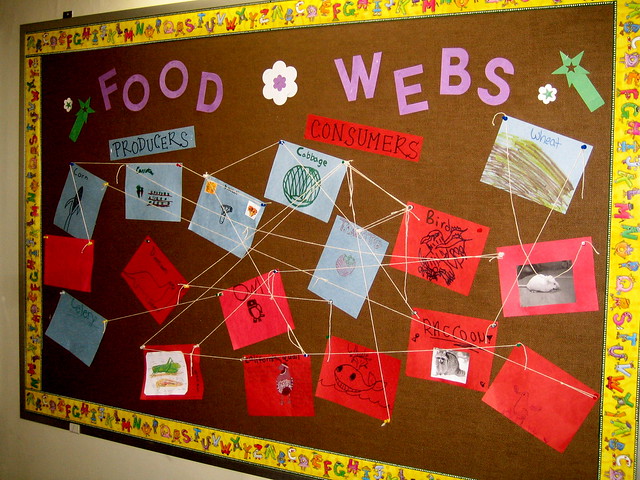
On your bulletin board, post the lab safety rules prominently (and permanently). Set off a small space for “For Your Information” notices (e.g., fire drill evacuation map, the school calendar). Then divide the rest of the bulletin board space between the two grades. Color code the information or use different colored backgrounds for each grade (wrapping paper or wallpaper does not fade, and you can keep the same background all year—or even several years). I found that the most effective bulletin boards were those created with student materials (or by the students themselves) and whose content served an instructional purpose:
- For each grade, you could include a “word wall” with the key vocabulary for the unit. Refer to it often during class discussions or writing assignments. As you introduce a new word, ask a student to create a card with the word and post it on the wall. The cards can be taken down and used during review games, too.
- Save some space to display student work. It should be ungraded, but you can use sticky notes to draw attention to specific look-fors: “Note how Jason organized his data.” “What can we learn from Maria’s graph?” “Is this an observation or an inference?” Throughout the year, try to display work from as many students as possible.
- Post the “big idea” or theme of the unit, outlining the topics and activities. Refer to it often to remind students of how the activities and discussions are connected.
- Include the rubrics for lab reports, science notebooks, or other projects. Ask a few students to illustrate them.
- During a discussion or activity, use a section of a bulletin board for students to post “I wonder….” questions to be addressed at a later date.
- Print magazines and the internet are great sources for pictures related to your current units. In addition to their decorative value, these pictures can be used to stimulate discussions or as part of writing prompts (e.g., compare and contrast, predict, describe) or activities in classification. My school did not have a laminator, so I used plastic sheet protectors to display them. These protectors are less expensive than laminating film, and they are reusable.
- Display some of your own photographs related to the topic and encourage students to share their photos or to bring in related pictures or news articles. Students also enjoy seeing pictures of their teacher in science-related venues and activities.
Some of your colleagues’ bulletin boards are the result of many years of experience—they’ve been collecting resources for a long time. The school may have some parent or community volunteers who assist with bulletin boards.
If you have the opportunity to attend a science conference, the vendors have posters and other materials you can bring back. Take your digital camera with you wherever you go—you never know when you’ll see a photo opportunity (an alternative energy source, an interesting cloud formation, a rock outcrop, or unusual plants). When you have a display that is particularly effective, take a photo. Put the picture and other materials in an envelope and keep it with the unit materials so you can recreate it next year. You’ll soon have your own science-related, amazing displays.
Photograph: http://www.flickr.com/photos/kissyface/2287122313/
I teach science to fifth and sixth graders. I have a separate classroom equipped as a lab. It’s an ideal situation, but as a new teacher, I’m struggling to keep up with everything. It may sound trivial, but I am concerned about my bulletin boards. In other classrooms, the teachers have amazing displays. My room looks drab in comparison. Do you have any suggestions for brightening it up?
Free technology for teachers
By Mary Bigelow
Posted on 2011-01-04
Happy New Year!
Over the holiday break, I found this blog on a colleague’s Facebook page. Free Technology for Teachers has lots of suggestions for free (yes, free) applications. Today’s entry (January 4) is 11 Science Resources to Try in 2011.
Share yesterday’s entry 11 Math Resources to Try in 2011 with your colleagues!
Happy New Year!
Over the holiday break, I found this blog on a colleague’s Facebook page. Free Technology for Teachers has lots of suggestions for free (yes, free) applications. Today’s entry (January 4) is 11 Science Resources to Try in 2011.