
Travel as PD
By Mary Bigelow
Posted on 2013-01-29
 My school provides some professional development money every two years for summer travel. This summer I would like to take an educational trip to Italy to visit Pompeii, Herculaneum, Vesuvius, some Galileo astronomy sights, or others that would fit into my discipline areas (Earth science and physics). Can you help me find anyone in the NSTA community who might know of professional development trips in Italy or know of science educational tours in Italy for which I could use my grant?
—Scott, Dallas, Texas
It’s hard for schools to provide specialized content knowledge and experiences, so you have a great opportunity for your own individualized professional development (PD). I posed your question on NSTA’s Earth Science listserve:
- Larry suggests a day in Florence, visiting Leonardo da Vinci’s haunts and creations.
- Nathaniel sent a link to information on a 2013 PD trip to Italy sponsored by the Fernbank Science Center in Atlanta.
- Len and Bob both note that Earthwatch does a great job in providing opportunities for educators. Based on their experiences, science education was a key part of their trips, with instructional videos and talks given by Earthwatch staff assigned to the project. The “volunteers” (the people signed up for a trip) worked each day alongside the permanent staff to meet the objectives of the particular study that had been undertaken. Earthwatch promotes the idea of communicating the progress back to students via a blog set up for the trip.
- Michael suggested two museums that might be of interest: the Museo Galileo in Florence and Museo Nazionale della Scienza e della Tecnologia “Leonardo da Vinci” in Milan.
Another experienced educational traveler suggests contacting a university geology department or a geology professional organization to inquire about summer experiences. Even if they don’t have trips this summer, their previous itineraries may give you some suggestions for places to visit, they may have contacts in Italy, or they may know of other organizations that are sponsoring trips.
I also poked around the internet. Depending on how much exercise you want, check out the Sierra club outings. They have one this summer for hiking in the Dolomites, for example. A New York Times article has more ideas for Hiking Italy-Volcano to Volcano. And VolcanoTrek offers tours to Italian volcanoes. (—Please note, I don’t know anything about this company other than what’s on the website.)
Some additional thoughts on Scott’s question:
Many of our students have Individualized Education Plans to meet their needs. Perhaps its time for teachers to create IPDPs (Individualized Professional Development Plans) for themselves, particularly for content knowledge. Some districts already offer such an option for self-directed learning. Teachers set their own learning goals, design a learning strategy, document their activities, and describe how they will apply the new content knowledge. The plans require prior approval (especially if the district is awarding official PD hours) and usually teachers pay for the programs themselves but are then excused from some or all of the traditional inservice programs.
Scott describes what this looks like in his school:
Every year our parents’ association has events to raise money. They give a lot of that money to the school as part of our faculty grant program. People have been generous recently, and teachers are now eligible for $3000 every two years. The money can be used for anything that will improve our teaching. We submit an application that gets reviewed by the faculty grant evaluators (a revolving group of about six teachers) and if they agree that the plan will benefit the school and the students, they will approve it. It is much easier to get your plan approved if it is for schooling or part of an educational trip/tour (for example, the GSA Geoventures). It is possible to create your own itinerary explaining what and why you are going to do, but it is more difficult (but not impossible) to get approval. After the experience we have to write up a summary describing the experience and how we are going to use what we learned. The write-ups and descriptions are all kept in a binder so other teachers can read what their cohorts have done and get inspired to improve themselves too. It is a great program!
Photo: http://www.flickr.com/photos/dennischnapp/360214306/sizes/l/in/photostream/
My school provides some professional development money every two years for summer travel. This summer I would like to take an educational trip to Italy to visit Pompeii, Herculaneum, Vesuvius, some Galileo astronomy sights, or others that would fit into my discipline areas (Earth science and physics).
Vernier LabQuest 2
By Ken Roberts
Posted on 2013-01-25
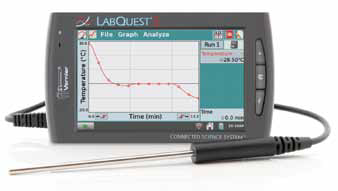
In the not-so-distant past, many science teachers measured temperature with mercury-based thermometers and graphed the results of their experiments on graph paper. Perhaps some of you recall how problematic it was to clean up a broken mercury thermometer and cringe at the thought of a smeared pencil erasure after a correction was made to the graph paper of a lab report. In stark contrast to the old-fashioned scientific laboratory equipment of the past, a new tool known as the LabQuest 2 is available to science teachers. The LabQuest 2, a standalone unit interface, can be used to collect data from a sensor. Slightly larger than a cell phone, the LabQuest 2 is equipped with built-in graphing and analysis applications that combine integrated software for data collection and inquiry. The hardware includes a USB port and three analog ports and can collect data from multiple sensors simultaneously. Once data is collected, results can be saved on a USB flash drive for later transfer to a computer. In addition, the unit includes a built-in GPS, stopwatch, calculator, and even a microphone for remarks. The unit lends convenience to situations in which it’s undesirable or problematic to carry multiple instruments into the field. In a field test, the device was easy to use and worked well with both Macintosh and/ or Windows computer platforms. Moreover, it comes with easy-to-follow instructions for over a hundred labs and is compatible with more than 70 probes. From my perspective, it is remarkable that a multifaceted device such as this is so easy to use. Once data collection has occurred, the LabQuest 2 can complete data analysis and report the results via Wi-Fi using Vernier Data Share. Subsequently, rather than using a pencil and graph paper, the results can be exported to a spreadsheet and sent out as a PDF graph representation for analysis. This function is unique in that it allows students to e-mail, print, and share sensor-based data for the report. In summary, the LabQuest2 from Vernier is an outstanding tool to engage students in scientific inquiry. In my opinion, its reasonable price and ease of use make the LabQuest 2 a valuable tool for students conducting scientific investigations. It can help motivate them toward greater science achievement. If you’re interested in a versatile and cost-effective tool that is user friendly, look no further than Vernier’s LabQuest 2.
Step Turn and Learn, Level 1
By Ken Roberts
Posted on 2013-01-25
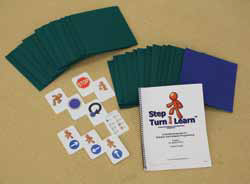
This product is an idea for introducing young children to skills they will use for robotics and computer programming. Level 1 includes lightweight, flexible floor tiles, cards, and a guide booklet. Students tried Step Turn And Learn both in the classroom and outdoors. Any floor grid will do indoors, even a taped carpet. The tiles provided make it easy to take the activity outside where there might be more room for students to watch one another. The website directs viewers to a video. This narrated slide show gives the basic information about the product. Students look at symbols on cards that direct them as they move through the grid. Eventually the students will be designing the routes and organizing the cards. Children age seven and older handled the cards without problems, removing the top card and placing it at the bottom of the pile after following the instruction. Some younger children moved more than one card at a time, or dropped the cards. A teacher or an older student can hold the cards for the children as they work their way through the grid, moving around the array as the direction changes. As children pick up and later deposit an object, they can no longer juggle card manipulation. Students are to learn that the “Step Right” instruction means “Turn right and step one time.” The symbol glossary identifies this card with the caption “Step Right.” Identical symbols accompany these three instruction cards: “Step Forward,” “Step Left,” and “Step Right.” Arrows differentiate one card from the other, so students used the arrows and ignored the symbols. The product is announced as K–3 on the Bulletin Board at the website; PreK–4, on the accompanying literature. At the Oregon public elementary school where students tested it, children in grades 1 and 2 were able to grasp the concept, and they enjoyed it more than younger students. The Step Turn And Learn idea can initiate readiness for a complex, technological world without using any technology at all. It is portable, and the sequences are limited only by the users’ ability to strategize. Robotics tends to find its way into enrichment classes for academically successful students. This product can be used for all students and for more than one purpose. For example, students can organize the tiles in several arrays, preparing for comprehension of more advanced math concepts. From first grade up, students wanted to keep doing the activity. Younger students, confused at first, later got the idea and began helping one another. Step Turn And Learn allows students to design grids, paths, and strategies for getting from one place to another without having to read a single word. Therefore struggling readers and English learners may practice complex skills with the same access opportunity as their more literate classmates.
Vernier Logger Pro and Go!Motion Sensor
By Ken Roberts
Posted on 2013-01-25
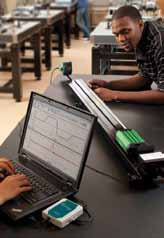
It’s hard to write a review for Vernier’s motion sensor and not sound like I’m writing an advertisement. Between the interface to the software and number of possible applications, this is one of the most modular and versatile tools of scientific investigation a physics teacher is likely to encounter. Let’s start with the hardware. Unlike previous and different companies’ motion sensors, this one plugs in using the same USB cable your printer or scanner might use. That makes storage much easier, while it also means if I (or a student) manage to damage or misplace the cable, replacements are both cheap and plentiful. Thanks for going generic, Vernier! Now let’s talk applications. If you’re reading this, you’re probably a physics teacher, and you’re likely at some point to use a motion sensor like this to follow a cart, ball, or other object. Let me tell you, the Go!Motion sensor delivers. To measure the efficiency of a motor reeling in a vertically suspended shoe box, I used the motion sensor looking up at the shoe box from the floor. Worked perfectly. Same for a basketball dropped from under the motion sensor looking down. Same for a student carrying a whiteboard in a graph-matching exercise. It just works. In fact, I tried replacing my old photogate with the Go!Motion sensor to analyze the pendulum’s motion. Worked even better! I must admit a large par t of what makes the Go!Motion sensor a great piece of lab equipment is the software. Logger Pro is intuitive, straightforward, and inexpensive. For a typical pendulum experiment , I had previously had used a photogate to just measure the pendulum’s periods and average them over each trial. Using the Go!Motion sensor, I just placed it on a lab table, aimed it horizontally at the pendulum, and the sensor watched as the pendulumm approached and receded. Now it just became that much easier to teach simple harmonic motion, since I have demonstrable evidence that the motion of both the pendulum and a mass suspended from a spring are sinusoidal. And with the Curve Fit tool, I can fit a sine curve to my pendulum’s posi t ion-versus- t ime graph, get the period, and get the correlation so I know how confident I should be in the value. What could be easier? Putting it all together, if you want a device that just works for you, no questions asked, I would strongly recommend the Go!Motion sensor from Vernier. It’s great as a stand-alone product because of its USB functionality, but will also be backwards compatible if you do have older Vernier hardware on hand. Logger Pro allows students and teachers to have a very straightforward analysis of the data you collect in lab. It’s a lot of bang for the buck, and a site license costs as much as do many companies’ single-user licenses. Not only that, but when you call tech support, you might even be speaking with Dave Vernier himself.
Introducing guest blogger, Patty Born Selly
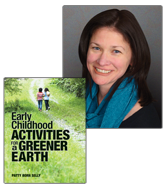
By Peggy Ashbrook
Posted on 2013-01-24
Who better to meet, in this winter season, than someone from Minnesota who shares her ideas on how to enjoy the outdoors with children in her blog, Small Wonders?
(I especially enjoyed the post about wrestling with discussing possible truths about a butterfly’s end with her children.)

Patty participates in a physical science challenge.
When we met in person at a conference for the National Association for the Education of Young Children I found that the friendly, inquisitive nature of her blog is really who Patty is, and she clearly enjoys talking about connecting children with nature.
Patty is the founder of Small Wonders, an educational consulting company, and teaches classes on environmental and nature education at universities. In her book, Early Childhood Activities for a Greener Earth (2012 Redleaf Press), she writes joyfully about important environmental topics such as recycling, and her engaging experiences for young children illustrate how to be “greener”—while still being developmentally appropriate and focusing on play. Her background in early childhood teaching shows—the ideas are very doable.
Welcome Patty!
 Peggy, thanks for the very kind intro. I’ve been a loyal and devoted “Early Years” reader for a long time and I’m grateful and honored to contribute a guest post!
Nature offers a host of opportunities for children to develop scientific thinking skills such as inquiry and observation. Scientific learning is not something that happens only in the science stations in the classroom! Opportunities for scientific exploration in the out-of-doors include: the structures we and other animals build, the air we breathe, the changes of seasons, animals, habitats, the list goes on. Whether you have access to a large wilderness preserve or just a few scattered trees at the edge of your parking lot, you have a rich source of material just outside your doors.
Exploring nature is, in fact, a perfect opportunity to develop the same skills that are essential for scientists, researchers, and engineers throughout the world. These fundamental skills include: making observations and describing those observations, classifying objects, investigating phenomena, asking questions, predicting outcomes, drawing conclusions and explaining outcomes.
Most of you who work with young children will intuitively recognize that these are skills and habits children already practice, simply through play and exploration. Thus, an early childhood environment that embraces outdoor experience, is a perfect setting for practicing the skills of science.
You can support and cultivate these skills by approaching your interactions with children in ways that creatively engage their scientific minds. Some ideas include:
Engaging the five senses, observing and describing—Challenge children to notice ten new things outside and then use words to describe them. Bringing awareness to the senses can really help children become more adept at noticing details. Have frequent conversations that include your sense-observations: “I hear a bird chirping.” “This smells like pine” or “I can feel a light breeze on the back of my hand”. Sentences like this help direct attention to children’s senses.
Classifying—One of my favorite activities to do with young children. This helps children make sense of things, to bring order to collections of seemingly random objects. Pay attention to the many ways that children collect, organize, and use materials such as sticks, plant materials, or small stones outdoors. Ask them to tell you some common characteristics about the materials. Many children will notice colors and textures, others will point out general shapes, or even scents. Then challenge the group to find or describe more objects that fit their categories. Mix up the materials and find new ways to classify them together.
Investigating and asking questions—Carefully observe children’s natural curiosities outdoors. What are they drawn to doing? Do some children always investigate the same tree trunk, day after day? Are others constantly moving piles of sand from one place to the next? What are they investigating by doing so? They may be exploring different ways of carrying sand, a loose material whose texture can be manipulated. Or, perhaps they are curious about how much sand it takes to make a very big hill. Ask them lots of questions, such as “how else could we carry the sand?” or “What can you tell me about how wet sand and dry sand pile up?”
Drawing conclusions, giving explanations—When children are able to make observations, describe and discuss those observations, and are able to repeat an experience, they can draw conclusions based on that experience. Support those explorations by asking children to explain what happened. For example, the child who drops pinecone after pinecone into a stream from a bridge above and then quickly turns to see the pinecones traveling downstream has drawn a conclusion that the pinecones will come out on the other side of the bridge as they travel downstream. He has also concluded that they float (as evidenced by the fact that he knows he’ll be able to see them when they pass under the bridge) through trial and error, he’s tested his observations and is making predictions, expecting a certain outcome. An observant teacher may ask the boy, “What is causing the pinecones to move? Will other objects appear on the other side of the bridge if you drop them into the water too?”
Note that none of the examples I gave above are scripted or pre-planned. One of my favorite things about nature is the consistent unpredictable supply of spontaneous opportunities for exploration! (also known as “fun learning”!) Often things happen in nature that just can’t be predicted: a rainbow in the morning sky, a busy squirrel rummaging on the edge of a sidewalk, or a chrysalis discovered under a picnic bench. Be open to nature’s own “curriculum.”
The idea of free, unstructured time in nature may be challenging for some educators, but I encourage you to allow children to explore freely: following their own interests, spending their time on the things that pique their curiosity. Allow them time to become deeply immersed in their explorations. By observing them carefully, you’ll soon see that their scientific minds are hard at work, although their bodies may appear to be at play.
Patty Born Selly
Early Childhood Activities for a Greener Earth (2012 Redleaf Press)
Read more tips from Patty at Redleaf Press, Author Spotlight
Who better to meet, in this winter season, than someone from Minnesota who shares her ideas on how to enjoy the outdoors with children in her blog, Small Wonders?
(I especially enjoyed the post about wrestling with discussing possible truths about a butterfly’s end with her children.)
Focus on the new standards
By Mary Bigelow
Posted on 2013-01-23
 Interested in what using the NGSS (Next Generation Science Standards) could look like in a classroom? The editor has a summary of significant components outlined in the Framework for K-12 Science Education, which is a guide for the development of the standards. The featured articles in this issue each start with an overview of how the activity can be related to the Framework.
What are the differences between science inquiry and engineering design? The authors of Taking Engineering Design Out for a Spin* compare and contrast these in several tables and then illustrate the processes with a simple whirl-a-gig activity (which many of us may already do—or something similar such as paper airplanes). Cost or Quality* looks at the trade-offs that can be part of engineering projects. Using an egg-drop activity, students go beyond following directions to designing their own solutions to a problem with a real-life context. The authors include rubrics, examples of student work, a visual of the design process, and other resources. Shedding Light on Engineering Design shows how content and engineering practices can relate to a real-life design project—determining the UV protection afforded by sunglasses. The Stealth Profession* suggests several trade books and activities to think about engineering and think like an engineer or inventor. [SciLinks: UV Index, Gravity, Buoyancy]
Wonders of Weather* is this month’s Early Years contribution which includes suggestions for a learning activity to investigate local weather patterns. You could take this a step further and have the students present their observations each day via the school’s public address system or website. [SciLinks: Weather, Weather and Climate, Weather Instruments, Weather Patterns]
The authors of Ducks Overboard* show how principles of buoyancy can be integrated with concepts of water movement and pollutants (especially debris) in the ocean – or local waterways. This is an interesting activity, given that debris from the 2011 tsunami in Japan is beginning to wash up on the beaches of Hawaii. This month’s Formative Assessment Probe Using the P-E-O Technique* is also related to uncovering students’ ideas about sinking and floating. [SciLinks: Water Pollution and Conservation, Buoyancy]
Many elementary science classes include growing plants from seeds and learning the names of plant parts. Strong STEMS Need Strong Sprouts* has 5e lesson ideas that show how to kick this up a notch to incorporate questioning, models, and higher order thinking (the photographs of the first-graders and their work are wonderful). [SciLinks: What Are the Parts of a Plant?, Photosynthesis]
Constructing and Critiquing Arguments describes strategies that could be used with any age level of student: Visualize ideas using a concept map; Whole-class engagement in a negotiation circle; Time to pause and reflect; and Writing a letter to a younger audience. The authors provide examples of student work, too.
* Many of these articles have extensive resources to share, so check out the Connections for this issue (January 2013). Even if the article does not quite fit with your lesson agenda, there are ideas for handouts, background information sheets, data sheets, rubrics, and other resources.
Interested in what using the NGSS (Next Generation Science Standards) could look like in a classroom?
Next Generation Science Standards–understanding based on "prior experiences"
By Peggy Ashbrook
Posted on 2013-01-20

A preK student acquires prior experience with sunlight needed to demonstrate understanding of NGSS Performance Expectations.
The second draft of the Next Generation Science Standards (NGSS) has been released and can be viewed in two formats, by Disciplinary Core Ideas (DCI) from the NRC’s Framework for K-12 Science Education, and by topic.
We are all invited to provide feedback, on parts of the standards that interest us, or on the entire document. Again and again, the NGSS states that the Performance Expectations build on “prior experience.” That means to demonstrate understanding of the Kindergarten Performance Expectations, children must already have had experiences which will allow them to understand. So preschool teachers take note of the proposed Performance Expectations for Kindergarten through Grade 2, and provide the rich experiences that will allow children to build understanding of these natural phenomena and relationships.
Before diving into this second draft, I found it helpful to read Science and Children editor Linda Froschauer’s reflection on the guiding document for the NGSS, A Framework for K–12 Science Education: Practices, crosscutting concepts, and core ideas.
In the January 2013 Editor’s Note she says:
What does the Framework tell us? We all see different aspects of the document that are personally revealing, but I’ll share with you my own list of significant components.
• Inclusion of engineering as a partner in developing scientific thinking. The addition of engineering brings with it many opportunities to support student understanding not only of core ideas (concepts) but also the nature of science and practices.
• Practices (using process skills) taught in conjunction with development of disciplinary core ideas (content). In the past, lessons may have provided instruction in practices without these vital connections.
• Crosscutting concepts as integral and conscious components. We have all used themes to connect aspects of student learning. The Framework provides a concerted effort to identify crosscutting concepts and build them in a continuum of understanding.
• Continuum of learning or learning progressions. Although we have all been aware of the importance of knowing what our students have learned in the past and how that learning will be further developed in the future, the Framework emphasizes the importance of this carefully crafted progression.
This issue [Science and Children 2013] helps teachers move toward the NGSS by providing lessons based on the Framework. It’s clear that where we are going and how we will get there has changed; the next step is up to you.
Linda Froschauer
Editor, S&C
Reference
National Research Council (NRC). 2012. A framework for K–12 science education: Practices, crosscutting concepts, and core ideas. Washington, DC: National Academies Press.
Take a look at the NGSS January 2013 draft and see the Performance Expectations for grades K and above. Join in the conversations in the NSTA Learning Center forum about the NGSS and comment before the January 29, 2013 using the NGSS website form.
Regardless of how we think the new standards apply to preschool or align with our programs’ standards, we can use this opportunity to reflect on our teaching and consider how to improve it.
A preK student acquires prior experience with sunlight needed to demonstrate understanding of NGSS Performance Expectations.
Mix it up
By Mary Bigelow
Posted on 2013-01-20
 As the editor notes, “You can’t just wing it” with middle-level science (or any level for that matter). Effective teachers have a variety of strategies to use, so that if one isn’t working with a group of students, another tool is ready. The featured articles in this month’s addition describe a variety of strategies and illustrate what they “look like” in a real classroom.
Most of us don’t start a project by saying “I have a hammer and a box of nails. What can I build?” We select a goal and then choose or get the tools we need. That is the focus of Technology Techniques: Using Them the Right Way—merging the learning goals (content) with the appropriate pedagogy and technology. The author shares a link to the TPACK model, which illustrates this focus.
Scientific Inquiry Meets Storytelling and Filmmaking looks at strategies to create video lab reports. The investigation described here deals with Newton’s laws of motion, friction, and force. Students design and test model cars. So far this sounds typical, but the author also has the students video (or photograph) their work. As the culmination, the 6th graders create a video documenting the entire process. The author shares how he guides students through the entire project. [SciLinks: Newton’s Laws of Motion, Friction, Forces and Motion]
Using Presentation Software to Integrate Formative Assessment into Science Instruction describes a project in which several teachers investigated how to incorporate assessment tasks into presentations. They provide the design model and a list of tasks they used, along with examples of presentation slides. I can see how this project could be adapted for any topic or grade level.
For many students, especially those who are new to a subject or who are learning English, science vocabulary can seem like a different language. I suspect that many of us used the ideas in Parts Cards: Using Morphemes to Teach Science Vocabulary without using the word “morpheme” (the smallest unit of meaning—a word part such as a root word, prefix, or suffix). Many of these have Greek or Latin origins, and I found that my students were fascinated by words. The author illustrates how to help students learn vocabulary with cards that are somewhat similar to Frayer diagrams.
If you’re interested in differentiating the instruction in your classes but concerned about how to manage the process, Creating and Delivering Differentiated Science Content Through Wikis has many suggestions. After a brief review of what differentiation is (and is not), the author provides a step-by-step guide for creating class wikis to share information, deliver content, provide opportunities for collaboration, and share assignments. Using animal adaptations as the focus, the author shares examples, guidelines, learning goals, activities, and final project instructions and rubrics for two levels of learning. [SciLinks: Adaptations of Animals, Natural Selection, Darwin and Natural Selection]
When I had middle-schoolers “teach” others about a topic, I wish I had been as organized as the author of Student Teaching in the Eighth-Grade Science Classroom. Working on the premise that “if students could effectively teach the material, then it would be an indication that they had truly mastered the content,” she provides introductory material, rubrics, and self-assessment templates that could be used for any topic (the sample lesson is on watersheds), as well as a description of how she guided the students through the process of lesson design and assessment. [SciLinks: Watersheds]
It’s hard for middle school students (and their teachers) to sit still for any length of time. The Neuron Game takes advantage of that with a lesson that embeds a movement activity into instruction in the structure and functions of neurons. Worksheets, rubrics, and diagrams of the game are provided. [SciLinks: Neuron]
It’s helpful for a teacher to know what students already know about a topic, in order to choose appropriate goals and instructional strategies. Pretests or reflecting on previous years can be helpful. The authors of Using Interviews to Explore Student Ideas in Science suggest that “interviewing” individual students or groups of students (sounds like a focus group?) can also provide information on students’ knowledge and misconceptions. The authors describe how to get started with this tool.
It’s not a new strategy, but one that is always timely—reading in science. Helping Students Navigate Nonfiction Text: Paving the Way Toward Understanding has suggestions that evolved from a collaboration between a science teacher and a reading specialist.
Even if you teach several sections of the same subject, each section has its own characteristics, so you still nee a variety of approaches.
As the editor notes, “You can’t just wing it” with middle-level science (or any level for that matter).
Project based learning and the Next Generation Science Standards
By Mary Bigelow
Posted on 2013-01-17
Guest blog by Andrew Miller
The Next Generation Science Standards (NGSS) call for a conceptual shift in teaching and learning. Yes, content is changing in the upcoming NGSS. In addition to traditional subject matter, science and engineering are now integrated into the standards, where students will learn about the principles of engineering and engage in the engineering design processes. In addition, many concepts are cutting across content. For example, the concept “systems and system models” is used in the exploration of nuclear energies as well as ecosystems. Also, scientific and engineering practices are aligned multiple times with the disciplinary content. The NGSS calls for a deeper understanding and application of content. The focus is on core ideas and practices of science, not just the facts associated with them.
While many teachers are already teaching for application of knowledge as well as engineering and core concepts, these key features will cause a deliberate shift in instruction requiring all teachers to reflect on their practice. Project Based Learning (PBL) is a learning model that not only aligns to these key features, but also strongly supports NGSS-based teaching and learning.
First of all, let’s clarify the difference between projects and PBL. Instead of a curricular add-on at the end, the project is the context for the learning. Students are given an authentic task and a student-friendly driving question to investigate over the course of the project. Within this project, the teacher scaffolds the learning for students and arms students with skills through traditional labs, lectures, and other instructional activities. Instead of teaching all content and skills before the project, the teacher teaches through the project, which is engaging and relevant to students. Using a “need to know” list generated by students, and revisited through the project, the teacher gives lessons and instructional activities to meet the needs of students. Students learn 21st century skills such as critical thinking, collaboration, and communication. The project has an audience outside the four walls of the classroom, and students create a variety of products for this authentic audience. These are just some of the essential elements of a PBL project.
Just as the draft NGSS calls for deeper understanding and application of knowledge, PBL demands the same. When teachers design PBL projects, they pick power standards to focus on, standards that usually take significant time to teach and focus on depth, not breadth. The NGSS are being designed to be those type of standards and thus easily used when designing a PBL project. In fact, a teacher designing a PBL project might target one of the crosscutting concepts, as that concept permeates the entire year of content. PBL calls for in-depth inquiry into the content. Students investigate a rigorous driving question, and do so by unpacking it into many subject questions. In addition, they must apply this knowledge as they construct products that answer the driving questions and complete the project. The product reflects a deep understanding of content, as students have reflected and revised throughout the learning process. It’s not just one encounter with the content per se, but multiple encounters.
As we notice the new engineering focus of NGSS, we might consider design challenges, a key component of science, technology, engineering, and mathematics (STEM) education. However, design challenges are not necessarily PBL by default. One can take a design challenge, add some PBL essential elements to it, and make it into a PBL project. A common design challenge is to build an effective bridge, either physically with toothpicks, or digitally using a tool like SketchUp. However, there are some components that need to be added to it to make it truly a PBL project. Right now, the bridge is a great activity. In fact, it can be a great activity within the PBL to scaffold material. To make it PBL, students could make recommendations for retrofitting a local bridge and present this information to city officials and engineers. Yes, the product might be a bridge design, and yes, students may engage in a toothpick contest along the way. The difference is the work goes outside the four walls of the classroom, and actually is an authentic situation, where students are engaged in real-world work. As the design process and other components of engineering are leveraged in the NGSS, PBL projects can be designed to teach and assess these standards.
The NGSS will need to be met with pedagogical models that can leverage the required depth of understanding, and PBL can meet that challenge. PBL provides the strength of inquiry, rigor, and relevance that can capitalize on the key components of the NGSS.
—-
Andrew Miller currently serves on the National Faculty for the Buck Institute for Education and ASCD. He travels internationally, working with educators in his many areas of expertise. Andrew is an avid blogger for a variety of organizations including Edutopia and the education section of the Huffington Post. Follow him on Twitter @betamiller.
Guest blog by Andrew Miller
Scientific and engineering practices
By Mary Bigelow
Posted on 2013-01-16
 If you’re concerned or apprehensive about the NGSS, this month’s Commentary Preparing for the New Standards should be on your to-read list. The author, a high school physics teacher, describes his experiences in including engineering in his classes and basing student learning on the practices, crosscutting concepts, and core ideas as described in the Framework for K-12 Science Education, on which the standards are based. His advice: read the Framework, start small, and participate in conversations (and NSTA has many ways to participate, including webinars and tweet chats #ngsschat). The featured articles this month focus on scientific and engineering practices.
Learning to drive is a rite of passage for many teenagers, who are most at-risk for traffic fatalities. A Science That Saves Lives* describes a project in “crash science” – investigating car crashes through hands-on designs and simulations. The authors embed an egg-carrying paper car design activity within an investigation of car crashes. Perhaps this could complement the driver safety course? On a similar topic, your students could also look at Curbing Texting While Driving*, a simulation of how distractions can have an impact on awareness. [SciLinks: Momentum, Forces and Motion, Potential and Kinetic Energy]
When can a cell phone camera become a science tool for measurement and documentation? Keeping a (Digital) Eye on Nature’s Clock shows how photography can be incorporated into a longitudinal study in phenology. The authors include a 5e lesson and a link to software for analyzing photographic data of changes in plants over time. The software is Image J, which is an easy—and free—download. I’m sure students would be able to figure it out!). The article also includes samples of real data, suggestions for camera calibrations, and links to citizen-science networks. [SciLinks: Plant Growth, Plant Photosynthetic Pigments]
Many science investigations are constrained by the 45- or 90-minute time period. As the authors of The Hydraulic Jump note, however, science research is more complex and time-consuming and describe their experiences in helping students conduct independent research. I must admit I was unfamiliar with the term in the title as related to turbulent water (the authors provide a definition/description of the phenomenon), but by the end of the article, it’s clear how this seemingly simple event relates to a host of variables (and a list is provided) and lends itself to investigations. If your students are going to be involved in a research project, The Devil’s in the Deadlines has suggestions for planning and documenting a long-term project, including a sample deadline checklist.
What are the similarities and differences between science inquiry and engineering design? The author of Design Practices and Misconceptions* takes the eight practices and compares them in terms of science and engineering. He also addresses each with suggestions for those who are not as familiar with engineering design.
*Don’t forget to look at the Connections for this issue (January 2013), which includes links to the resources mentioned in the articles. These Connections also have ideas you could adapt for handouts, background information sheets, data sheets, rubrics, etc.
If you’re concerned or apprehensive about the NGSS, this month’s Commentary Preparing for the New Standards should be on your to-read list.