What if you could challenge your second graders to help communities prepare for disasters ranging from floods and wildfires to earthquakes and hurricanes? With this volume in the STEM Road Map Curriculum Series, you can!
What if you could challenge your second graders to help communities prepare for disasters ranging from floods and wildfires to earthquakes and hurricanes? With this volume in the STEM Road Map Curriculum Series, you can!
What if you could challenge your second graders to help communities prepare for disasters ranging from floods and wildfires to earthquakes and hurricanes? With this volume in the STEM Road Map Curriculum Series, you can!
What if you could challenge your second graders to help communities prepare for disasters ranging from floods and wildfires to earthquakes and hurricanes? With this volume in the STEM Road Map Curriculum Series, you can!
Different Strokes for Different Folks
Cross-curricular differentiation strategies for inclusion classrooms
A Manhattan jury recently awarded nearly $60 million in damages to a former Beacon High School student who was badly burned by a teacher’s botched chemistry experiment more than five years ago. The student suffered third-degree burns over 30% of his body, including his face, neck, arms, and hand. This happened when his teacher accidentally ignited a fireball during a “Rainbow Experiment” to show the colored flames produced by various salts. The teacher seemingly ignored many safety protocols while performing the experiment, including pouring highly flammable methanol directly from a gallon jug instead of using a beaker and pipette to dispense it. During the flame jetting of the methanol from the jug, students were seated too close to the demonstration and were burned. This took place in a classroom without a ventilated hood to remove fumes. Several safety deficiencies have often been identified in lab accident reports and warnings for this type of lab demo over several decades:
• students sitting too close to the demonstration;
• limited, inappropriate, or no personal protective equipment in use;
• no safety shield present or fume hood use;
• alcohol stock bottles sometimes used to refill hot ceramic dishes or surfaces;
• limited or non-existent teacher training in the hazards and risks of using flammable liquids with resultant safety actions.
RAMPing up safety
One approach to help prevent these types of safety incidents involves the active use of four principles of safety fostered by the American Chemical Society: Recognize hazards, Assess risks of hazards, Minimize risks of hazards, and Prepare for emergencies. Using the RAMP process allows teachers working in academic labs to help minimize risks and protect students from serious injuries. Unfortunately, if the first step of recognizing and understanding hazards is not successful, risk of hazard assessment may faulter.
A recent issue ACS Journal of Chemical Health & Safety (May/June 2019, Volume 26, Number 3) had a feature article titled “Recognizing and understanding hazards – The key first step to safety.” The author, Robert H. Hill Jr., presents an analysis of several incidents and illustrates how in most cases, if not all, the teacher lacks understanding of the hazards and in effect cripples the RAMP process, resulting in a safety incident. For example, he noted how the teacher in one case did not understand the properties of flammable liquids in high concentrations of flammable vapor above the liquid.
ACS has a video for students about RAMP and a video for teachers about RAMP.
The AAA method
A similar approach encouraged by the NSTA Safety Advisory Board is the AAA (Analysis, Assessment and Action) process for “driving home” safety involving a hazard Analysis, risk Assessment, and appropriate safety Action. It addresses the need of doing a full hazard analysis as the first step.
To located the hazards for a lab or demo, one reliable source is the Safety Data Sheets: Section 2—Hazard(s) identification: All hazards regarding the chemical and required label elements. Other sources include inquiring with fellow colleagues, checking out the NSTA safety portal, the NSTA safety alert and the ACS safety alert.
Once hazards are analyzed, the associated risks can be assessed. For example, if the chemical is flammable and vapor builds up, a flash fire and jetting flame can be effected. The risk in this case includes extreme heat and active flame exposure for observers. Lastly, determine the appropriate safety actions that should be taken as precautions, given the hazards and resulting risks. In the case of the Rainbow demonstration, the safer action is an alternative demo eliminating the use of the flammable methanol. This can be done by dissolving the salts in water, soaking a wooden applicator stick in the solution, and running it over an active Bunsen Burner flame.
In the end
Whether RAMP or AAA is used, one thing is clear: Most safety incidents can be avoided if done in a safer way using one of these two hazard analysis approaches. Once employed at science teachers, too many schools don’t follow up with initial or annual safety training for science teachers—that is, until an accident occurs and there is a lawsuit like the one mentioned above. Stay safe. Don’t destroy a student’s life or your own.
Submit questions regarding safety to Ken Roy at safersci@gmail.com or leave him a comment below. Follow Ken Roy on Twitter: @drroysafersci.
A Manhattan jury recently awarded nearly $60 million in damages to a former Beacon High School student who was badly burned by a teacher’s botched chemistry experiment more than five years ago. The student suffered third-degree burns over 30% of his body, including his face, neck, arms, and hand. This happened when his teacher accidentally ignited a fireball during a “Rainbow Experiment” to show the colored flames produced by various salts.
I find it challenging to engage elementary students in the life sciences. What are some hands-on activities that work? Are there anchoring phenomena that you recommend? —C., Utah
Depending on your curriculum, you could pursue several avenues to capitalize on students’ innate curiosity about nature and engage them in their learning.
One of the easiest is to explore your school grounds. Observing how natural processes and organisms take advantage of almost any condition can be powerful anchors for lessons. Questions like, “How can weeds grow in sidewalk cracks?” or “How can ants survive on a playground?” can lead to broad-reaching inquiries. The questions students raise or phenomena they observe are almost limitless.
Consider introducing a classroom pet or aquarium and make the students the caretakers. Focus lessons with the presence of these living things. Tending a school garden can be enjoyable and educational at the same time. Sharing their harvest will also build a community spirit among your students. Individual projects like terrariums or pop-bottle ecosystems will develop a vested curiosity and motivation to keep them thriving.
Field trips to nature centers or zoos are always memorable and introduce students to experts, careers and role models. Many conservation groups have outreach programs to bring nature into the classroom.
A good introduction into genetics and heredity is for the class to go through a list of human genetic traits and collate their results. Funny traits to track: widow’s peak hairline, hitchhiker’s thumb, attached/detached earlobes, tongue curling, convex/concave nose, and so on. To avoid conflicts with family privacy, keep this introductory activity as a simple survey among the students in your class.
I find it challenging to engage elementary students in the life sciences. What are some hands-on activities that work? Are there anchoring phenomena that you recommend? —C., Utah
Depending on your curriculum, you could pursue several avenues to capitalize on students’ innate curiosity about nature and engage them in their learning.
Measuring Murphy’s Law with the Vernier Go Direct Acceleration Sensor
On the 4th of July this year, a fitting date, America lost a true hero whom many people had never heard of, namely Robert Gilliland. Bob Gilliland was the chief test pilot and first person to fly the iconic SR-71 Blackbird, arguably the coolest airplane in history.
Robert Gilliland with a model SR-71 Blackbird. Bob glowed when he told Blackbird stories. As a test pilot in the early days of space flight, although Bob did not go into space, he flew into its blackness routinely to avoid every other enemy aircraft or weapon on earth as the cameras in his plane photographed what would later be the job of satellites.
Even without all its world records, the profile of the Blackbird has inspired and awed generations for generations. And if the first SR-71 flight wasn’t enough, Bob took the beautiful new Blackbird to supersonic speed on its maiden voyage back in December of 1964. Something unheard of! And Bob told me he flew the first flight of every Blackbird to follow ultimately logging more time at mach 2 and mach 3 that anyone else on earth.
The Vernier Go Direct Acceleration sensor is a rock-solid piece of science instrumentation. Onboard battery and Bluetooth radio gives its multiple measurements an infinite number of uses. Literally, an infinite number! Prove me wrong.
In order to get up to those supersonic speeds in a reasonable amount of time, the Blackbird accelerates at around 20 meters per second or about 10 times faster than a commercial airliner taking off. The pilot of an SR-71 experiences the feeling of about 2 g, or twice the usual tug of the earth. That impressive force you feel when your Boeing 737 takes is only adding about two-tenths of a g.
As an instrument of exploration, the Vernier Go Direct Acceleration sensor can be placed onto and inside many objects which then can be subjected to motion. The sensor will send real-time data to any device running compatible Vernier software including (and especially) the Graphical App.
Acceleration is a change in velocity where velocity is a change in position. While basic on the surface, acceleration causes much confusion in the science classroom. And speaking of confusion, the famous, infamous rather, Area 51 was where the SR-71 was born.
The SR-71 Blackbird, pictured here from Wikipedia.
The Skunkworks in Area 51 was home to Clarence “Kelly” Johnson, the legendary aircraft designer. I read as story about Kelly where he was in a meeting to discuss a new military aircraft. Several requirements for the plane were given and Kelly, in his head, calculated the necessary wing surface area and shape to get the job done. Remember, powerful computers, CAD, and the internet were still a long ways off in the future. Which leads me to another story, one that Bob Gilliland told me personally. First, remember that Bob was flying around in the SR-71 at 85,000 feet at three times the speed of sound. The SR-71 could fly about 3000 miles on a tank of gas, or roughly 90 minutes. To do an extended international mission, a supporting team of aerial refueling tankers had to be staged along the route. So in the era prior to GPS navigation, there was Bob with map on knee dropping to about as low and slow as the Blackbird could fly to mate up with a fuel tanker in a sky dance with the tanker flying as fast as it can. Time was critical as the now-inefficient SR-71 engines were struggling in the dense air. I imagine it somewhat like a Star Trek or Star Wars scene where a ship traveling faster than light suddenly slows and just appears in a new place. Bob told me, and I quote, “You’ve never been lost until you’re lost at mach three!”
The Vernier Go Direct Acceleration sensor easily attaches to almost anything. While zip-ties are an excellent, effective and secure fastening solution, many other options will work as well. Taking a clue from the tackle set of the Vernier Structural Materials Tester, I assembled a collection of bolts, washers, wingnuts and threaded collars allowing a quick, repeatable, and adjustable method of attachment.A plastic zip-tie is a strong solution, but can be an added cost as well as more plastic trash.
Mach 3 is 38 miles a minute, or over half a mile a second. A few minutes of miscalculation and you could be over the wrong state or even the wrong country!
Now once a vehicle is at it’s cruising speed whether bicycle of Blackbird, the sensation of movement maybe impossible. As anyone knows who has had a very smooth flight on an airliner, at cruising speed it’s impossible to tell with your eyes closed if the plane is sitting still on the ground, or flying at 500 miles per hour at 37,000 feet. Thus is the magic of acceleration. Only change is detectable.
One innovative use of the Vernier Go Direct Acceleration sensor is to attach it to a fly fishing rod. The smooth and precise swing of the fly rod is desired skill that takes practice, Using the Vernier Go Direct Acceleration sensor to visualize the swing, it was possible to both learn about harmonic motion, and improve the graceful stroke of casting a fly line.
Golf clubs, tennis rackets, and baseball bats are also obvious candidates for science fun. In fact, since all activities involve movement (hence the name activity), the Vernier Go Direct Acceleration sensor could be used to create science experiments almost anywhere. I can even imagine an entire science fair where the Vernier Go Direct Acceleration sensor was used in every single student’s scientific inspection of something. Hmm, maybe there is room for a Acceleration Fair?The Vernier Go Direct Acceleration sensor attached easily to the fly rod with short bolts whose tension could be adjusted without risk to rod or sensor.
Prior to the development of the SR-71, the parameters of the human body with regard to acceleration, or rather deceleration, were hot topics. How much deceleration could a human take and remain conscious, or even remain alive? To explore that physiological avenue, rocket sleds and centerfuges were used where “living sensors” were strapped into a seat and subjected to incredible speeds and slow-downs. One such engineer on the project was named Edward Murphy who proposed using strain gauges in addition to live subjects. It was the beginning of the popular use of Murphy’s Law when in one centrifuge trial every one of the strain gauges were wired backwards.
Attached to mountain bike handlebars, the Vernier Go Direct Acceleration sensor provided detailed and descriptive data about the ups and downs as the bike speeds along a trail. The frequency and amplitude of trail riding is visible and measurable with the accelerometer. The next step is to attach the Vernier Go Direct Acceleration sensor to a bicycle helmet and do some impact testing.
But I have another take on this. If there was no directional indication on the strain gauges, then there is a likelihood that at least one of the gauges would have been wired correctly. And statistics would support that half would be wired right. But since all sensors were backwards, something else seems to be at work. And that something else, in my mind, is a backwards understanding of how the acceleration would be measured by the strain gauges. Remember, the key measurement of interest was the slowing of the subject, not the speeding up. Or “eyeballs out” in fighter pilot vernacular.
Fast forward to September 8, 2004. On that day, an elegant spacecraft named Genesis was returning to earth after a three year mission collecting solar wind particles on hundreds of thin wafers each a hexagon about the size of a playing card. The fragile wafers were of 15 different materials including sapphire, gold, amorphous carbon, germanium, and silicon like the one I have in my teaching collection. It would be the first sample return mission to arrive back on earth since Apollo 16 back in 1972.
Because these wafers were so fragile, a complex and Hollywood-like recovery was planned where the returning capsule would be plucked out of the air by a helicopter as it gently drifted to earth under a parafoil (like a parachute, but directional).
Remember Murphy? Well, the plan was for the capsule to detect a change in acceleration as it slowed due to the resistance of earth’s atmosphere to the tune of 27 g. A drogue chute would automatically launch stabilizing the capsule until the main chute deployed. The whole system would begin when a small acceleration sensor said it was time. Unfortunately that sensor was installed backwards thus preventing the capsule of fragile glass-like disks from making any attempt to slow down. The Genesis capsule slammed into the Utah desert while traveling 193 miles an hour.
But wait, there’s more. Meanwhile, another sample return was on its way home, a capsule full of STARDUST, well, comet dust actually. But the mission was named STARDUST. The plan here was for the capsule to eject from the main spacecraft, fly through the atmosphere as the fastest man-made thing ever, then gently land in Utah under a fully deployed parachute. Except that the STARDUST sample return capsule contained the same accelerometer as did the Genesis capsule. Luckily the documentation of the construction of the STARDUST capsule showed the correct orientation of the accelerometer and STARDUST make a picture-perfect landing even doing a “NASCAR” victory lap upon landing.
Now imagine yourself in role of accelerometer installer. Which direction will the sensor experience the necessary force to activate the drogue parachute when the capsule encounters atmosphere? Not so easy is it? Now attach a few hundred million dollars to your decision and suddenly it’s a really big deal to get it right. Not just some chimpanzee on a rocket sled or a man in a centerfuge anymore.
The Vernier Go Direct Acceleration sensor, with its onboard battery and bluetooth radio makes an amazingly powerful package that is only 26 grams and 30 cubic centimeters or about the size of a pack of gum.
Altimeter: –1,800 m to 10,000 m (-5,900 ft to 33,000 ft)
Angle: ±180°
Take a moment and consider those specification. A 10,000m altimeter? That much taller than Mt. Everest. And 200 g’s is plenty to kill a human four times over. However bacteria has survived over 400,000 g’s so don’t expect this sensor to capture the moment of g-force death of your E. Coli. But do expect it to do just about anything else you and your students can dream up.
On the 4th of July this year, a fitting date, America lost a true hero whom many people had never heard of, namely Robert Gilliland. Bob Gilliland was the chief test pilot and first person to fly the iconic SR-71 Blackbird, arguably the coolest airplane in history.
The “Zoon Hot-Air Balloons Getting Started Package” contains all the materials necessary for a class of 30 students to construct and launch their own hot air balloons. The kit is designed for students in Grades 3-12 and is user friendly. By having students follow the instructions provided in the manual, they can construct their very own hot air balloons out of the tissue paper that is provided in the kit.
The kit comes with 30 student user guides to guide students through creating their own hot air balloons. Subsequently, students can select whatever color of tissue paper that they desire to build their hot air balloon.
We found the instructions for constructing the hot air balloons to be clear and easy to follow. Moreover, the directions include helpful images to guide you through the instructions. In addition, the student user guide contains useful background information about the Zoon Balloon and a variety of balloon terms including: altitude, buoyancy, gore, temperature differential, and template. In essence, these terms will be essential for flying the balloon.
When assembling the hot air balloons, remind to students to be careful to not tear the delicate tissue paper. Holes in the tissue paper can prevent the hot air balloons from flying, so any tears or holes in the tissue paper must be mended before launching a hot air balloon. A picture of the kit is depicted below in Image 1. Image 2 is an example of what a constructed Zoon hot air balloon.
Image 1. Zoon Hot-Air Balloons Getting Started PackageImage 2: A constructed Zoon hot air balloon.
As a word of caution for time management, assembling the hot air balloons can be time consuming and could take several class periods. Therefore, by having students multiply tasks for efficiency, it would be helpful for students to work in pairs. Once the glue has dried and any holes have been repaired, it’s time to launch the balloon.
For safety, because propane hot air balloons need to be launched outside. The small propane canister needs placed in the propane cylinder base and screwed into place. Image 3 shows the propane canister on the propane cylinder base.
Image 3: The propane canister (not included in the kit) on the cylinder base.
Once the propane canister is screwed into place, students can launch their hot air balloons by placing their hot air balloon on the launcher as shown in Image 4.
Image 4: A hot air balloon being placed on the launcher
Once in position, make sure to wait for the balloon to inflate with air. Once the balloon is filled with air, students can release the balloon and it will fly. A picture of a hot air balloon in flight is depicted in Image 5.
Image 5: A hot air balloon in flight
What’s Included: – Zoon Hot-Air Balloons
o 30 glue sticks
o Box of 100 paper clips
o Zoon Balloon template
o Assorted colored tissue paper
o Zoon Balloon User Guide (30 copies) – The Inflation Station Hot Air Balloon Launcher
o Launcher Base
o 6 bots, 3 wing nuts, and 6 nuts
o Launcher legs (3)
o Torch and Igniter o Nylon wire wrap (3)
o Propane Cylinder Base – Hot Air Balloon video – Adventures in Lighter Than Air Flight booklet
What You’ll Need:
– Propane canister
– Scissors
Cost: $515.00
Edwin P. Christmann is a professor and chairman of the secondary education department and graduate coordinator of the mathematics and science teaching program at Slippery Rock University in Slippery Rock, Pennsylvania. Emily Ferraro is a graduate student in the mathematics and science teaching program at Slippery Rock University in Slippery Rock, Pennsylvania.
The “Zoon Hot-Air Balloons Getting Started Package” contains all the materials necessary for a class of 30 students to construct and launch their own hot
Welcome to guest post authors Cindy Hoisington, a science educator researcher at Education Development Center (EDC), and Claire Christensen, an educational media researcher at SRI International. This post is based on Cindy and Claire’s recent evaluation of the PBS KIDS Play & Learn Science app and activities.
Are you an early childhood educator with lots of experience doing science with children? Or are you just dipping your toes into science and STEM (science, technology, engineering, and math)? You are probably being asked to include more science in your curriculum and make connections to the other STEM disciplines. As you may know, families have a huge influence on their children’s attitudes toward doing and learning science. Family science interactions and conversations support children’s science and STEM interests and their views of themselves as capable learners. By getting families engaged, you can help them maximize their important role in promoting children’s science inquiry, interests, and self-confidence.
One way to do this is by hosting a family science event at your school or program. But where do you start? We found that the PBS KIDS Play & Learn Science app can be a useful tool for planning and hosting engaging and interactive family science events at early childhood programs.
The PBS KIDS Play and Learn Science app
The PBS KIDS Play & Learn Science app was developed as part of the Corporation for Public Broadcasting (CPB) and Public Broadcasting Service (PBS) Ready To Learn Initiative, funded by the U.S. Department of Education. It includes child and parent-facing resources on five topics: Ramp and Roll; Water Games; Shadow Play, Weather Control, and Gear Up (weather-appropriate clothing). The app is free to download on any smartphone or tablet. We did a study of the app and found that– along with supports including family science events—it positively influenced children’s science learning and vocabulary and parents’ engagement in science activities with their children.
Hosting a family science event
In order to conduct the study, we collaborated with two early childhood programs: a private childcare center in the South and a Head Start program in the northeast. As part of the study we used the Play & Learn Science app to plan and facilitate two 90-minute family science events, focused on Ramp and Roll and Water Games (Event 1) and Shadow Play and Weather Control/Gear Up (Event 2). We combined Weather Control and Gear Up since both topics relate to learning about weather. Program staff recruited interested families, provided feedback on our study plans, and helped us facilitate the family science events. In the process of implementing the study, we identified seven key strategies for hosting engaging and educative science events that get parents and children exploring, interacting, and talking together. We use the term “parent” to apply to any adult who provides primary care for a child.
Plan what, where, when, and who for the event
We found that careful planning was essential. At each family event we introduced two science topics and planned hands-on activities for each topic based on games and activities in the app. Activities were separated into separate stations (2 per topic). Event 1 focused on Ramp and Roll and Water Games and included the following hands-on activities:
Explore the Roll: Families placed a variety of objects on ramps and recorded which objects slid and/or rolled depending on their shapes and how they were placed on the ramp.
Hit the target!: Families placed a paper target on the floor and worked together to create an incline that would land a ball on the target.
Build and play with ramps: Families built ramp systems using foam blocks, cardboard, baking pans, and cove molding.
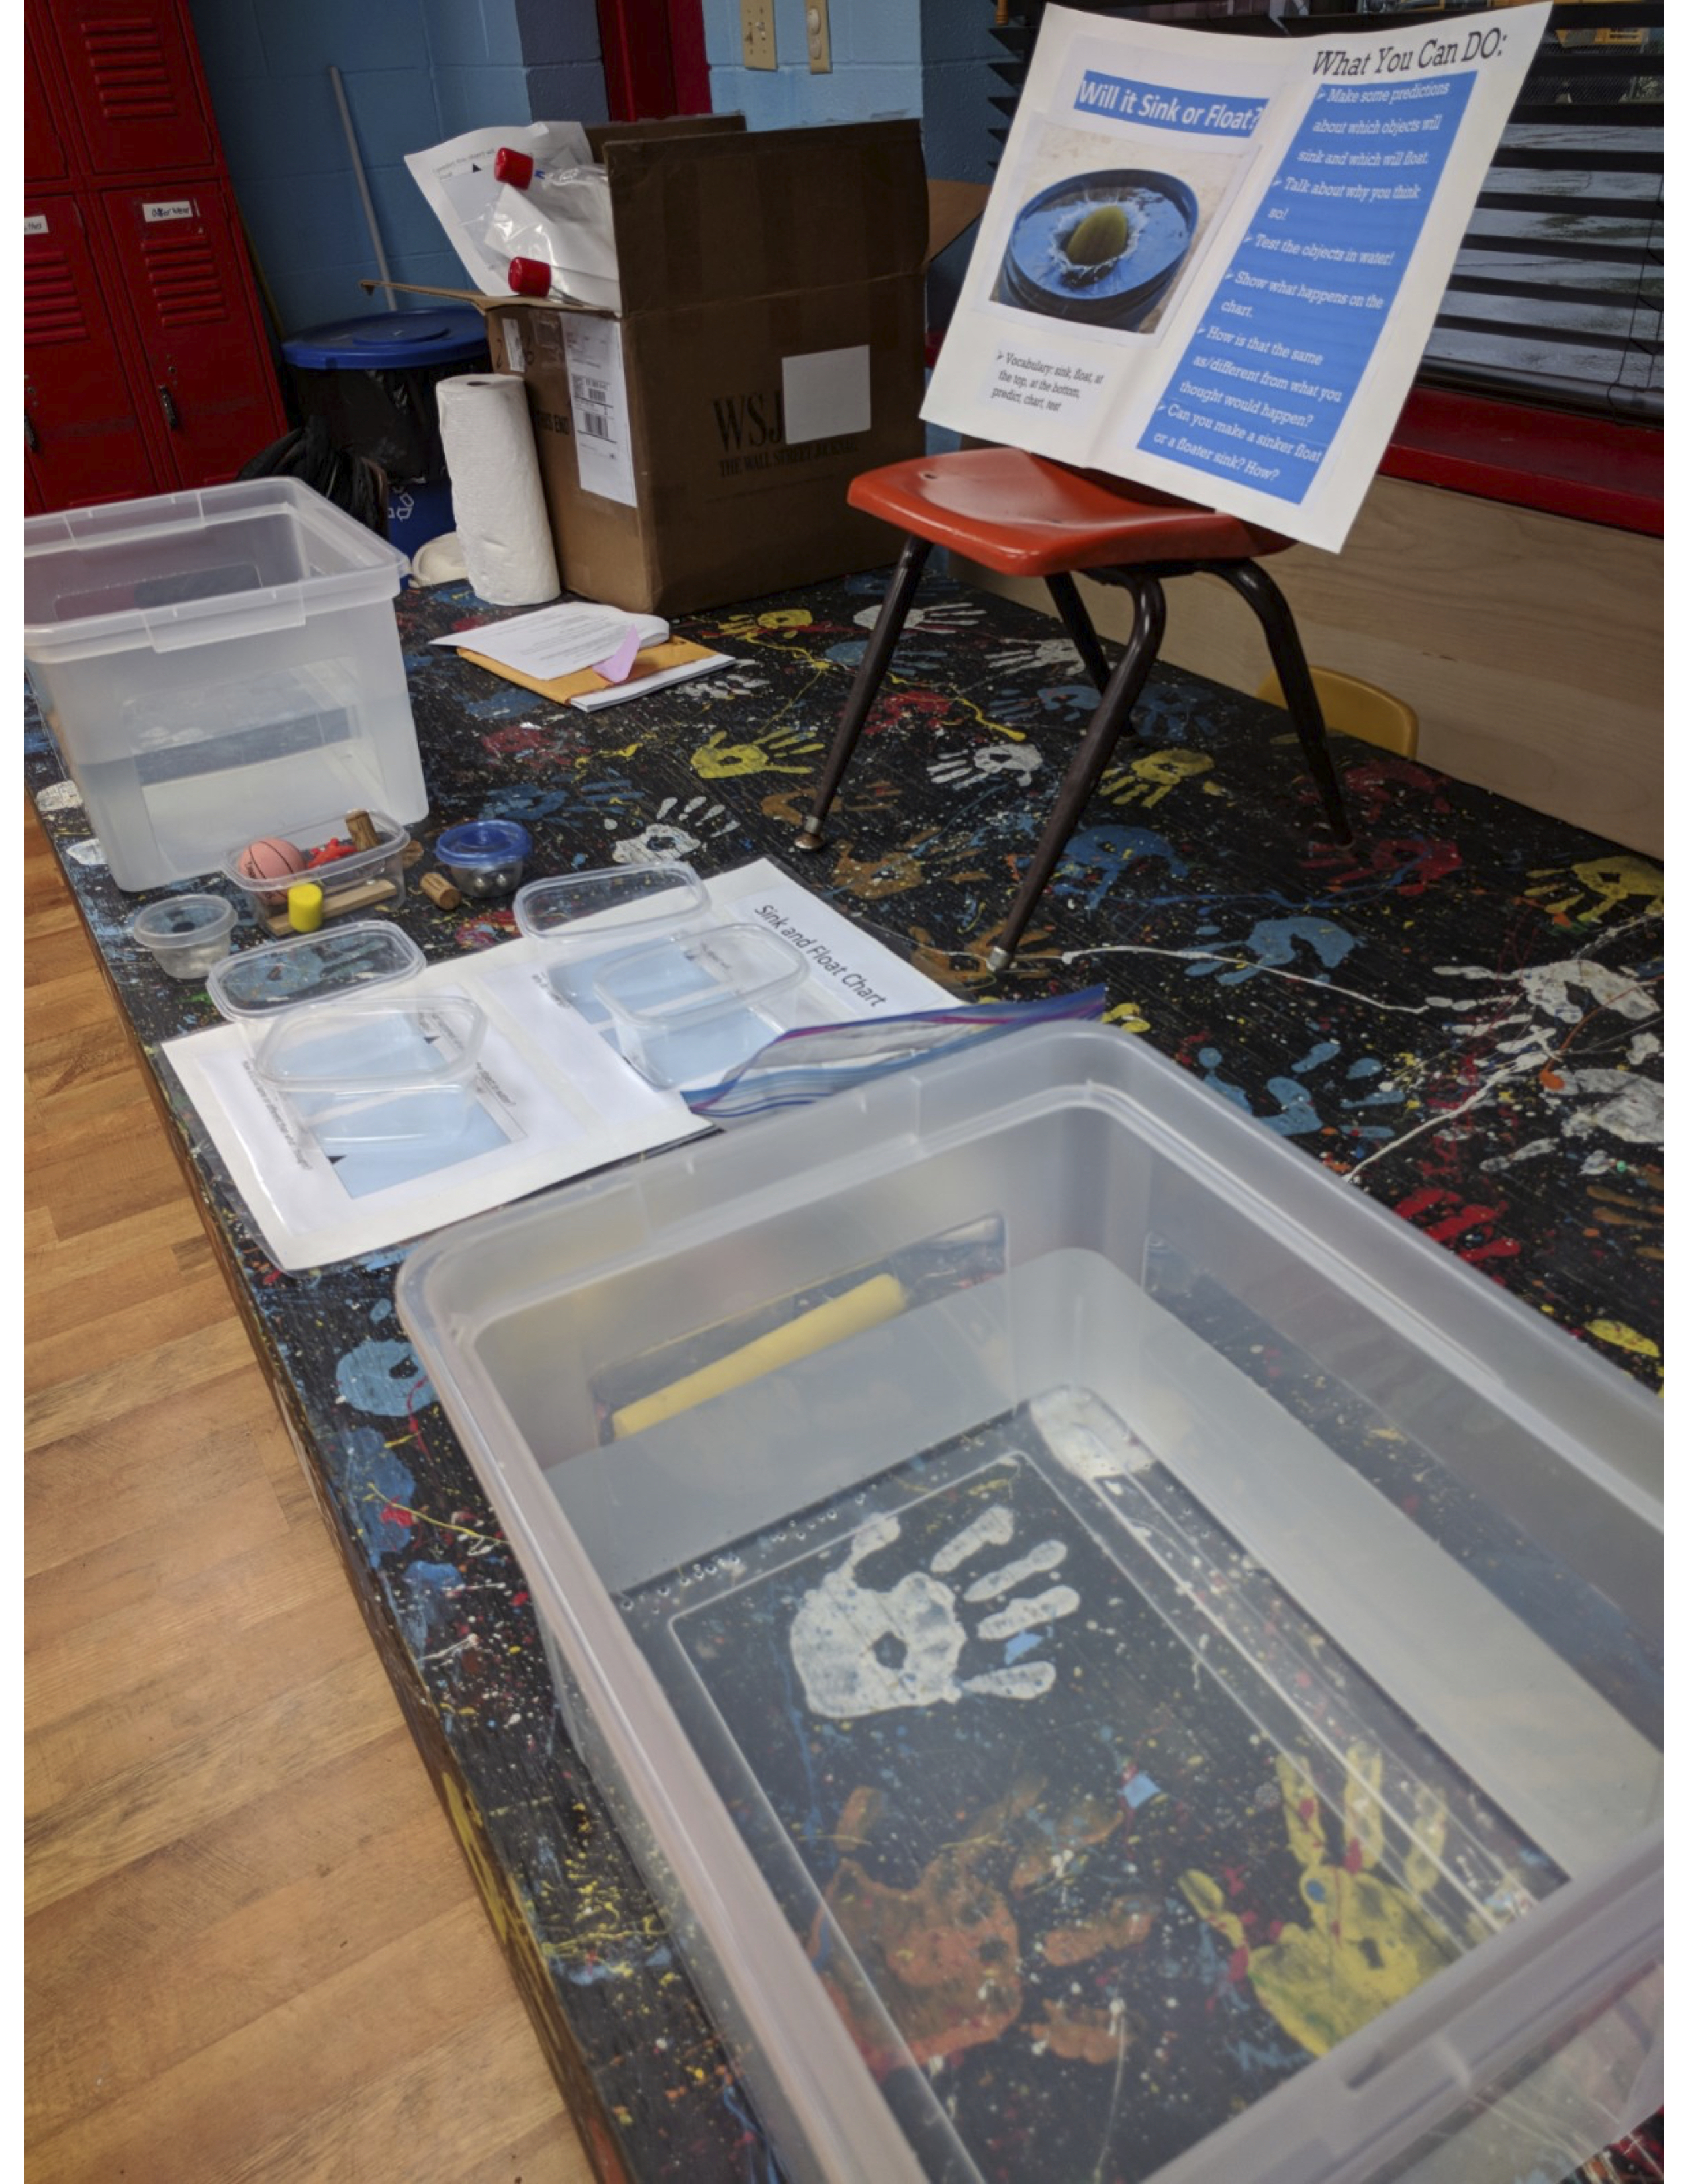
Will it sink or float?: Families made and recorded predictions, tested objects in water, recorded results, and talked about how their results compared to their predictions.
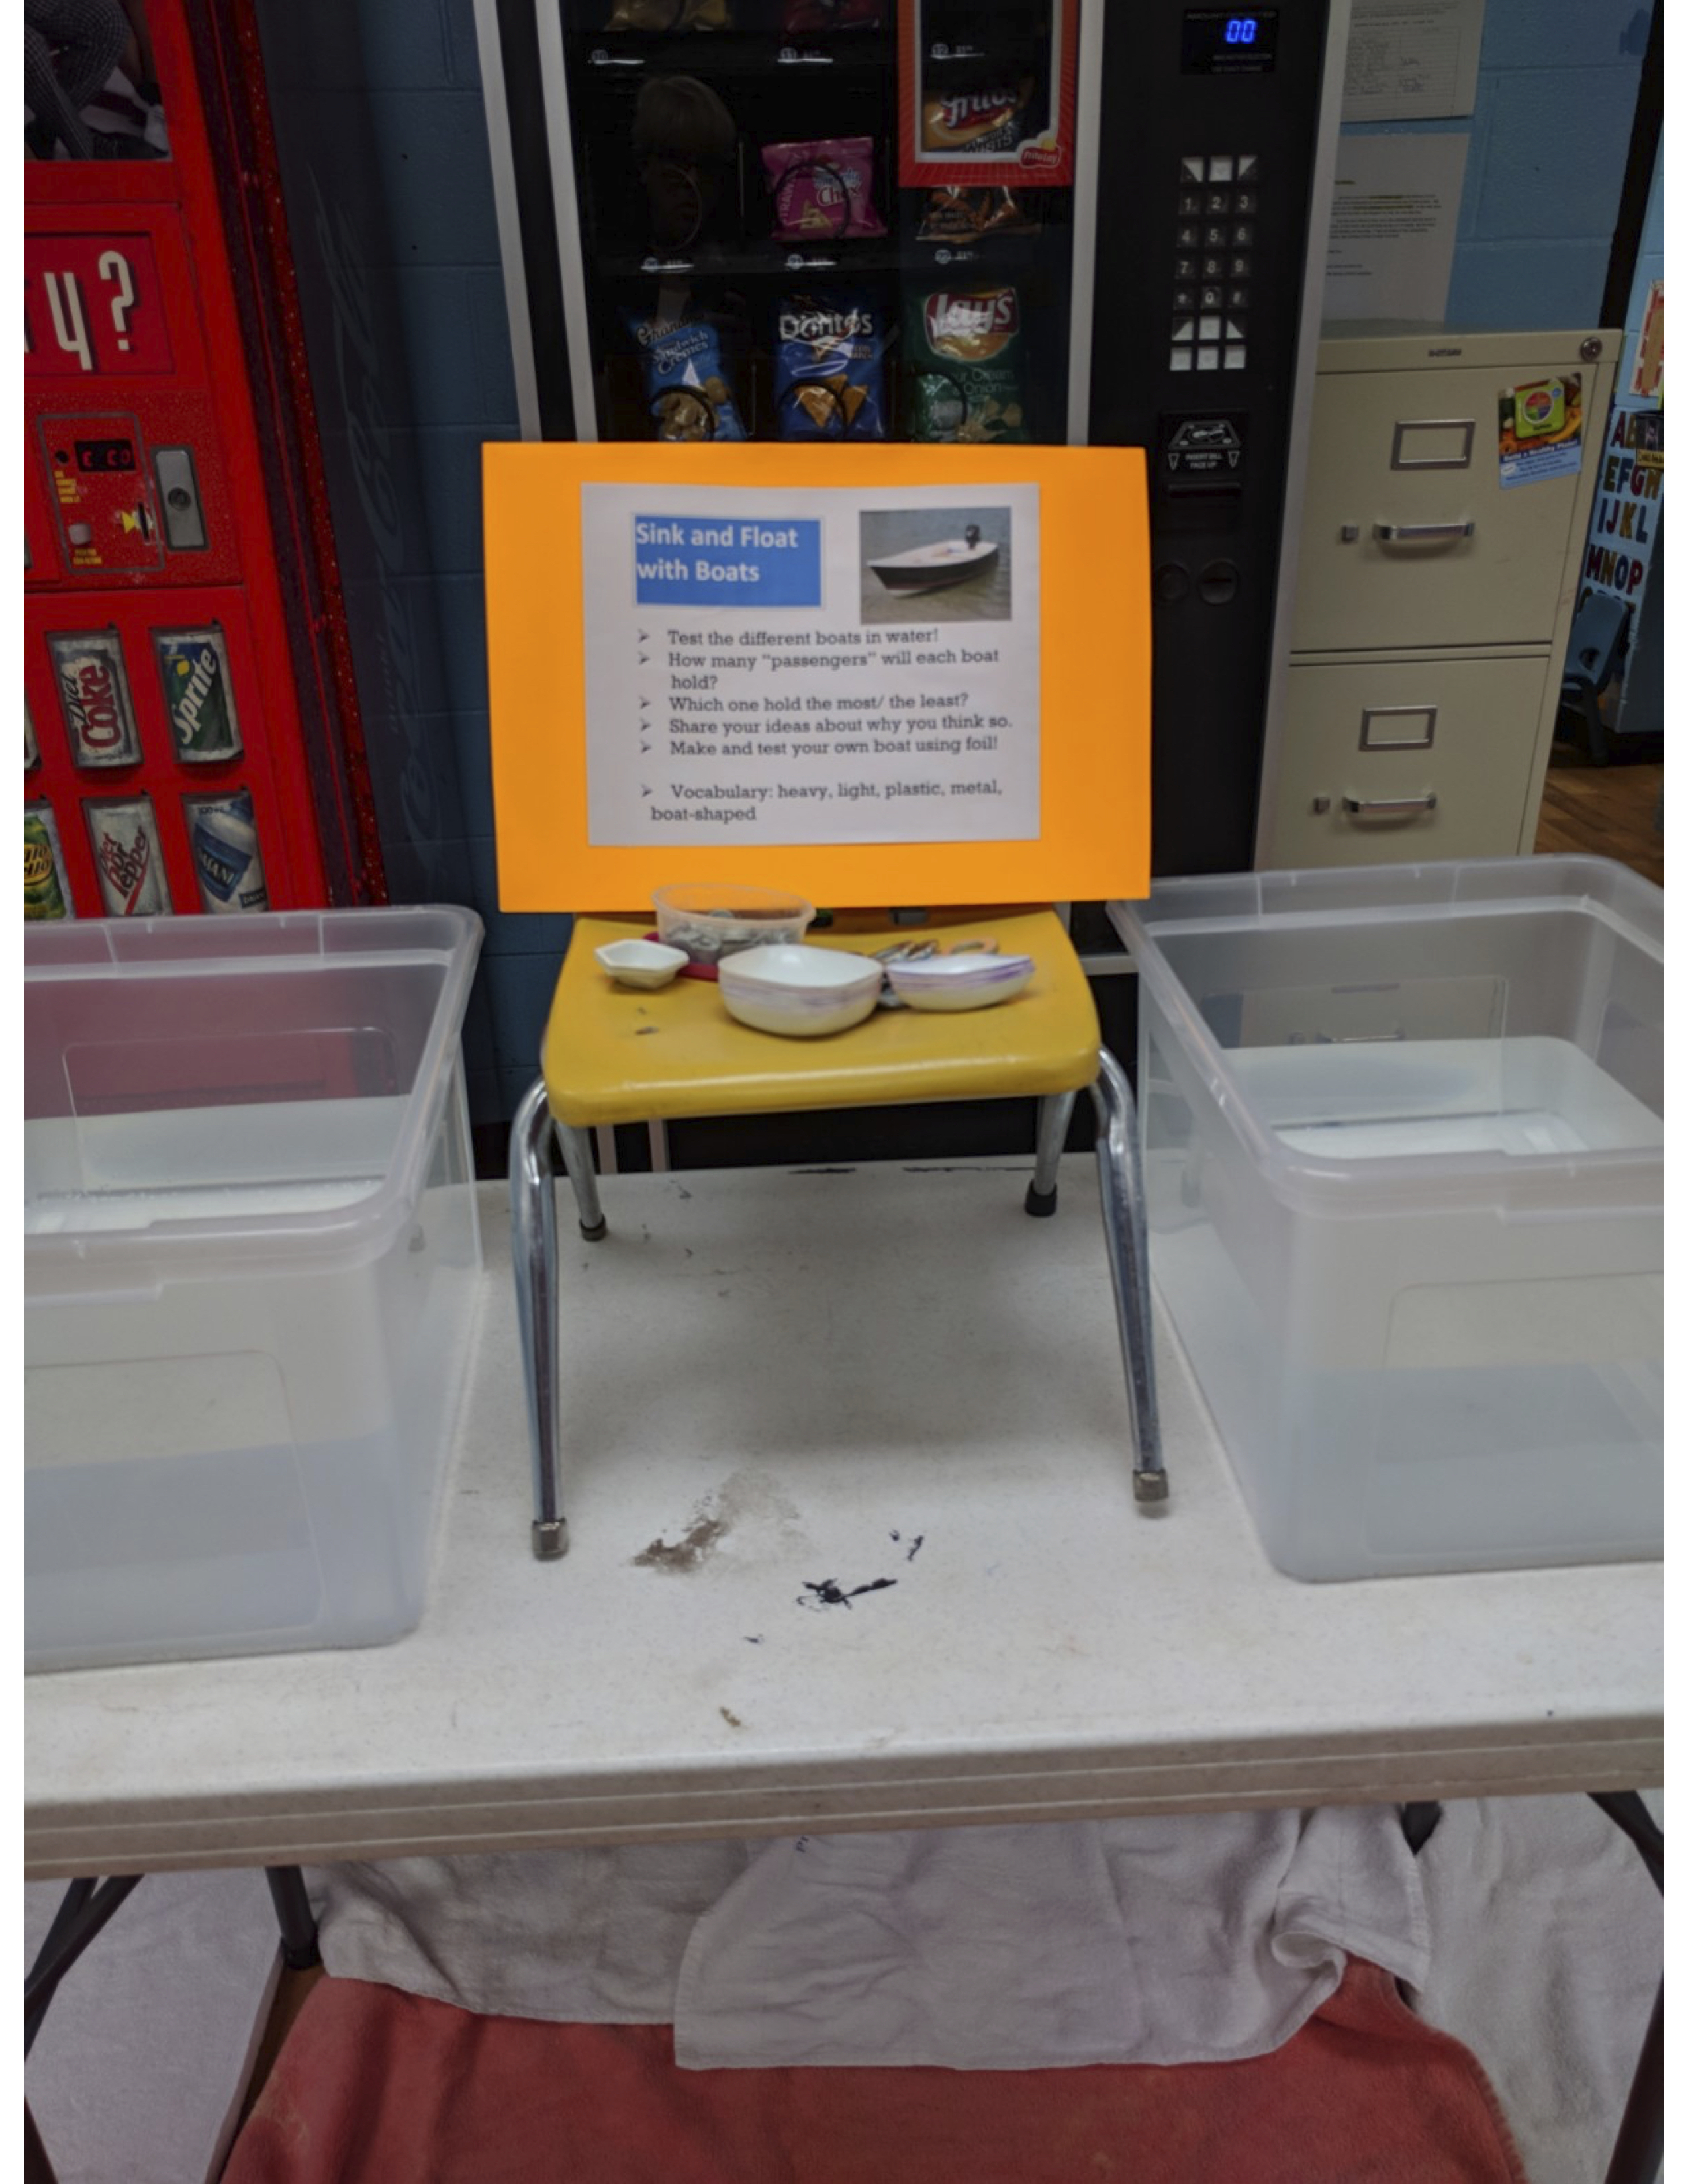
Sink and float with boats: Families tested a variety of small plastic boats in water to find out how much weight they can hold and still float.
Make and test your own boat: Families made boats from aluminum foil, tested them using metal washers as “passengers”, and recorded how many passengers their boats would hold before sinking.
Read books about ramps and sinking and floating: Families read and talked about Roll, Slope, and Slide by Michael Dahl and Who Sank the Boat? by Pamela Allen.
At Event 1 we learned that families moved through the activities more quickly than we had anticipated so we incorporated more activities into Event 2 than we had originally planned.
Event 2 focused on Shadow Play, Weather Control, and Gear Up and included the following activities:
Make shadow puppets: Families used cardstock, markers, craft sticks, hole punchers, and tape to make “puppets” and used them to create shadows on the wall with flashlights.
Create shadow structures: Families built structures with foam blocks inside a large cardboard box layered with white paper and used flashlights to make and explore their structures’ shadows.
Make flashlight shadows: Families investigated a variety of objects with flashlights and drew pictures of the shadows they created.
Trace your shadow: Families used an LED work light to make and trace their own shadows on chart paper taped to the wall.
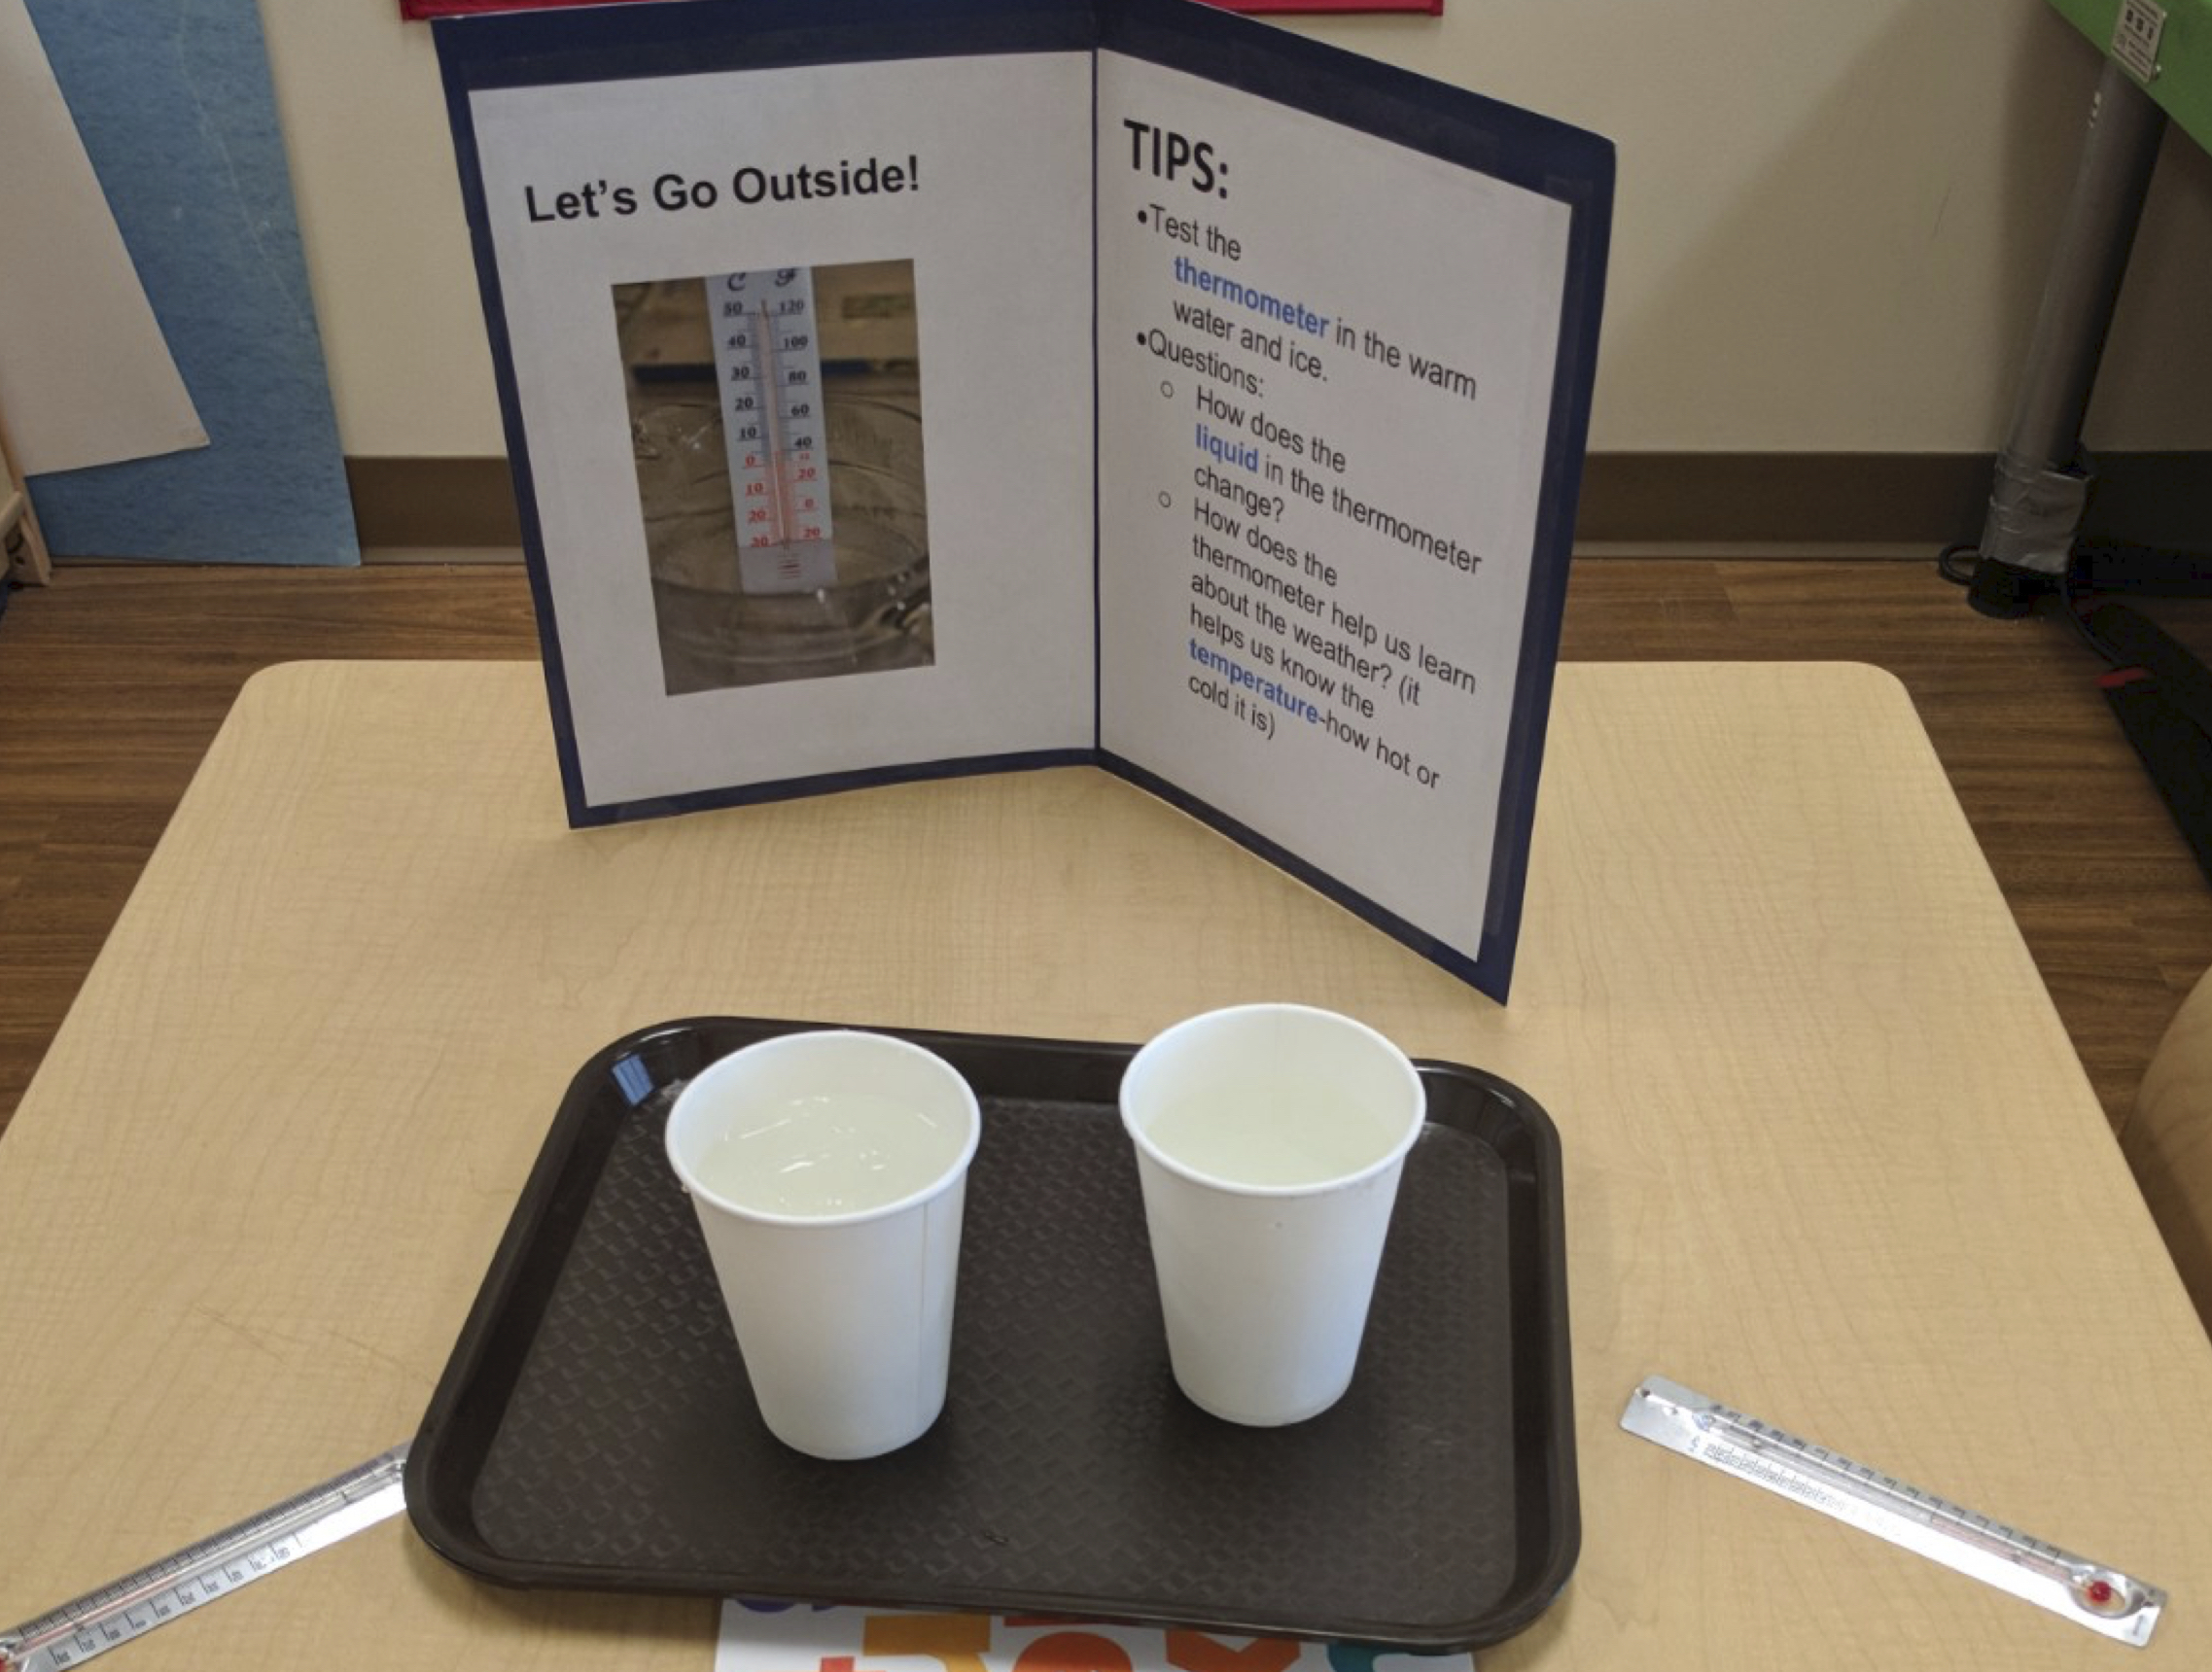
Investigate thermometers: Families tested thermometers in cups of ice and warm water to observe how the liquid in the thermometers changed to indicate temperature.
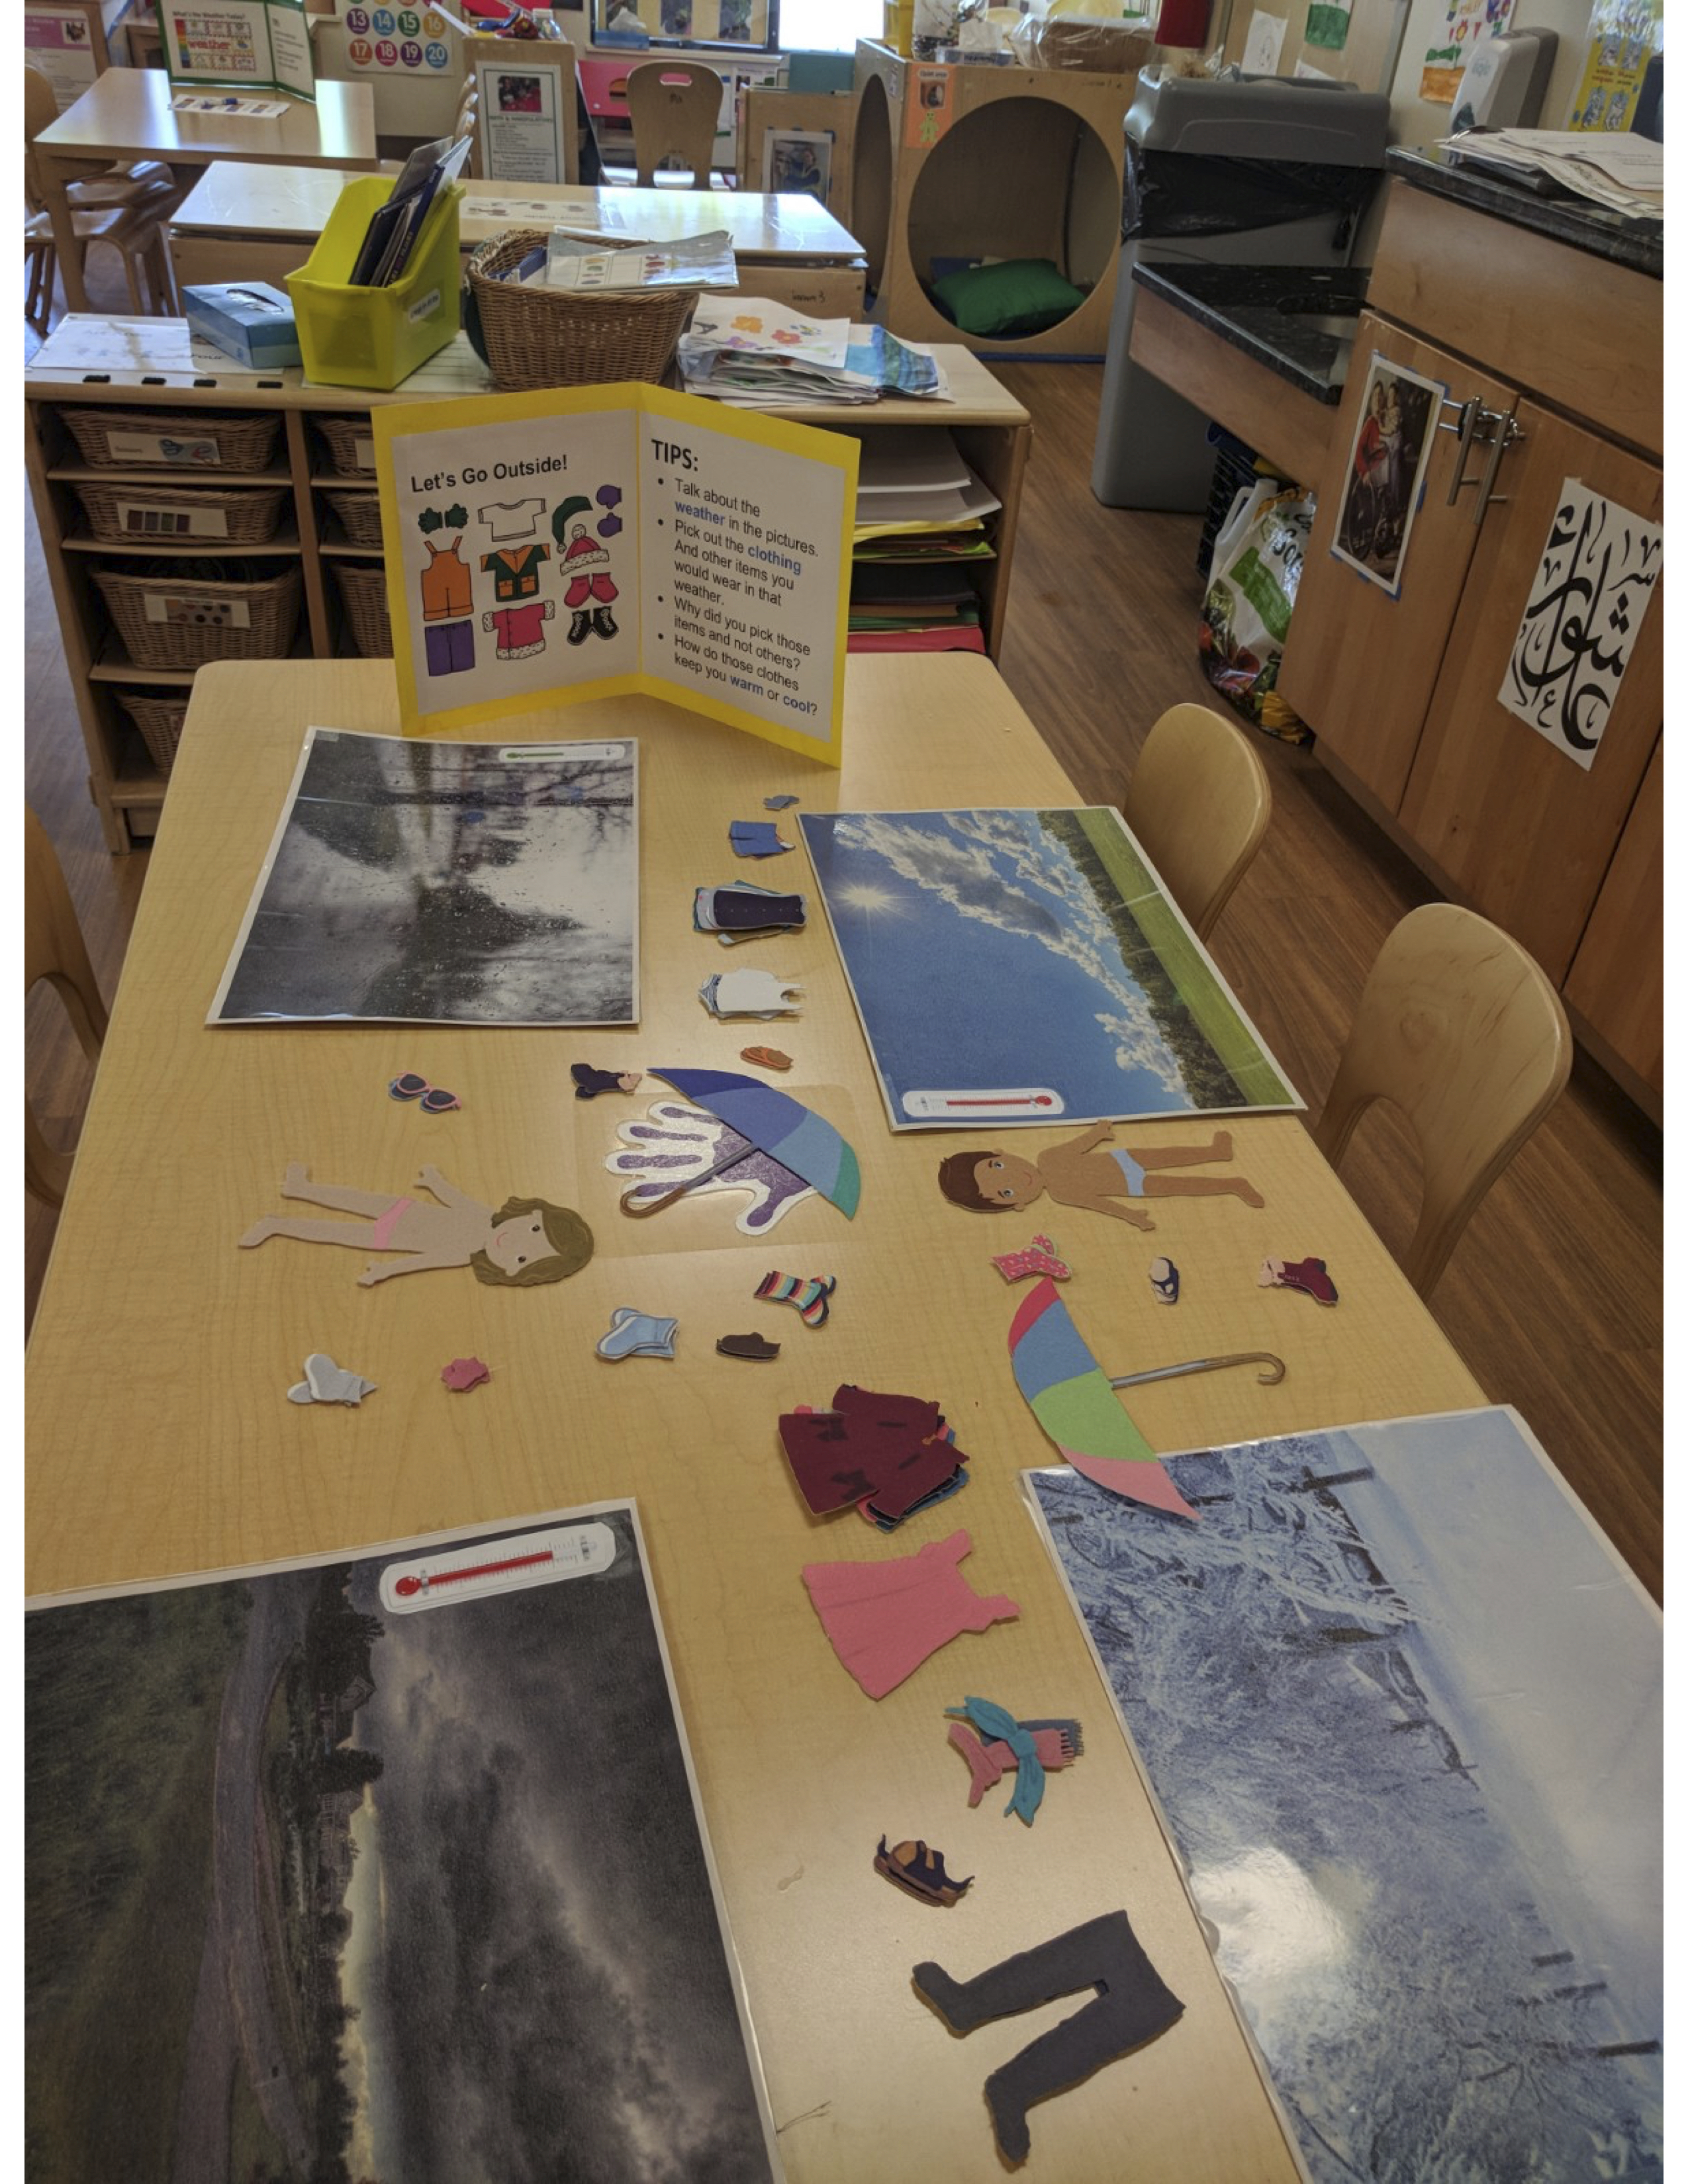
Dress for the weather: Families choose from 4 different weather scenarios and dress felt dolls for the weather choosing from a wide variety of weather-appropriate clothing.
What’s the weather today?: Based on their own observations of the weather outdoors, families filled out a weather chart and talked about aspects of weather including sun, clouds, wind, precipitation, and temperature.
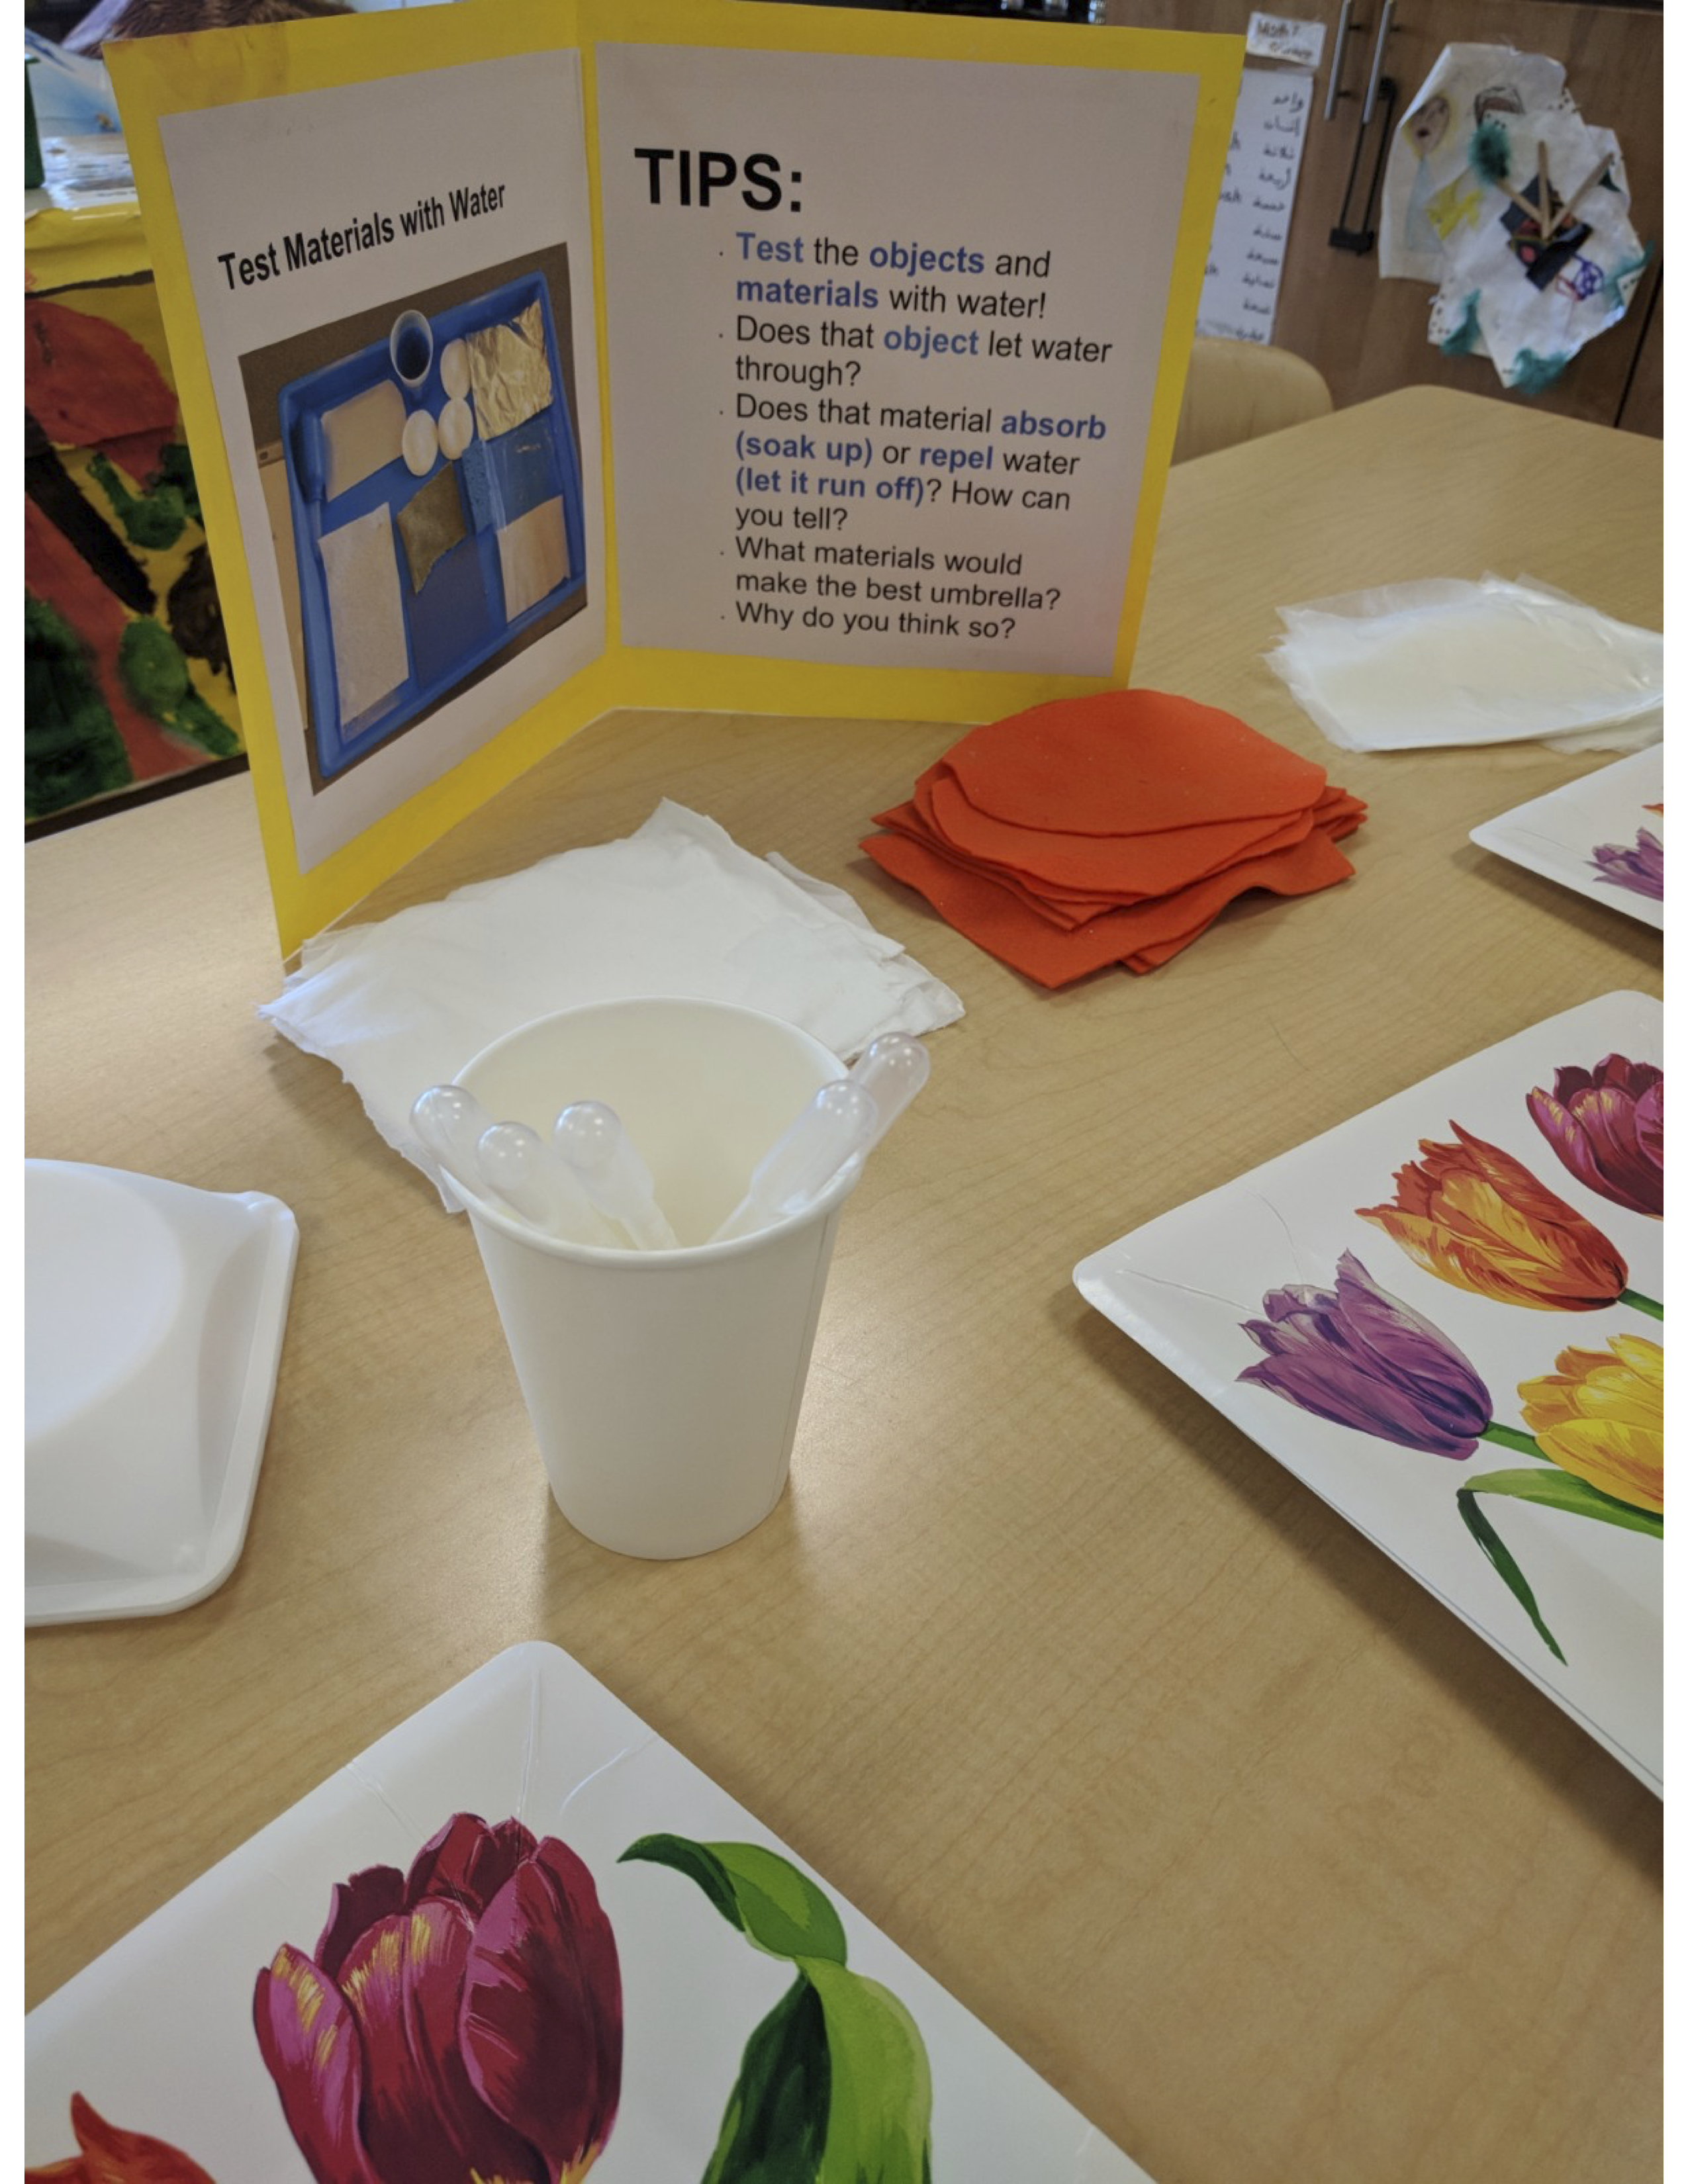
Play with umbrellas: Families explored and role-played with different types of umbrellas and talked about how their sizes, shapes, and materials umbrellas make them useful for staying dry in the rain.
Test materials with water: Families tested pieces of felt, cotton, plastic, and paper towel by dropping water on them with plastic pipettes and recording which material would be best for staying dry in the rain.
Read books about shadows and weather: Families read and talked about Shadows and Reflections by Tana Hoban (wordless picture book) and Weather words and what they mean by Gail Gibbons.
We applied what we learned from Event 1 to our planning of Event 2. For example, at Event 1 families moved through the activities more quickly than we had anticipated so we added more activities to Event 2 than we had originally planned. We also learned that it was important to have plenty of space between stations and activities in order to avoid traffic jams. At Event 2 we assigned one facilitator the task of guiding families to less crowded activities. We planned both events to begin at one hour after pick-up time to accommodate family schedules and found that we needed that time to set-up the activities before families arrived. We created “passports”—large index cards with labels and picture cues of each station to help families navigate independently. Once a family completed a station they received a sticker to put on their passport. We collaborated with program staff to make sure there was a facilitator available at each station to encourage family participation, support parent/child interactions, and keep the activities organized.
Create a welcoming atmosphere
Entire families were invited to each event, including the preschoolers’ siblings. Having a staff member available to provide childcare enabled parents to focus more attention on their preschooler. Both events began with pizza and salad so parents wouldn’t have to worry about rushing home to make dinner. Finding enough space to accommodate 15-20 families for a meal was a challenge and we tried a conference room, a large classroom, and a gross-motor space. At the first event we gave a short talk about families’ important roles in sparking children’s interest and excitement in science, quickly realizing that we needed to keep our remarks brief since children were eager to get to the activities. We identified the exploration activities and where they were located, distributed the passports, and sent families off to explore.
Keep the focus on parent/child interaction and talk.Our primary goals were to show parents that science inquiry and learning can be active, engaging, and playful and to encourage them to explore, interact, and talk with their children during the activities.
We intentionally chose activities that were easily accessible to all parents—no specialized science knowledge required! We found that activities in which children needed adult support—for recording predictions and results of an investigation for example– were most successful in promoting parent/child interaction. We also found that how we arranged the chairs at each activity was critical in supporting parent/child interaction. Parents were much less likely to sit with their child at an activity if they thought a child was waiting for a seat. One challenge was finding seats for adults who were not comfortable sitting in preschool-sized chairs.
Directly facilitate parent/child inquiry and interaction.
Directly before each of the events, we met with program staff who would be facilitating the activities, reviewed our plans, and suggested a variety of specific strategies they might use to promote parent/child interaction. These included 1) encouraging parents to observe their children’s play and point out science connections—for example drawing attention to the perseverance and problem-solving involved in creating a ramp system; 2) modeling talk tips parents might use such as Do you think the car will still roll if you turn it upside down?; and 3) suggesting challenges parents and children could address together such as How can you create one shadow with both of your bodies? We found that some parents wanted to explain science concepts to children by telling them for example “all heavy things sink”. In this case facilitators were encouraged not to correct parents, but to gently challenge their ideas by asking for example What about this big heavy wooden block? Do you think it will sink or float?
Create signage to support inquiry and interaction.We created clear signage for each activity that included questions parents might ask to spark inquiry.
Our signage was in English only, but we highly recommend providing signage in all languages spoken by the families. Signage at the roll and slide activity included What is similar about all the objects that rolled? and How can you turn that object to make it slide? and signage at the shadow tracing activity included What happens to your shadow when you move closer to/farther from the light? and How can you change the shape of your shadow? We found that parents used these questions more often when we drew their attention to the signage and provided explicit modeling.
Provide resources for at-home science activities.All of the activities at the events featured familiar household materials and required minimal set-up. We provided paper-based directions for each activity—including talk tips and extension ideas—to support families’ home explorations. We were also able to give families some take-home materials such as small LED flashlights, sidewalk chalk for tracing shadows outdoors, child-safe thermometers, ping pong balls and paper targets, and plastic eyedroppers for water explorations. During dinner at the second event we engaged families in small group discussions about their home experiences. We were impressed to hear families talk about how they had extended children’s ramps and water explorations to the playground (rolling balls down slides) and to bath-time (exploring sinking and floating in the tub). Parents’ enthusiasm was contagious as they shared their children’s on-going interest in the topics they had explored at the first event and how much they and their children were anticipating the second one.
Consider incorporating digital technology.As well as the parent-facing resources we used to plan our family science events, the PBS KIDS Play and Learn Science app includes developmentally-appropriate digital science games for preschoolers. We incorporated parent/child tablet use at each station along with the direct, hands-on explorations, pointing families to the game(s) in the app most relevant to the science content they were exploring at that station. We found that integrating tablet use within stations—rather than introducing them separately— helped parents and children make explicit connections between their digital and real-world investigations. We also used the tablet activities to familiarize parents with the parent-facing resources in the app—including the hands-on activities, extensions, and talk tips.
Keep in mind that an app with parent science supports can be a useful tool for planning and hosting family science events and supporting children’s inquiry whether or not you decide to incorporate digital games.
In conclusion
Parents can be powerful mediators of their children’s science experiences, but science can be a challenging domain for parents to support, especially when they lack access to information and resources about children’s development and learning in science. By engaging families at your school or program, you can be instrumental in helping them maximize their critical role in supporting their children’s science inquiry, interests, and confidence. We were fascinated to observe how early children’s specific science interests begin to emerge as we observed individual children return again and again to their favorite ramps, water, shadows, or weather activities. You can be even more effective in supporting families when you align children’s home and school science explorations. Teachers and administrators at the programs that participated in our study were so amazed at the enthusiasm families expressed about the science events, that they decided to continue the topical explorations in classrooms.
Below are some suggestions for other free educational apps that include child, parent, and teacher-facing resources as well as some teacher-friendly research articles about supporting children’s and families’ inquiry-based science experiences.
Welcome to guest post authors Cindy Hoisington, a science educator researcher at Education Development Center (EDC), and Claire Christensen, an educational media researcher at SRI International.


 I find it challenging to engage elementary students in the life sciences. What are some hands-on activities that work? Are there anchoring phenomena that you recommend?