
Feature
Start With Art
Using perspective to guide an interdisciplinary STEAM unit

CONTENT AREA Life science
GRADE LEVEL 6–8
BIG IDEA/UNIT All living things are made of cells, either one cell or many different numbers and types of cells.
ESSENTIAL PRE-EXISTING KNOWLEDGE Microscopes are tools that have altered scientists’ view of living things. Cells are the smallest unit of living things. Organisms may be single-celled or multi-cellular.
TIME REQUIRED Five to six 45-minute class periods for the main portion of the project in science class. Three to four 45-minute class periods in art. One to two 45-minute class periods in math.
COST Approximately $25 for Anacharis plants and cost of prepared cheek cells (assuming all microscopes and slide-making supplies are already available).
SAFETY Students follow safety procedures, such as wearing safety goggles, taking care when using the dissecting scissors and forceps, and washing hands after completion of the lab.
In recent years, schools have begun to shift from STEM to STEAM curricula, integrating the Arts into Science, Technology, Engineering, and Math programs. Early research on STEAM education shows that STEAM-based curricula increases student engagement and motivation, and helps create real-world connections for students (Kang et al. 2012 as cited in Quigley, Herro, and Jamil 2017). The inclusion of the arts can also foster the development of traditional STEM skills, like analysis and problem solving (Land 2013). However, educators experience little “guidance on how STEAM is different from STEM” and can be left to integrate the arts in limited and cursory ways, such as drawing a picture of a science concept after completing a lesson on the topic (Quigley, Herro, and Jamil 2017, p. 1).
As a middle grades science teacher, I have often struggled with this intentional and meaningful integration of the “A” into my STEM-based activities and units. My perspective changed the first day I met our art teacher, who asked if I wanted to collaborate on a project about cells. Her inspiration for the project came during a visit to the University of Michigan’s children’s hospital where she noticed an “Art Under the Microscope” display—artwork created by photos taken through microscopes. Inspired by the art–science connection, she researched how to incorporate this idea into her sixth-grade class, tying it to the science class cell unit. Her research led to the artwork of Ruben Sandoval, a microbiologist working at Indiana University. Initially, Sandoval’s aim was to use images taken under his microscope to create an interesting computer desktop background. He began tessellating the cell pictures he was observing for his research. Sandoval noticed that the tessellations created beautiful pieces of artwork but also led researchers to look at the parts of the cell in new and different ways.
Observing and modeling
Artistically, the goal of our project was to encourage students to create works of art from a unique perspective, a concept that challenges students to present subject matter in a new and different way. In completing this project, students worked from an artistic lens to explore the scientific concepts of cell biology and the mathematical concept of geometric transformations. Scientific observations from the activity are used later in the unit to address student questions about the organelles observed, their individual functions, and how they work together to make a cell function. This activity also helped students connect how the shape of cellular components are directly related to their function. For example, by observing the thick cell wall in the plant cells compared to the thin, flexible cell membrane in the animal cells, students better understand the supportive function of the cell wall versus the cell membrane.
Students began by viewing prepared images under the microscope and modeling them on paper. Then they learned how to create their own wet mount slides. They took samples of an Anacharis plant and created a slide from their sample (see Figure 1). (Anacharis is also known by the name Elodea and is available for purchase at pet stores that sell aquarium supplies). Students followed safety procedures, such as wearing safety goggles, taking care when using the dissecting scissors and forceps, and washing hands after completion of the lab. The students observed the Anacharis plant sample under three powers of magnification and sketched their observations, adding as much color and detail as possible (see Figure 2). Over a period of two to three days, students created their own slides and sketches but worked in pairs or triads to share the microscopes. A great deal of collaboration took place as they helped each other focus microscopes and viewed each other’s samples, naturally comparing and contrasting their findings. The students repeated the process with prepared slides of cheek cells, sketching and labeling both low- and high-power magnification (see “Cell Observation Worksheet” in Online Supplemental Materials).

Anacharis plant cells, 400x magnification
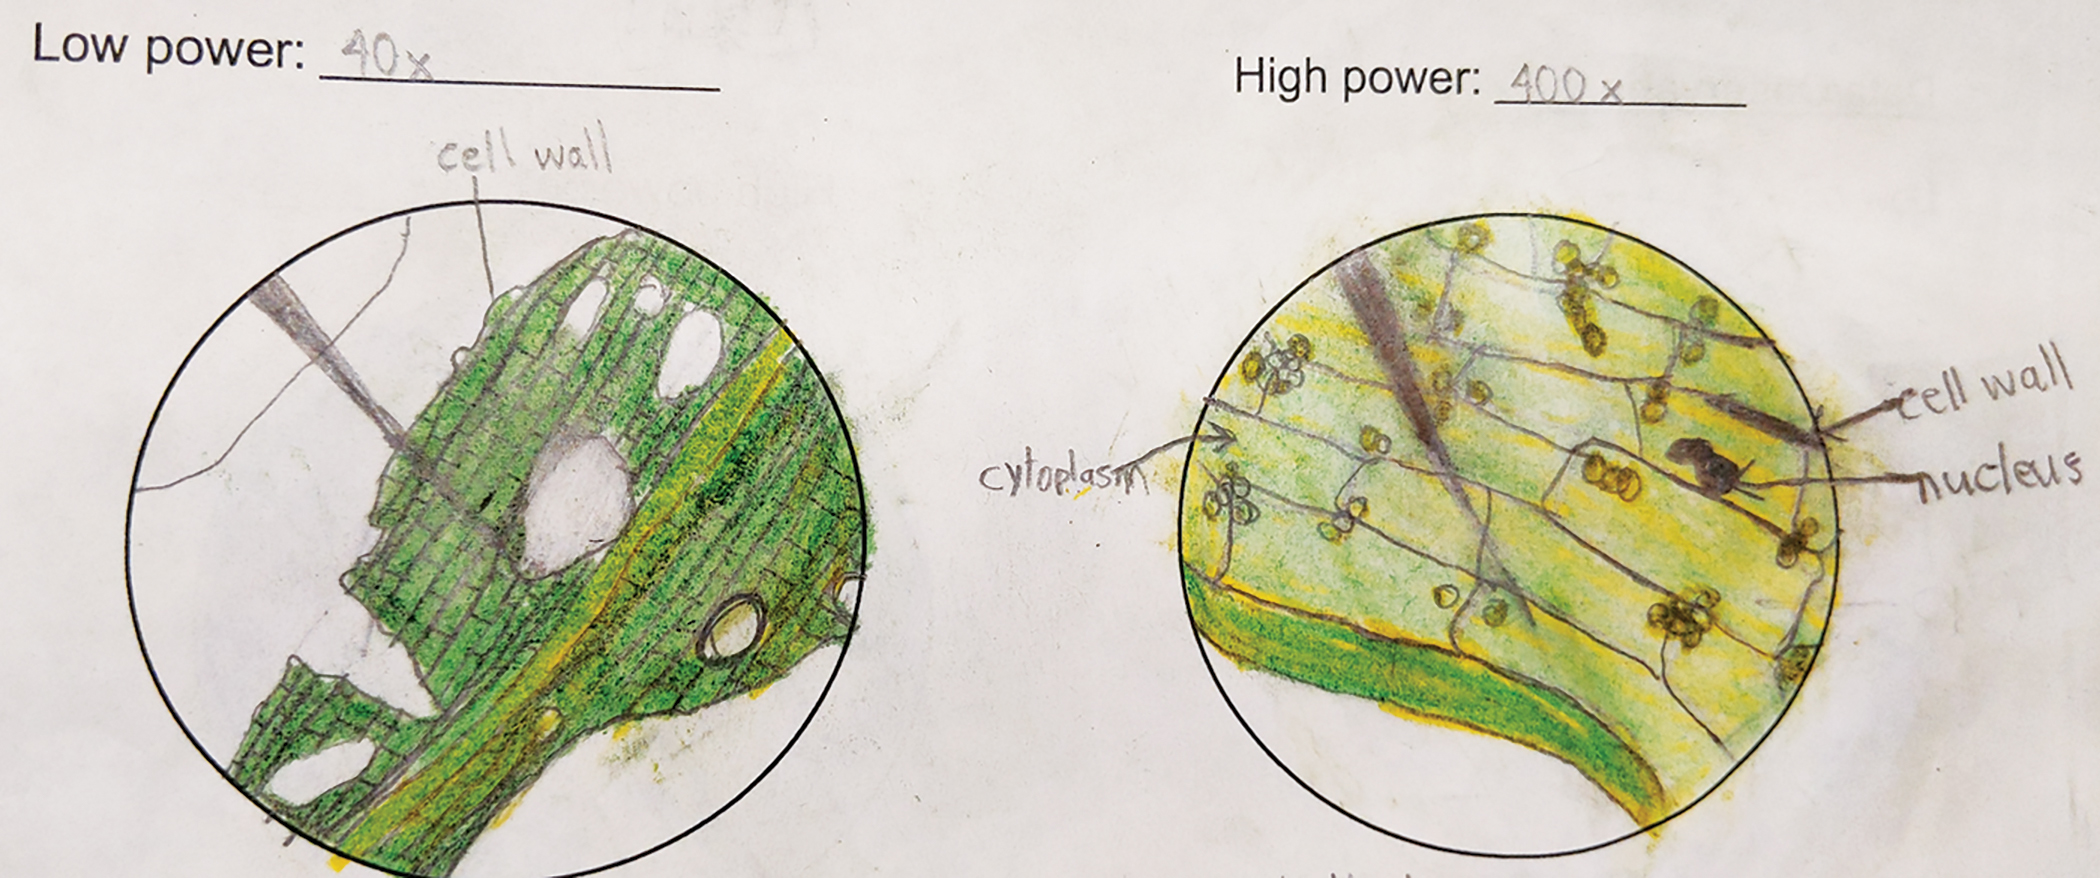
Student sketch of Anacharis plant cells at various magnifications
When doing this activity, students should aim to complete observations and sketches within one class period. If students do not finish their sketches in one class period, it is extremely difficult to find the exact view from the previous day to continue their sketches. If they complete the sketches under one or two different powers of magnification and continue with the rest on the following day, they may have sketches of different areas of the sample. While still a scientifically valid lesson, this approach detracts from the concept of perspective and the phenomenon of “zooming in” on the sample.

Timeline is based on the school schedule of science and art classes occurring four times per week for 45-minute class periods.
The process of sampling, slide making, observing, and modeling can last up to a week, depending on the availability of microscopes and the time the students devote to their observations and sketches. Students who moved more quickly through their slide-making and sketching process had access to other prepared slides, which they compared to their sketches of both the Anacharis and prepared cheek cell slides (see sidebar “Timeline of Project Completion”).
Comparing
After the sketching process was complete, students identified similarities and differences between their sketches of the Anacharis plant and the cheek cells. They immediately noticed the change in perspective between the levels of magnification and described how their drawings look like someone had taken a camera and “zoomed in” on their sample. They noticed the different shapes of the plant and cheek cells, and began to discuss their hypotheses of why plant cells appear more angular and rigid than the cheek cells. At higher levels of magnification, students identified some basic organelles, such as the cell wall and nucleus, which led to more in-depth study on the structure and function of each organelle later in the cell unit.
While the students worked through this process of sampling, slide-making, and modeling, they were called individually to put their wet mount slides on a compound microscope connected to the eyepiece of the class document camera. (If a document camera is not available, or for a time-saving strategy, students may capture images from the microscope using cell phones. Directions for using personal devices like cell phones to capture images from microscopes can be accessed in the article “Cells on Mars: Incorporating Personal Devices to Develop Argument-Driven Inquiry” [Sutton 2018].)
If time allows, I prefer to use a document camera, which is connected to the smartboard and allows the rest of the class to view classmates’ samples. It also provides an excellent view of the cytoplasmic streaming of the chloroplasts in the Anacharis plant; the students are very excited to see the movement of these organelles on the smartboard. For each student, two images were captured with the document camera: one at high power and one at low power, for both plant and animal cell slides. The four images captured for each student were transferred from the document camera to the computer and saved in a shared Google Drive file. The file was then shared with the art teacher and students for later use in art class. This portion of the project is very tedious and time-consuming, usually spanning two to three days while the students are working with their sketches. It is crucial to name each image file correctly when saving, so the students can identify and work with the images in art class. We used a three-word naming system that identified the student’s name, type of cell, and magnification level (e.g., “Josh plant low” and “Josh skin high”).
Math connections
Art connections
As the math teacher was concluding the geometric transformations lessons and students finished capturing their cell images, the art teacher began to further develop the idea of perspective with students. With assistance from the school’s technology coordinator, the art teacher downloaded the Photoshop Express app and LiveCollage app onto the classroom set of iPads (both apps were free; the Photoshop Express app is specifically for mobile devices, and LiveCollage is available for both Mac and PC as well as mobile devices).
Using these apps, the students chose one of the four cell images captured in science class that they found unique or interesting, paying attention to contrast and interesting shapes or lines. They loaded the image into the Photoshop Express app and cropped a segment of it into a square shape. The students manipulated the color of the image or added filters. After saving the cropped image, they rotated and flipped the image horizontally and vertically. These new images were then saved and loaded into the LiveCollage App and added to a 16-square grid to complete the tessellation. The resulting piece of artwork was then printed in color and displayed in the school (see sidebar “Cell Tessellation Directions”). The process of choosing, manipulating, and printing the final images takes three to four days in art class. While the tessellations are beautiful, they also helped student scientists and the school community to see the cells in a different way. See Figure 3 and “Cell Tessellation Rubric” in Online Supplemental Materials.
Integrating other science concepts
- Log in to Google Drive using the given login and password.
- Open the different folders of photos and find your photos. Choose the most interesting photo. Chances are, it will be your plant cell photo. You are looking for contrast and interesting shapes and lines.
- Once you choose a picture, go to the corner where the three dots are located (***) Choose send a copy>save image.
- Go to Photos on the iPad and find your photo in the camera roll. Once you know it is there, open the PS Express App.
- Once in the app, edit your image. Click on the photo to open it. The first thing you will do is crop the photo.
- Choose the crop tool from the menu at the very bottom of your iPad. Then, choose the Square format. Drag the image to where you like it and it makes an interesting composition. Crop out the pointer from initial photograph.
- Once you’ve cropped the photo to be square, you may edit the color if you would like. The options that are probably going to make the most dynamic effects are the pop color or nature filters. You may experiment with those. If you like it the way it is, do not apply a filter.
- Save the image once you like it.
- NOW IT’S TIME TO CREATE A TESSELLATION WITH YOUR IMAGE!
- Go back to the crop tool and choose rotate>flip horizontal. Save.
- Open that image again and choose rotate>flip vertical. Save.
- Go back to the original photo and choose rotate> flip vertical. Save.
- Your photo should be saved in four different rotations.
CREATING THE TESSELLATION:
- Open the LiveCollage App.
- Choose Collage.
- Find the collage option that is a 16-square grid.
- Add the images to create the tessellation as shown in the example.
- Save when you are finished.
- We will print it to special paper in color when it is complete.
Reflection
Across disciplines, the artistic theme of perspective was employed to create a project that was highly engaging, conceptually challenging, and visually stunning. This project evolved from a real-world experience with the artistic, creative side of the spectrum, which encourages divergent thinking. Divergent thinking skills are important when considering multiple perspectives in problem solving, which is an essential STEM skill (Oner et al. 2016). In this way, we not only incorporated creativity as an additional piece of the cell unit, but we also used it as a guiding principle for multiple disciplines. It was an interdisciplinary undertaking where teachers contributed their expert knowledge to connect to the learning objectives. Each discipline contributed specific knowledge, skills, and content that were used within one another, a key factor in interdisciplinary projects (Quigley, Herro, and Jamil 2017).
This authentic, successful STEAM project had extensive cross-curricular collaboration, co-planning, and learning that occurred in each discipline (Oner et al. 2016). For nearly a month, students were immersed in a study of perspective via the examination of cells in science, geometric manipulation in math, and using technology to create a visual arts piece. Instead of viewing the “A” as an extraneous “add-on” to our STEM lessons, beginning with creative and artistic concepts as the backbone of the project created a rich, rewarding STEAM experience for students in a variety of disciplines.
Julie LaConte (jlaconte@rossmanschool.org) is a science teacher and Erica Spangler is an art teacher, both at Rossman School in St. Louis, Missouri.
Interdisciplinary Labs Life Science Teaching Strategies Middle School