
To our Chapter and Associated Group Leaders: HAPPY NEW YEAR!
By Teshia Birts, CAE
Posted on 2012-01-06
 So, another year, another set of goals (or resolutions) made. That goes for us at NSTA as well. Over the past few months, we’ve discussed lots of new ideas and projects to support our members and other constituents. I’ve focused on what will benefit our state chapters, associated groups and student chapters. Resources that will help these leaders set a direction that will move their organizations forward.
During the fall conferences, our team (Howard Wahlberg, Ken Rosenbaum and myself) listened to a lot of teachers; they discussed their challenges both in and outside the classroom. I know from experience that when you add running a small association (local, state or national) to that mix, those challenges are multiplied.
So, we’re wondering, what can we do to help? Here are a few ideas…some are already in the works; others we’re still batting around.
- Re-establish quarterly newsletters to the chapter and associated group leaders. This project is actually in the works and we hope to have the first edition in your e-mailbox by March.
- Frequent conference calls and webinars. In talking to a few chapter leaders in Districts I and II, they asked if we’d create a forum for them to come together more frequently to share ideas and network. We’re certain doing this in targeted regions across the country will help a lot of leaders.
- Creating a Chapter & Associated Group Resource Center on the NSTA website. As staff, we’re connected in more ways than one. We receive great ideas from many of you; we also network with other association execs that do what we do. We’ve collected and have access to content, templates, samples and just general information on an array of topics like membership, programming, social media, board relations and so on. This knowledge needs to be centrally located and shared among all of you!
We have other ideas percolating as well, but these are just a few. The main point we want you to remember: NSTA is here to support you! Having strong, grassroots partner organizations is essential to supporting (and growing) this profession and NSTA is committed to do what we can to help!
What do you think we can do to support your efforts and strengthen your chapter or associated group? Add a comment below or e-mail us at chapters@nsta.org.
So, another year, another set of goals (or resolutions) made. That goes for us at NSTA as well. Over the past few months, we’ve discussed lots of new ideas and projects to support our members and other constituents.
Moon and the Earth and the Sun, and more
By Peggy Ashbrook
Posted on 2012-01-06
Happy New Year! This year I look forward to more conversation in the early childhood community about science education.
 The January 2012 Early Years column adapts an activity about making craters from Marie Faust Evitt’s book, Thinking BIG, Learning BIG.
 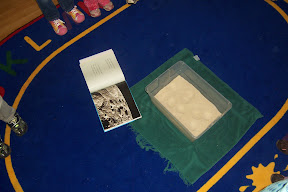 Craters on the Moon are visible without a telescope, even in daytime, a time when teachers can point out the Moon to their students. Children enjoy making craters in snow, damp sand, or other fine material, by dropping balls of varying sizes and weights into the material. There are many ways to use imaginative play to allow children to explore the topic of Space, and the ideas they have already learned through media and at home. Some of what we learn as children (Think of “The cow jumped over the Moon”) may lead to misconceptions that, if teachers learn of them through conversation, we can help students replace with accurate information. Simply talking about the accurate information will not correct misconceptions, but through activities and discussion students can discard them.
Learn more about the Moon and its relationship to the Earth and Sun by using some of the resources in the National Science Teachers Association’s Learning Center such as the a collection of resources I created titled “Moon and sky—observations.” Register at no cost, go to Advanced Search and enter Keyword: Moon, Author: Ashbrook, and Type of Learning Resource: User created collections (select in both menus) to see resources in the “Moon and sky—observations” collection. Photos of features of the Moon can be viewed on GeologyRocks site by Dr. Katie Davis and Dr. Jon Hill.
Young children may know the word “gravity” but we don’t expect them to understand yet that it is a force between any two objects and that it pulls the objects together. In the case of the Earth and the objects on it, the gravitational pull of the Earth on the objects is greatest, so objects are pulled down to the Earth (ground). The January 2012 Teaching Through Tradebooks column, “Gravity and Weight”, by Emily Morgan and Karen Ansberry uses the 5E Learning Cycle in activities for grades K-2 and 3-5. These authors are sometimes referred to affectionately as “The Picture-Perfect ladies” because their “Picture-Perfect Science” books are very helpful to elementary teachers (note that the picture trade books they suggest are available through NSTA).
 The article “Shadow Play” by Kathy Cabe-Trundle and Margilee P. Hilson is free to all—read about how students can observe shadows to learn about seasonal change. I recommend reading it (even if some of the activities are too advanced for your class) to see the authors’ approach to teaching concepts about which students commonly have misconceptions. I find the articles for older students a useful review of concepts at an elementary level, for myself.
Let me know what your plans are for the New Year, and what you’d like to see discussed on this Early Years blog by commenting below. Best wishes for the new year,
Peggy
Happy New Year! This year I look forward to more conversation in the early childhood community about science education.
Extra credit?
By Mary Bigelow
Posted on 2012-01-03
 My students are asking for “extra credit” work. I’m having second thoughts about doing this, especially since it seems that students wait until the end of the marking period to ask. Is there a good rationale for giving (or not giving) extra credit work?
—Wayne, Kansas City, Missouri
“Extra credit” seems to be part of school vocabulary. When students don’t complete assignments, don’t do well on tests, or are seeking a higher grade, they (or their parents) ask the teacher for additional assignments or activities.
I suspect this is more common in classes where the students’ grades are based on accumulating points. Students may view class assignments or tests in terms of earning these points. Teachers may reinforce this notion with statements such as “You’re 10 points away from a passing grade” or “Three more points and you’ll have an A+!”
Let’s assume your class activities and assignments such as lab reports, notebooks, or projects align with the unit or lesson learning goals and students are evaluated on the extent to which they meet those goals. It doesn’t seem to be productive to have a student who has not achieved the learning goals or who has not met the course requirements do an unrelated task just to “pull up a grade.” These tasks require time on the part of the teacher to create and assess. Ask yourself if activities such as reading and summarizing an article, completing puzzle sheets, or doing an extra book report allow the students the opportunity to demonstrate their understanding of a concept.
In previous years, your students may also have been awarded extra points for tasks or behaviors that have little or no relation to learning goals: bringing in classroom supplies, assisting with chores such as cleaning glassware, putting up a teacher-created bulletin board, participating in nonacademic events at school, or their parents attending an open house. These are good activities, but it would be hard to align them with learning goals in science.
The bottom line: Can (or should) students earn a passing grade by doing activities not directly related to the learning goals? Should exemplary grades reflect an advanced level of academic performance or the completion of extra busywork?
If you have students who do not turn in assignments (such as lab reports) and then ask for extra credit, perhaps you should allow them to turn in the original assignments. If a student had a poor test performance, you could offer a retake or an alternative that shows the student has met the learning goals, at least at a minimum level. If projects do not meet the requirements, have the student review the rubric and make revisions.
I know teachers who provide students with a list of the unit’s learning goals and several options or alternatives for each to demonstrate their learning. Having choices can give students more ownership of the learning process and capitalize on their interests. The literature on differentiation has many suggestions, such as choice boards or alternate assessments (NSTA journals have had many articles on the idea of differentiation. Click here to see a few of them. Also check the work of Carol Ann Tomlinson).
Another response would be to put the responsibility back on the students: “These are the learning goals for the lesson/unit. How will you demonstrate you have accomplished them?” If the students give you a blank stare, you could offer suggestions. However, you might be surprised at what some students come up with. Their ideas can become alternative activities in the following year.
Some students who are interested in a topic may ask for opportunities to expand their knowledge, with no thought of earning extra points. (Pinch yourself to make sure you’re not dreaming!) Encourage them to pursue their interests, especially those that relate science to other subjects or personal interests. For example, a student in my life science class was interested in finding words relating to arthropods that had origins in mythologies (e.g., the Luna moth, nymphs, arachnids, the Cyclops copepod). I shared this with the language arts teacher (who did a unit on mythology) and we both encouraged her to pursue this interest. She shared a journal in which she kept her notes on the subject. She had an intrinsic “extra interest” rather than a need for extrinsic bonus points.
Photo: http://www.flickr.com/photos/daviddmuir/1410227652/sizes/m/in/photostream/
http://farm2.static.flickr.com/1328/1410227652_e0f5cf7f0e.jpg
My students are asking for “extra credit” work. I’m having second thoughts about doing this, especially since it seems that students wait until the end of the marking period to ask. Is there a good rationale for giving (or not giving) extra credit work?
—Wayne, Kansas City, Missouri
Instructional technology
By Mary Bigelow
Posted on 2011-12-26
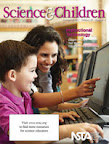
 I recently talked with a high school senior who wants to become an elementary teacher. “Working with younger students, one thing I won’t have to think about is technology,” she said. She certainly has some misconceptions about elementary students! I thought about her as I read this issue of Science and Children and the examples of young students using technology for many tasks and in many contexts.
Space and technology seem to go hand in hand. To the Moon and Back show how students in Grades 2 and 3 used the Starry Night resource to gather data on phases of the moon and look for patterns and develop questions. The article includes a rubric, an example of a student journal entry, and a discussion of other technology application on the topic, including iPad/iPhone apps and online simulations. [SciLinks: Moon Phases]
The authors of Caught on Video use videos to document student projects. Students were both the subjects and the videographers as they demonstrated their work. The article has suggestions for incorporating more local videos in instruction. [SciLinks: Engineering Structures]
“No child left inside” could be the subtitle for Trail Blazers. The article describes a project in which 4th-graders created field guides (on iPods) for the school’s nature trail. Starting with a site study, they also created kits for teachers to use with students to study weather on the trail. [SciLinks: Identifying Trees, Nature]
What technology (if any) is appropriate for primary students? Harness Your Tech Side includes resources from the NAEYC on technology integration in the younger grades and a lesson plan on using technology to create a class book. Smart Boards Rock has pictures of students (not the teacher) at the board, manipulating objects and words. [SciLinks: Rocks]
Virtual Inquiry Experiences incorporated technology into a study of pond insects. Students shared their specimens with scientists who shared (through videoconferencing) the use of an electron microscope—quite an experience for these young students. Another option for younger students as described in Time for Slime, is a digital microscope connected to a projector. The pictures of students show the benefits of the large projected images. The formative assessment probe Representing Microscopic Life looks at student conceptions and misconceptions about microscope pond organisms. [SciLinks: Microscopes, Insects, Protozoa]
Classroom communications is changing, too. Not an Unfeasible “Extra” shows how students in 4th grade are blogging about their science learning. The teacher-author offers suggestions for starting a blogging project and a rubric to assess the blog content. In Turtles and Technology, other 4th graders took on a challenge to protect and advocate for an endangered species. They raised turtles to release in the wild used a variety of technology (blogging, producing videos, creating webpages, and even developing an online game) to inform the community of threats to the turtles.
After reading and reflecting on these articles, future elementary teachers have a lot to look forward to, with students who are very comfortable with technology. Secondary teachers have a lot to look forward to, also, as younger students become more familiar with technology as a tool for learning, communicating, and creating.
Several other articles have SciLinks connections: One Hungry Dinosaur [SciLinks: Dinosaurs] and Simple Machines [SciLinks: Simple Machines] And check out more Connections for this issue (December 2011). Even if the article does not quite fit with your lesson agenda, there are ideas for handouts, background information sheets, data sheets, rubrics, and other resources.
I recently talked with a high school senior who wants to become an elementary teacher. “Working with younger students, one thing I won’t have to think about is technology,” she said. She certainly has some misconceptions about elementary students!
The dynamic earth
By Mary Bigelow
Posted on 2011-12-26

Table of Contents
Why is it that the earth sciences bring out the lifelong learner in people? We spend time stargazing at night, watching the weather channels, learning about geologic features at national and state parks, reading about topics such as climate change and prehistoric events, and wondering when (and where) the next earthquake, tsunami, or volcanic eruption will occur. And yet, for many students, their experiences in elementary and middle school are the capstone of any formal classes in the earth sciences. In high schools, earth science is often an elective (if it’s on the schedule at all). So hats off to all teachers who spark an interest in lifelong learning in this branch of science, including the authors featured in this issue!
As I was growing up, my family had an interest in geography. Most get-togethers usually included someone digging out an atlas to look something up. If Google Earth had been around in those days, we would have never left the dinner table! Three articles in this issue illustrate how web-based mapping projects can spark and build on student interest: Dynamic Lessons with Google Earth, Global Environmental Issues, and Teaching with Current Events. Investigating Continental Margins uses the GeoMapApp to compare and contrast the East, West, and Gulf coasts of North America. [SciLinks: Mapping]
Krakatoa Erupts! takes an interdisciplinary approach to capitalize on student interest in volcanoes. By studying a historic event, student can correct misconceptions and ask their own questions about volcanic eruptions. A rubric is provided (actually the rubric is not specific to this project and can generalized to other inquiry activities). [SciLinks: Volcanoes, Volcanic Eruptions, Volcanic Zones, Ring of Fire]
The authors of Going Underground describe how to help students learn about groundwater and karst systems with both field studies and classroom simulations [SciLinks: Water Cycle, Caverns (and Karst Topography), Groundwater]
The earthquake centered in Virginia last summer dispelled the misconception that these seismic events happen only on the west coast of the North America or elsewhere in the Pacific region. The activities described in Its YOUR Fault can help students understand concepts in seismology such as faults, fault zones, and tectonic boundaries by studying historic data and using current monitoring tools. [SciLinks: Earthquakes, Seismographs, Tectonic Plates, Plate Boundaries]
Although Color Code is not directly related to earth science, the activities help to dispel common misconceptions. In this case, misconceptions related to heredity and inherited traits, using hair color as an example. Although students would have to consider that for many people, their hair color has been altered chemically! [SciLinks Genotype/Phenotype, Pedigrees, Genes and Traits]
Don’t forget to look at the Connections for this issue (December 2011). Even if the article does not quite fit with your lesson agenda, this resource has ideas for handouts, background information sheets, data sheets, rubrics, etc.
Table of Contents
Technology integration in science
By Mary Bigelow
Posted on 2011-12-23
 As a principal, I’d like to work with the teachers to develop some indicators to use during walkthroughs and classroom visits to assess how instructional practices in our science classes are changing as a result of the technology we’re using. Rather than reinventing the wheel, are you familiar with existing protocols we could use?
–Delores from Washington
It’s a good idea to develop a common language regarding what effective teaching could look like, especially when an entire school or department is engaged in a project. This common language clarifies discussions and fosters collaboration. You’re very wise to consider existing resources first to find descriptions and examples of this language.
I’m familiar with several protocols, including a few relating to science teaching in general. These protocols do not have indicators for technology integration per se, so you would have to determine how your technology initiative would relate:
- The Science Classroom Observation Guide from the North Cascades and Olympic Science Partnership is a user-friendly and concise tool. This one-page document includes indicators (or look-fors) on classroom culture, science content, instruction for understanding, and organizing/applying scientific knowledge. This protocol is different in that it focuses on what the students are doing as a result of the teacher’s instruction, rather than strictly on the teacher’s performance.
- Inside the Classroom Observation and Analytic Protocol from Horizon Research is a comprehensive instrument that can be used in both science and mathematics classes. It’s very lengthy, however, and could be overwhelming for the observer and the teacher. But you might get some ideas from it.
- The Reformed Teaching Observation Protocol (RTOP) is used in many math-science partnership projects. RTOP is divided into five sections with statements related to lesson design and implementation, content (propositional knowledge and procedural knowledge), and culture (communicative interactions and student/teacher relationships). Each of the five sections has statements that further define the section and assist in documenting what was observed in the classroom. RTOP is an excellent tool for understanding the culture of the classroom and what the students are engaged in to enhance their learning experiences. The website includes not only the instrument but also professional development resources, such as videos of classrooms.
The HEAT framework can be used to look at how students are integrating higher order thinking, engaged learning, authentic connections, and technology use. It’s not related to science specifically. The website includes a one-page document that summarizes look-fors.
A tool I’ve recently learned about is the Technology Integration Matrix from the Florida Center for Instructional Technology. The matrix shows the relationship between levels of technology integration (entry, adoption, adaptation, infusion, and transformation) and characteristics of the learning environment (active, collaborative, constructive, authentic, and goal directed). This matrix is applicable to K-12 and includes detailed descriptors and sample lessons in science, mathematics, social studies, and language arts. The samples can be searched by grade level and type of technology. The matrix site also has resources for professional development, including presentations, videos, and handouts of the matrix. I’m considering it for some projects I’m involved with because it considers not just doing things better with technology (taking notes from a PowerPoint instead of an overhead or looking up answers on a website instead of a textbook) but also doing better things with technology (collaborative activities, authentic learning, student reflection, or creative problem solving).
In my experience, however, it’s not the technology itself that changes classroom practices. Providing effective teachers with technology can make them more effective; providing technology to less effective teachers will not guarantee that instruction will improve. The key is focused and continuous feedback and professional development.
Photo: http://www.flickr.com/photos/nooccar/5495911044/
As a principal, I’d like to work with the teachers to develop some indicators to use during walkthroughs and classroom visits to assess how instructional practices in our science classes are changing as a result of the technology we’re using. Rather than reinventing the wheel, are you familiar with existing protocols we could use?
–Delores from Washington
Science notebooks: Archive or learning tool?
By Mary Bigelow
Posted on 2011-12-16
 In my Earth science classes, I require the students to keep notebooks. I give them directions as to what pages to put in the notebook and in what order. I thought this would be an easy grade for the students, but many of the students don’t follow the directions. Short of a failing grade for the notebooks, how can I demonstrate the value of organized notes?
—Sarah, Edison, New Jersey
A traditional approach to science notebooks uses a folder or binder to hold lab reports, homework, handouts and notes, tests and quizzes, and/or completed worksheets. The students are given a list of documents and the order in which they must appear in the notebook. The notebooks are graded periodically on how complete they are and on whether the documents are in the order required by the teacher. But how do students perceive the purpose of a notebook? Is the notebook a means to an end (to use in learning) or an end in and of itself (an archive for the teacher to grade)?
What makes a notebook useful?
Many teachers work with their students to create a personalized learning tool, one that will be used daily throughout the year. These teachers recognize the importance of helping their students to learn organizational strategies, but they also know the importance of helping students become better at recording and analyzing data and at using writing to reflect on and communicate what they are learning. These notebooks are dynamic documents in which students record their lab investigations, vocabulary, class notes, sketches, summaries, and other assignments.
To help students see the value of their notes, you could encourage them to use their notes to complete class assignments and projects. You could also allow students to refer to their notebooks for essay questions on a test. Giving students choices in what to include and how to organize it may give them more ownership in the process.
As you’ve observed, many students do need some guidance in getting and staying organized, whether they’re using a traditional notebook or an online version such as a wiki or LiveBinders. But how important is it for students to comply with the teacher’s directions on how to organize a notebook? I remember a high school teacher who required us to put the notes in one section, the lab reports in another, and the returned quizzes at the end. This may have been her way to organize her own notes, but it didn’t make sense to me—I preferred having all of the resources for a particular topic in one place. I complied with her directions, but the notebook was an assignment for her to grade, not a useful reference for me.
With high school students, they should experiment with different organizational strategies. I would share several examples, and students could choose the strategy that made sense to them. As I met with students, I looked at the table of contents and asked them to explain their strategy. Most chose a topical or chronological strategy, although one student had a notebook that was a total mess—papers upside down and in no particular order. I asked what strategy he used. He thought for a few seconds and said with a sheepish grin, “Would you believe random access?” He was doing very well in class, so I had to laugh with him.
In the NSTA Learning Center, I’ve compiled a sampling of articles from NTSA journals that have examples of how students and teachers are creating and using notebooks.
Photograph: http://www.flickr.com/photos/tomsaint/2987926396/
In my Earth science classes, I require the students to keep notebooks. I give them directions as to what pages to put in the notebook and in what order. I thought this would be an easy grade for the students, but many of the students don’t follow the directions. Short of a failing grade for the notebooks, how can I demonstrate the value of organized notes?
—Sarah, Edison, New Jersey
Earth science topics that grab students' interest
By Claire Reinburg
Posted on 2011-12-14
 From news that scientists have discovered the biggest black holes yet to dramatic video footage of volcanic eruptions, the new information science gleans about Earth and space grabs students’ attention. To help teachers capitalize on student curiosity and interest in Earth science, NSTA Press recently launched updated editions of the popular Project Earth Science Series for grades 5–10 teachers. Check out some of the creative lessons in these four resource books as well as additional lessons from NSTA Press books in the December issue of NSTA’s Book Beat. One timely lesson offered for free in this Book Beat issue is “Habitable Zone: How Distance and Temperature Are Related.” In this lesson, you can investigate with your students how distance from a light source and temperature help us understand why Earth is “just right” in its ability to support life. A recent New York Times article focused on findings from NASA’s Kepler satellite telescope that suggest astronomers may soon announce progress in the search for other habitable planets. Imagine other Earth-like planets that we might soon be studying in the lab and the classroom! The Project Earth Science Series includes individual books on Astronomy, Geology, Meteorology, and Physical Oceanography chock full of activities on a wide range of Earth and space topics.
From news that scientists have discovered the biggest black holes yet to dramatic video footage of volcanic e
Practices of science and engineering
By Peggy Ashbrook
Posted on 2011-12-12
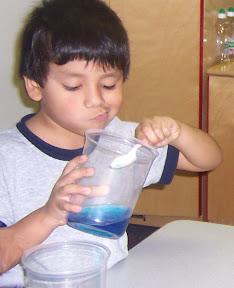
What science and engineering practices will he use to solve this problem?
With any profession, including teaching, experience helps the practitioner be better at the job. Not every part of teaching gets easier with years of experience (unbending my knees) but I no longer have to remind myself to use clear phrases to set limits or further children’s thinking, to plan some next steps in the science inquiry, and to make statements about the practice of science. Learning from research as well as our own practice improves our teaching effectiveness. Researchers are finding better ways to describe the process of learning both the concepts and practice of science and they are calling it “practices of science.” This term does not describe a new whole new way of teaching but a new way of describing this complex process.
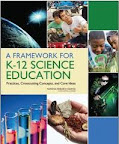 The new work from the National Academies Press, A Framework for K-12 Science Education: Practices, Crosscutting Concepts, and Core Ideas, uses the word “practices” to “stress that engaging in scientific inquiry requires coordination both of knowledge and skill simultaneously.” Even young children can learn science content knowledge, such as “water can exist as a gas, a liquid and a solid”, and science skills, such as making observations to find out.
When reading the Framework, it is interesting to reflect on the science activities that the children are currently engaged in. Yes, they are learning about the needs of living organisms by caring for and observing roly-polies, but are they also learning that scientists make observations and record this data to gain understanding of biological systems, and that engineers make observations to be able to design environments (terrariums) to meet the needs of living organisms?
 To apply this new Framework to my work in the classroom I found guidance in Robert Bybee’s article, Scientific and Engineering Practices in K-12 Classrooms, in the December 2011 Science & Children. He describes the relationship between science and engineering as written in the Framework and his explanations helped me understand, and hopefully apply, the science and engineering practices he restates from the Framework.
To help bring understanding of engineering practices into your classroom, consider using these resources, and add your own suggestions to this list by commenting below:
- I love to visit other classrooms to see what is working well and think about how to do the same in my work. Join Margaret Berry Wilson, author of What Every Kindergarten Teacher Needs To Know and the Responsive Classroom approach blog, and take a peek into a classroom where the teacher’s “careful selection of age-appropriate tasks…, along with her careful set-up, cheerful reinforcement, and appropriate challenges, made all students feel safe and significant.”
- Engineering Is Elementary (EiE) has several videos of children in grades 2 and up learning about engineering through the EiE storybooks and hands-on explorations. At the end of the videos, the teachers offer tips to implement the lessons.
- Engineering for All: Strategies for helping all students succeed in the design process by Pamela S. Lottero-Perdue, Sarah Lovelidge, and Erin Bowling, describes how “the core practice of engineering, the engineering design process, was taught in a third-grade inclusive classroom in which students used this process to design windmill blades” using the EiE unit, Catching the Wind: Designing Windmills (Science and Children March 2010).
- Family Engineering, developed by the Foundation for Family Science and Engineering, with Michigan Tech and the American Society for Engineering Education, is a program for providing informal engineering learning experiences to elementary age children and their families.
- Engineering, Go For It! (eGFI) sponsored by the American Society for Engineering Education.
What engineering practices do you do in your classroom?
Peggy
What science and engineering practices will he use to solve this problem?
Transfer of energy
By Mary Bigelow
Posted on 2011-12-11
 My middle schoolers were full of energy! This month’s Science Scope has many suggestions for channeling their enthusiasm into studying energy transformations. What’s really relevant is that most of the activities require simple materials and can be completed within a few class periods, while still focusing on higher-order thinking and science/engineering practices.
Middle-schoolers love a challenge, especially when they can work in teams. Powering the Future describes a wind turbine design challenge. Students demonstrate their understanding of how energy changes form in the process. The authors provide suggestions on time (2 class periods), equipments needed, student handouts, and a rubric. The photos show the creativity of the students. Generating Excitement has a related activity in which students build generators. (It’s a coincidence that I was reading this article while traveling–as a passenger–through western NY and PA where there are many windmills on the ridges, providing a real-life application). [SciLinks: Wind Energy, Kinetic and Potential Energy]
NSTA journals have published have published articles describing investigations using common objects such as pencils and paper. Clips and Clamps describes a 5E hands-on activity (including a student handout) with these common classroom objects. This would certainly fit into a unit on simple machines (levers). [SciLinks: Mechanical Advantage, Pencils, Paper, Simple Machines]
Students can demonstrate their creativity as well as their understanding of motion and forces as described in Drivers, Start Your Glue Guns. In this challenge, students build “stock car pasta pods” and test the distance their model can travel. [SciLinks: Forces and Motion, Measuring Motion, Laws of Motion]
Every four years, it seems that people are intrigued by the Winter Olympic sport of curling. The author of Swept Away describes how her students learn science concepts along with a new sport—and if you don’t have a curling rink or club nearby, the article has video resources. [SciLinks: Friction]
As the author of Teaching About Heat and Temperature Using an Investigative Demonstration notes, the transfer of thermal energy is a difficult concept for middle school students (and others!). He shares how he uses the Predict-Share-Observe-Explain sequence for class demonstrations and formative assessment probes to help students with concepts of conduction and convection. [SciLinks: Heat Transfer, Conduction, Convection]
Energy Scavenger Hunt provides a real-life look at uses and costs of electricity. Students find examples of energy use at home (the authors provide suggestions for students who are unable to complete the activity at home). [SciLinks: Ohm’s Law, Current Electricity, Electrical Circuits]
Look at That! shows a different sort of transfer of energy–from Eww and Gross to Wow and Cool as students observe and describe the behavior of Madagascar Hissing Cockroaches. Instead of just keeping these (or other classroom pets) in the back of the room, the authors show how putting them center stage can be an effective way to improve students’ skills in observation and description. [SciLinks: Insects]
My middle schoolers were full of energy! This month’s Science Scope has many suggestions for channeling their enthusiasm into studying energy transformations.