Important lessons learned from a teacher
By Claire Reinburg
Posted on 2011-10-05
After reading the moving NPR story of a neurosurgeon who thanked his high school science teacher, investigative reporter Steve Silberman began to imagine all the other stories out there of a teacher’s influence on prominent writers, teachers, and scientists. “It struck me how rarely we hear from accomplished people about the debt they owe their teachers,” writes Silberman in the NeuroTribes blog on PLoS Blogs. Lucky for us, Silberman approached a number of scientists and writers and asked them “What’s the most important lesson you learned from a teacher?” Read the wonderful submissions he received from award-winning science journalists, best-selling authors, and researchers paying tribute to the teachers who influenced their paths. The stories are both entertaining and inspiring. As Silberman notes, “The words of a true teacher stay with us a long time, offering wise counsel in a confusing world and a potent inoculation against foolishness.” What’s the most important lesson you learned from a teacher?
After reading the moving NPR story of a neurosurgeon who thanked his high school science teacher, investigative reporter Steve Silberman began to imagine all the other stories out there of a teacher’s influence on prominent writers, teachers, and scientists. “It struck me how rarely we hear from accomplished people about the debt they owe their teachers,” writes Silberman in the NeuroTribes blog on PLoS Blogs.
(Dis)organized students
By Mary Bigelow
Posted on 2011-10-05
My middle school students this year are very scatterbrained. It seems to take forever for them to get focused at the beginning of class and to find the materials they need when I ask for them during class. When it’s time to get into groups for a lab activity, there is a lot of commotion. Then they have lots of questions about what they’re supposed to be doing. Last year’s classes weren’t like this at all. What can I do?
—Margaret, North Carolina
It’s a common topic in the faculty room: “My classes last year were _____. This year they are so _____.” Teachers fill in the blanks with words such as cooperative, talkative, immature, energetic, needy, noisy, or inquisitive. It sounds like you would use disorganized to describe this year’s students.
For these students, you may need to establish routines to help them get and stay organized. Established routines free up time for more important topics and activities than dealing with logistical issues.
Visualize what a class activity should “look like.” In your mind, go through the activity in slow motion and focus on what the students should do to accomplish the task in an orderly and timely fashion. For example, you might establish routines for students to get their notebooks, access lab equipment, or enter/leave the room. Here are some routines that worked for me.
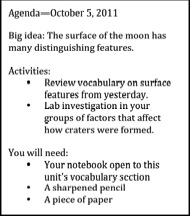
The beginning of a class period can be hectic as one group leaves, another enters, and the teacher takes attendance and performs other duties. Try posting an “agenda” that students see as they come in. Set aside a section of the board or project the agenda onto the interactive board. The agenda could include the purpose or big idea of the lesson, the activities for the class period, assignments they should have ready for you to check or turn in, and what they need to have ready at their seats (laptop, notebook, paper, pencil, textbook, etc.).
It may take a few days for students to get used to the routine of reading the agenda and getting things ready at their seats. I found that combining the agenda with a brief warm-up activity helped students focus for the rest of the period.
Rather than students selecting different teammates for each activity, use the same lab groups for a while. Assign students to groups, with a promise that you’ll change them in the future. Designate a space for each team to work on lab activities. Appoint one student in each group as the “coordinator” whose job is to get the materials for the activity. He or she should be the only one from the group who needs to move around the room. But you can minimize that movement by having all of the materials for each group in a box or tray. Designate another student in each group to be the “liaison.” This student is the group’s spokesperson and is allowed to ask you questions about the activity on the group’s behalf.
Routines at the end of the class period can help students organize their thinking before going on to the next class. For example, ask the students to complete a brief exit activity before departing. This can be a written summary in their notebooks about the day’s activities, thoughts about an upcoming lesson, or a reminder of due dates for tests, projects, or other assignments.
When students are learning your routines, you’ll need to demonstrate and model them and provide opportunities for practice. Since the school year has already started, it may take a while for students to catch on to them, but the effort is worth it.
My middle school students this year are very scatterbrained. It seems to take forever for them to get focused at the beginning of class and to find the materials they need when I ask for them during class. When it’s time to get into groups for a lab activity, there is a lot of commotion. Then they have lots of questions about what they’re supposed to be doing. Last year’s classes weren’t like this at all. What can I do?
—Margaret, North Carolina
Treating the economy with STEM students
By Christine Royce
Posted on 2011-10-03
Treating the economy with STEM students
By Shiv Gaglani
I began doing medical research as a freshman. Not in college; in high school. I had the good fortune of being able to find a professional scientist who was willing to take a chance by giving a 14-year old the opportunity to excel and innovate. The excitement of discovery kept me going both in the lab (in spite of the high experiment-failure rate) as well as in the classroom (learning about the digestive enzyme trypsin is more interesting when you have held a vial of it). Research not only taught me about the specific topics I was working on, such as the biology of stem cells, but also helped me develop confidence, perseverance, creativity, and the ability to simplify and present ideas through analogy:
Imagine for a moment that our economy is a human body. Like the body, the economy is made up of countless workers (cells) that compose many essential interdependent systems. The skin, for example, is analogous to the national defense system; the circulatory system corresponds to the transportation sector; the liver to the healthcare system; the bones to infrastructure; and the heart to the energy sector.
The financial sector—Wall Street, the Treasury and the Fed—is the brain behind the economy and, as recent experiences have proven, like its physiological counterpart it too is highly vulnerable to damage resulting from poor decisions. Also of note is the division between controllable and autonomous brain functions, though, lamentably unlike that of the human body, the economy’s involuntary behavior does not always tend towards self-preservation.
As important as each of these systems is, the definitive element responsible for the size and strength of the body is the muscular system; in the case of the economy, this is the science and technology sector. Muscles are the driving force of the body, just as scientific progress and technological innovation are the driving forces of our economy. In fact, though scientists and engineers only comprise four percent of the U.S. workforce their discoveries and inventions add a disproportionate number of jobs for the rest of us. Case in point: two part-time engineers named Orville and Wilbur effectively began the airline industry that now employs about 11 million people and contributes over $700 billion to our GDP.
The crisis now is that our innovative science and technology muscles are increasingly dystrophic, especially in comparison to those of other economies like China’s and India’s. Our colleges graduate more visual and performing arts majors than engineers and, of the engineering Ph.D. students we graduate, over 70 percent are foreign-born. These students are increasingly choosing or being forced to return to their home countries, often due to their inability to renew their visas or obtain green cards. It is no surprise, then, that over half of all patents awarded in the U.S. are now filed by foreign companies. There are countless other indicators foreboding the loss of American dominance in scientific and technological innovation, prompting the critical question: how can we treat this problem?
One of the most promising emergent therapies for treating damaged or diseased body systems is stem cell technology. Stem cells are unique due to their potential to become many different types of adult cells—skin, bone, liver, brain, muscle, etc.—and ability to renew and replace senescent or atrophying tissue. Hence, our economy’s stem cells would be our students, since they have the capability of pursuing any profession through which they may contribute to the vitality of the entire economic system.
In the same way that the human body relies upon stem cells for its health, our economy desperately needs STEM students (Science, Technology, Engineering, and Mathematics) in order to strengthen and grow. However, the key difference between stem cells and students is that the former choose their fate according to the needs of the entire system, whereas the latter choose their profession in part based upon cultural desires and influences such as reputation, fame, and fortune – all of which can more easily be found on the field or stage than in the lab. As researchers search for ways to increase the number of stem cells and influence their differentiation in order to deliver medical treatments, so should our nation focus on improving the desire among young people to pursue and excel in STEM disciplines.
The Obama Administration’s Educate to Innovate initiative as well as the President’s discourse about our Sputnik Moment and the need to celebrate science fair winners on par with Super Bowl winners are great first steps towards producing and inspiring STEM students. Similarly, the support of major companies like Intel, Google, and Siemens is critical to providing students scholarships and recognition for their inventiveness and initiative. However, it will be as important for the media to celebrate the scientific and technological drivers of our economy at least in equal terms as they cover the entertainers, athletes, and politicians on our television screens.
My early exposure to research set me on the committed path of scientific innovation, and it is my hope that, through the above-mentioned policies and encouragement from fellow students, my younger peers may develop a similar passion for STEM. I believe this will be the most effective treatment for healing our economy in the long-term.
Treating the economy with STEM students
By Shiv Gaglani
Children and motion
By Peggy Ashbrook
Posted on 2011-10-02
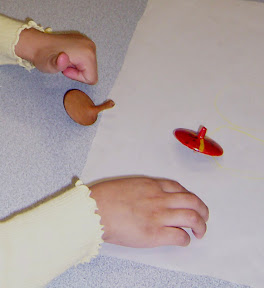
 What is in motion in your classroom, in addition to children? Spinning tops are one of the materials I keep available all year long because they can be an independent or collaborative activity, children’s ability to spin them increases as they grow, and spinning tops is an exploration in physical science. The October 2011 Science and Children is all about motion—read to learn more about teaching children about pushes and pulls.

Spinning tops can be part of learning mathematics. Young children can sort tops by size, weight, and shape, then record which top needs the biggest twist-push to begin spinning, and which top spins the longest. The concept of symmetry can be introduced. Children can observe the wobbly motion of a top made purposefully off-balance by the addition of a sticker on one edge or a crown (center post) placed off-center but measuring tiny differences in weight-distribution which affect how well a top can balance is too difficult. After several weeks of child-initiated play with tops, a few four-year-old children were able to predict that a top with a post placed purposefully off-center would not be able to spin. Younger children could not make a prediction or guess and had to try spinning the top. They lost interest when it “didn’t work” and did not investigate it further.
When a top “doesn’t work,” young children may not investigate possible causes such as slowed spinning due to an uneven surface, a loose crown (center post) making the top off balance, or too little strength in the child’s spin. Keep a variety of tops available and support children, before they walk away, with direct instruction on how to grip and turn the top’s crown to make it spin.
 Conversations and group discussion can help children build an understanding of the motion of an object. I have children draw the motion of an object (rather than the object itself) and we use the drawing to talk about the push or pull needed to get the object moving and to make it stop.
Older children may be interested in making their own tops using stiff paper and sticks, short pencils, straws, or sections cut from wooden chopsticks. Children will probably need help with the task of balancing the top by making sure the post is in the exact center and the body is a precise circle.
The Spinning Top & Yo-Yo Museum invites you and your class or other group to be part of International Top Spinning Day on Wednesday, October 12, 2011, by spinning a top anytime and anywhere. You can let the world know how many participated by reporting your spins on the museum website. Last year there were more than 20,000 spins!
 Spinning motion can be explored outside on spinning playground equipment. In this setting the children can feel the motion and pulls and pushes as they spin around.
 Provide drawing materials as children explore and document the motion of themselves and other objects—swings, wheels on toy cars, slinkys, hula-hoops, and balls in bowls.
The Spinning Top & Yo-Yo Museum notes that tops are known all around the world:
Argentina Trompo, Australia Kiolap, Bulgaria Pumpal, Cambodia Too loo, Denmark Snurretop, Ghana Ate, Greece Sbora, Iceland
Skopparahringla, India Lattoo, Japan Koma, Korea Pang-lh, Mexico Trompo or
Pirinola, New Zealand Potakas, Puerto Rico Chobita, Russia Volchok, Sri Lanka
Pamper, Switzerland Spielbreisel or Pfurri, Taiwan Gan Leh, Turkey Topac, United
States Top, and Venezuela Trompo or Zaranda
What name do you call these toys that teach science concepts?
Peggy
The Art and Science of Notebooks
Celebrate science in October
By Mary Bigelow
Posted on 2011-09-27
 It’s almost October and it’s time to celebrate science. Get ready for Earth Science Week this year (October 9–15, 2011). The theme is “Our Ever-Changing Earth.” You can move right into National Chemistry Week (October 16–22, 2011) The theme this year is “Chemistry—Our Health, Our Future.” Both of these websites have lots of resources, and it shouldn’t be hard to find some that align with your curriculum and standards.
Astronomy gets into the lineup of October events, too. Check out the Great World Wide Star Count in which your observation data can be uploaded and shared with participants from around the world during the October 14 — October 28 time period.
It’s not too early to plan events for Mole Day, celebrated on October 23 (10/23) from 6:02 a.m. to 6:02 p.m. The timing of this event celebrates Avogadro’s number: 6.02 · 1023. See SciLinks for more information on Avogadro: you’ll get a list of websites related to moles and to the work of this scientist. This day is also used to celebrate the science of chemistry and its applications. The National Mole Day Foundation’s website has background information, themes, and some suggested activities.
And then, top off the month by attending the NSTA conference in Hartford, CT from October 27 to October 29.
Photo http://www.flickr.com/photos/sfantti/53940691/
 It’s almost October and it’s time to celebrate science. Get ready for Earth Science Week this year (October 9–15, 2011).
It all started with the zebrafish…
By Debra Shapiro
Posted on 2011-09-27
Students in Rochester, Minnesota, are studying zebrafish as part of Integrated Science Education Outreach (InSciEd Out). The program has brought teachers from all disciplines together to create a new curriculum that allows “the language of science to emerge in multiple contexts throughout the [school] day,” explains InSciEd Out’s coordinator, Chris Pierret. InSciEd Out’s success has brought it national attention and praise from President Obama, as you’ll read in this NSTA Reports story.
Professional Learning Communities and You!
By Christine Royce
Posted on 2011-09-27
The question for this issue of the Leaders Letter focused around professional learning communities people are involved in as well as the benefits that each person has received. In Professional Learning Communities for Science Teaching the definition of a PLC included several key components around which they are defined – 1). a focus on learning; 2); collaborative culture focused on learning; 3). collective inquiry; 4). action orientation and experimentation; 5). continuous improvement; and 6). results orientation. The authors are quick and clear to also point out that a group of people simply working together on a task may not meet the definition of a PLC.
I actually find myself in groups somewhere between “not PLCs” (or as I often call them some departmental/university committees) and “PLCs” (one such was the NSELA Summer Leadership Institute in June of this year where we used this exact book). In thinking about all of the particular reasons as to why I think I end up in quasi PLCs, I come up with ONE major reason and that is related to commitment of time on my part as well as the part of others. An example of this definite interest but lack of time comes from the last academic year. Our university sets up teaching teams of faculty members where we are grouped in fours or fives based on some common characteristic that we have identified – the one last year I was on was related to faculty who had an interest in science (yes that vague). The colleagues I was assigned to as a teaching team member were engaging and we started the year with a meeting that set dates for the entire semester but as you can imagine as the semester went on and meeting dates approached the initial enthusiasm waned – people including me couldn’t make it for a variety of reasons – they had papers that had to be graded; another meeting came up; needed to work on an upcoming presentation etc. All aspects of our daily jobs and necessary to be completed, however, all reasons why our own PLC fell short of being successful and thus the reason I say I find myself in quasi-PLCs.
I guess my question for my fellow educators out there is not only what benefits you obtain by being involved in PLCs but also, how do you sustain the momentum of a PLC when other responsibilities seem to be looming. I guess my other question would be how do you coordinate a PLC that might have people in various geographic locations – since my science education colleagues across the country are often the ones that have similar interests and provide me with great learning opportunities. Just some questions for thought as I get ready to head into the office this morning for a day filled with “non PLCs.” 🙂
The question for this issue of the Leaders Letter focused around professional learning communities people are involved in as well as the benefits that each person has received. In Professional Learning Communities for Science Teaching the definition of a PLC included several key components around which they are defined – 1). a focus on learning; 2); collaborative culture focused on learning; 3). collective inquiry; 4). action orientation and experimentation; 5). continuous improvement; and 6).


