
Clickers in the science classroom
By Mary Bigelow
Posted on 2010-04-28
 We are applying for a grant to upgrade the technology in our science department, and we’re thinking of buying “clickers.” Do you have any advice?
—Iris, Salem, Oregon
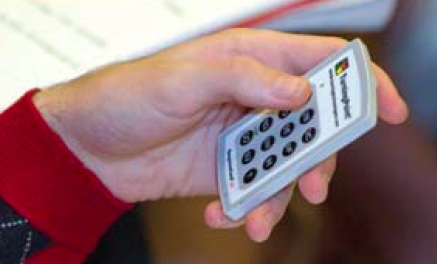
Clickers (personal response devices) look like calculators Students use keypads to respond to a question, often multiple-choice, and the results are tabulated and displayed—similar to popular television game shows that survey the audience and reveal the percentage choosing each response.
Clickers have become quite popular in classrooms at all levels. Unlike a show of hands or holding up index cards, students’ individual responses are not publicly displayed, although they can be recorded on the teacher’s computer. The teacher gets immediate results during the lesson and can modify the learning activities to correct misunderstandings, provide more in-depth examples or explanations, or move on to the next activity.
In a high school class I visited, the teacher was conducting a lesson in which students were solving chemistry problems. The teacher used a variety of instructional techniques, including a graphic organizer and guided practice at the interactive board. When the students indicated they understood the concept, the teacher displayed several problems on the board. The students did the calculations and entered their answers via the clickers. The teacher displayed a graph showing the percentage of students who entered the correct answer. Everyone had the first two answers correct, but several students missed the third one. He used the clicker software to display the number of students who chose each response and noted that one of the incorrect answers had been chosen by quite a few students. He then asked the class to figure out why that answer, although incorrect, was popular. After some thought, one student volunteered, “Maybe they thought Ca stood for carbon and they used the wrong atomic mass.” “That’s what I did,” another student remarked, and so the class experienced not just getting an answer correct, but figuring out the thought processes involved. The teacher knew he could move on to more complicated formulas, and the students were ready for the challenge.
In this class, the clicker system and its software was a component of the interactive board. The clickers were in a storage case, and as the students came into the lab, they retrieved the clicker assigned to them by number. The teacher had a record of responses, and although he did not “grade” these lesson checkups (formative assessments), he could monitor the progress of individual students from one lesson to the next
A middle school math colleague used clicker data to determine which students needed additional help. He worked with those students—re-teaching or providing more guided practice while the others worked on more challenging topics. He certainly could have used a paper-and-pencil quiz, but the immediate feedback gave him more time for the alternative instruction rather spending it checking more than 100 quizzes. He also used clickers for pre- and post-tests to show the students their progress.
Many college classes use clickers (see the two references at the end), and I’ve used clickers with third-graders who caught on very quickly. I’ve also used them to gather feedback during professional development workshops and at parent meetings to compile their opinions in an attitude survey.
In one project I was involved with, the classrooms did not have interactive boards. The system was portable, with a remote receiver connected to a laptop. A projector displayed the questions. It was a lot of equipment to set up, but we could use it in different venues.
There are many systems to choose from, ranging from simple numeric keypads to more complicated options for entering data. Ask your technology coordinator for input on what system would meet your instructional needs and your school’s technology capabilities. Other questions to consider: Is the system compatible with the test generator/test bank you have? How easy is it to import or copy/paste questions? Can graphics be included in the questions? What kind of analyses does the software perform beyond calculating the percent correct—simple statistics (mean, standard deviation, median), graphs, or an item analysis? Can you export the data into Excel or other statistical programs? Does it produce reports for individual students as well as class summaries? When you’ve narrowed your choices, ask other teachers about their experiences, including teachers in the NSTA Communities (you’ll get a lot of information from your online colleagues).
Regardless of what system you ultimately decide on, it does take class time to administer the questions. You’ll have to adapt or create questions related to the concepts and skills being learned. The systems lend themselves to multiple-choice format (including true/false questions) and would not be useful for open-ended questions or more creative solutions, although I’ve seen ways to capture text messages from cell phones or other devices that sound intriguing.
The clickers by themselves are not a solution to improving student learning. Much depends on the quality of questions that are presented and what the teacher and students do with the results. The clickers can be an expensive, high-tech “quiz machine” or they can be an integral part of a teacher’s strategies to improve participation, determine students’ misconceptions and misunderstandings, and adjust instruction to help all students learn.
Resources:
Clickers in the Large Classroom: Current Research and Best-Practice Tips
Building Acceptance for Pedagogical Reform Through Wide-Scale Implementation of Clickers
We are applying for a grant to upgrade the technology in our science department, and we’re thinking of buying “clickers.” Do you have any advice?
Maple tree seed toss makes a good gross motor activity
By Peggy Ashbrook
Posted on 2010-04-27
 The seeds of maple trees are shaped like single wings and rotate around the heavy seed end when tossed into the air. The twirling motion is unexpected because most leaf-like objects fall in a less regular fashion. Collect some for a rainy day. Have children spread out so no one bumps heads, then toss the seeds into the air. The children in one class leaped to catch then bent low to pick up the seeds, over and over again. The seeds will keep for a few weeks.
Maple Seed Helicopters by NASA has a lesson with plans for making additional rotating “seeds” from stiff paper, with information on the “why” of it. My grandfather showed us how to carefully split the seed casing, opening it to reveal the sticky cotyledons (first leaves and food for the sprouting seed). Then he put the sides on his nose so he looked like a rhinoceros! See a photo of how to do this on The BIG Fieldtrip, the Kirkman family blog, October 13th, 2009 entry, Bella’s Seeds (thanks, Kirkman family!). Some maple trees produce seeds in the fall and some in the spring so we get two chances a year to play with these seeds.
Peggy
The seeds of maple trees are shaped like single wings and rotate around the heavy seed end when tossed into the air.
*LAST CHANCE! This product is not eligible for return or exchange. All sales are final.*
Using More Picture-Perfect Science Lessons: Using Children’s Books to Guide Inquiry, K-4 in your classroom is easier than ever! NSTA’s ClassPacks, each sufficient for a class of 28 students, are lesson-specific collections of materials—an unmatched time-saver and a great deal.This ClassPack for the book chapter “Roller Coasters” in More Picture-Perfect Science Lessons: Using Children’s Books to Guide Inquiry, K-4 .
*LAST CHANCE! This product is not eligible for return or exchange. All sales are final.*
Using More Picture-Perfect Science Lessons: Using Children’s Books to Guide Inquiry, K-4 in your classroom is easier than ever! NSTA’s ClassPacks, each sufficient for a class of 28 students, are lesson-specific collections of materials—an unmatched time-saver and a great deal.*LAST CHANCE! This product is not eligible for return or exchange. All sales are final.*
Using More Picture-Perfect Science Lessons: Using Children’s Books to Guide Inquiry, K-4 in your classroom is easier than ever! NSTA’s ClassPacks, each sufficient for a class of 28 students, are lesson-specific collections of materials—an unmatched time-saver and a great deal.This ClassPack for the book chapter “Mirror, Mirror” in More Picture-Perfect Science Lessons: Using Children’s Books to Guide Inquiry, K-4 includes 14 6x9-in. plastic mirrors, 14 6x9-in. envelopes, 14 flashlights (with batteries), 14 shiny metal spoons, and 14 pieces 5x5-cm aluminum foil.
This ClassPack for the book chapter “Mirror, Mirror” in More Picture-Perfect Science Lessons: Using Children’s Books to Guide Inquiry, K-4 includes 14 6x9-in. plastic mirrors, 14 6x9-in. envelopes, 14 flashlights (with batteries), 14 shiny metal spoons, and 14 pieces 5x5-cm aluminum foil.
*LAST CHANCE! This product is not eligible for return or exchange. All sales are final.*
Using More Picture-Perfect Science Lessons: Using Children’s Books to Guide Inquiry, K-4 in your classroom is easier than ever! NSTA’s ClassPacks, each sufficient for a class of 28 students, are lesson-specific collections of materials—an unmatched time-saver and a great deal.This ClassPack for the book chapter “Over in the Ocean” in More Picture-Perfect Science Lessons: Using Children’s Books to Guide Inquiry, K-4 .
Community collaborations
By Mary Bigelow
Posted on 2010-04-23

Click on the cover for the Table of Contents
During April, many classes are involved with “projects” related to Earth Day themes. If you want your students to go beyond the make-a-poster-about-the-rainforest type of activity, several articles in this issue illustrate how students can become involved members of their own communities.
In Students for Sustainable Energy, physics students investigated how to reduce the need for energy or the switch to alternative forms of energy in their own community. The article has a list of project topics (generated by the students), a discussion of how community businesses and agencies became involved with the students’ projects, a description of the rubric (including a category for the underlying physics concepts used in the project, and lessons learned. NSTA’s SciLinks has lists of websites related to sustainability, sustainable agriculture, and sustainable development.
The Invasive Plant Species Education Guide describes a series of lessons developed to help students learn about the impact of these species in their own communities. (The actual lessons can be found on the project website. SciLinks also has resources on the topics mentioned in the article, including invasive species and classifying plants. I recently looked at USDA’s National Invasive Species Information Center, Alien Invasion, Invasive Weeds, and Alien Plant Invaders.
Local air quality was the theme of the activities in The Air Up There, using the 5E Learning Cycle as a framework. The article has many examples of the graphic organizers and data tables that were used in this investigation. Detecting air pollution is one of the many collections of websites in SciLinks that relates to this topic.
In all of these research projects, sharing the results is an important part of the assessment/evaluation. As an alternative to formal reports or PowerPoint presentations, consider the “symposium” format described in Talk Like a Scientist. The student handout and rubrics are good resources.
The Science 2.0 article Wiki, Wiki! briefly describes how this web tool can be used to create communities of learners within your school as well as beyond the classroom walls to share ideas or results. For more ideas, look at the article Wikis for Science Ed Collaboration from the February issue of NSTA Reports.
Check out the Connections for this issue. Even if the article does not quite fit with your lesson agenda, this resource has ideas for handouts, background information sheets, data sheets, rubrics, etc.
Click on the cover for the Table of Contents
*LAST CHANCE! This product is not eligible for return or exchange. All sales are final.*
*LAST CHANCE! This product is not eligible for return or exchange. All sales are final.*