Who Knew I
By Guest Blogger
Posted on 2017-04-01
The thing is, if you aren’t looking to broaden your knowledge and improve your practice, then stay away from the LA Convention Center and NSTA’s 2017 National Conference. I mean—stay away. Because when you walk into any door you are surrounded by a plethora of sessions, resources and exhibits. Oh, and did I mention the food trucks? Now that’s FULL service, NSTA!
Yesterday, I went to a variety of sessions that involved engineering in some way. One of my favorites—and one where I learned a lot—was led by Dr. Cary Sneider, a STEM expert and a lead on the development of the Framework for K-12 Science Education and the NGSS. The session was about Misconceptions about Engineering in the NGSS. In full disclosure, I consider(ed) myself somewhat of an expert on especially the engineering included in the NGSS. I led a review for ASEE (the American Society for Engineering Education) and have been using the standards in the bulk of my work as a P12 engineering education expert. So I’m not going to lie when I say I felt well, comfortable, about this session…maybe even a little smug.
Yeah, well that usually doesn’t work out the way. And it didn’t. Cary designed the session to have the audience members collaborate to complete some multiple-choice questions about engineering in the NGSS. He warned us that all the possible answers were at least somewhat right, and that we were to discuss them and choose what we thought was the best answer. Then we compared our results with another group, and finally, Cary reviewed the questions—and our answers—as a large group.
I was teamed up with a teacher from Mountain View, CA named Megan. Together we learned our first lesson: these seemingly clear statements had fuzzy answers. Yes, multiple choices could fit as an answer, or this part of (a) and that part of (c) were it. Megan and I discussed each one, and finally made choices. So when we compared our answers with the other team, color us surprised when the case they made for a different answer made sense. ARGH! Take it to the next level in the whole group discussion and clearly, much of the audience had struggled with the squishiness (yes, that’s a technical term). It was actually a bit disconcerting, as I know began to question myself.
Discoveries and Solutions Improve with Diverse Thinking
Near the end, Cary asked a brave lone dissenter why he’d chosen an answer. It was, after all, obvious he was wrong…..right? His reasoning, however, struck a chord. And all of a sudden, my perspective broadened. You could see from his face that Cary had the same reaction, and noted he’d simply never thought about it that way. He modeled, in exactly the right way, how to truly consider a different view and see it for the possibilities it presented.
Here’s the thing….in today’s education system being “right” is prized above all else, especially on tests in ELA and Math. As do scientists, engineers rely on data and evidence and as much as possible, try to minimize “squishiness.” But discoveries and solutions improve with diverse thinking. One of my favorite statements is a broader perspective on a solution team brings better solutions. Diversity, in all ways, matters. But perspectives tend to get fixed when answers are “right” or “wrong” , or when things “have always been that way” or when the way you’ve decided “it” is turns out to well, maybe not be just that way. It’s a little perplexing to have your perspective shift. But if you allow yourself to put that aside for just a moment it’s also invigorating, and squishy. And when you do all of this, and then model for others that it’s okay for the “expert” to still be learning—well, that’s perfect.
Author Liz Parry is a guest blogger for NSTA for the 2017 National Conference; follow Liz on Twitter @STEMninjaneer.
More About the 2017 National Conference on Science Education
Browse the program preview, or check out more sessions and other events with the LA Session Browser/Personal Scheduler. Follow all our conference tweets using #NSTA17, and if you tweet, please feel free to tag us @NSTA so we see it!
The mission of NSTA is to promote excellence and innovation in science teaching and learning for all.
Future NSTA Conferences
2017 STEM Forum & Expo
Kissimmee/Orlando, July 12–14
2017 Area Conferences
Baltimore, October 5–7
Milwaukee, November 9–11
New Orleans, Nov. 30–Dec. 2
Follow NSTA

Perspectives on Science Education. A Leadership Seminar
Ed News: Sanitized Science
By Kate Falk
Posted on 2017-03-31

This week in education news, climate change skeptic group seeks to influence 200,000 teachers; some California schools are trading the blacktop for greentop; New Mexico schools continue to teach outdated science while new standards sit on the shelf; engineering is getting more attention in classrooms; and President Trump leaves science jobs vacant, troubling critics.
Climate Change Skeptic Group Seeks to Influence 200,000 Teachers
Twenty-five thousand science teachers opened their mailboxes this month and found a package from the Heartland Institute, a libertarian think tank that rejects the scientific consensus on climate change. It contained the organization’s book “Why Scientists Disagree About Global Warming,” as well as a DVD rejecting the human role in climate change and arguing instead that rising temperatures have been caused primarily by natural phenomena. Click here to read the article featured on PBS.org.
Some Schools Trading The Blacktop For Greentop As An Innovative Way To Teach Science
Some students in California don’t have to take field trips to parks or national forests for environmental education – they just open their classroom door. To supplement their science and environmental curricula, hundreds of schools across the state have busted up their asphalt play yards and replaced them with wood chips, trees, flowers, shrubs and vegetables. The new gardens help teachers implement California’s new science standards, which emphasize hands-on learning, and crossover between scientific disciplines. Click here to read the article featured in EdSource.
What Would Trump’s Proposed Cut To Teacher Funding Mean For Schools?
President Trump has proposed getting rid of the Title II program, which aims to help districts and states pay for teacher and principal development, reduce class-size, craft new evaluation systems, and more. The program, which is officially called the Supporting Effective Instruction State Grant program, or Title II, Part A, is the third largest in the U.S. Department of Education’s budget that goes to K-12 education. Eliminating it would be a really big deal, state, district, and school officials say. Click here to read the article featured in Education Week.
The Irony In Ivanka Trump’s And Betsy DeVos’s Push For STEM Education
On Tuesday, presidential daughter Ivanka Trump and Education Secretary Betsy DeVos visited the National Air and Space Museum in Washington to “highlight the importance of science, technology, engineering and mathematics education” and to discuss “empowering young women to pursue STEM-related careers.” The event came just a short time after President Trump advanced his first federal budget, which included wiping out NASA’s education office, which oversees efforts to support women and underrepresented minorities in STEM fields, operates camps and enrichment programs, and provides internships and scholarships for young scientists. Click here to read the article featured in The Washington Post.
For four years, New Mexico Education Secretary Hanna Skandera has had on her desk a unanimous recommendation from a hand-picked panel of math and science experts. They want the state to join a growing list of others that have adopted the nationally vetted Next Generation Science Standards. It’s been two years since Skandera convened a focus group of 85 teachers, professors and school administrators to review new standards. That group also recommended NGSS adoption. Click here to read the article featured in the Santa Fe Reporter.
Engineering Making Headway In Schools, Analysis Shows
Engineering is getting more attention in classrooms, especially in those states that have adopted the Next Generation Science Standards, according to an analysis of national test data. Click here to read the article featured in Education Week.
Trump Leaves Science Jobs Vacant, Troubling Critics
On the fourth floor of the Eisenhower Executive Office Building, the staff of the White House chief technology officer has been virtually deleted, down from 24 members before the election to, by Friday, only one. Mr. Trump has not yet named his top advisers on technology or science, and so far, has made just one hire. It is unclear whether the vacancies are the result of the Trump administration’s overall slowness in hiring or a signal that the president places less importance on science and technology than Mr. Obama did. Click here to read the article featured in The New York Times.
Stay tuned for next week’s top education news stories.
The Communication, Legislative & Public Affairs (CLPA) team strives to keep NSTA members, teachers, science education leaders, and the general public informed about NSTA programs, products, and services and key science education issues and legislation. In the association’s role as the national voice for science education, its CLPA team actively promotes NSTA’s positions on science education issues and communicates key NSTA messages to essential audiences.
The mission of NSTA is to promote excellence and innovation in science teaching and learning for all.
Follow NSTA

This week in education news, climate change skeptic group seeks to influence 200,000 teachers; some California schools are trading the blacktop for greentop; New Mexico schools continue to teach outdated science while new standards sit on the shelf; engineering is getting more attention in classrooms; and President Trump leaves science jobs vacant, troubling critics.
STEM Sims: The Multicolored Dice
By Edwin P. Christmann
Posted on 2017-03-31
STEM Sims: The Multicolored Dice
Introduction
As mentioned in our prior overview of STEM Sims [http://nstacommunities.org/blog/2017/02/06/stem-sims-interactive-simulations-for-the-stem-classroom/], this interactive software package provides over 100 simulations of laboratory experiments and engineering design products for the STEM classroom. The simulation featured here is called “The Multicolored Dice,” which we found to be an excellent simulation for mathematics applications related to the concept of probability. Subsequently, students predict which combinations are most likely to occur and then evaluate their hypotheses by rolling the dice to generate combinations of numerical values for predicting the color combinations of multicolored dice. As with numerical dice, where the probability of one dice is 1/6 and the probability of two dice being the same particular number is 1/6 x 1/6 = 1/36. … There are six different possible numbers, so that would be 6/36 or 1/6. Hence, the same rules apply to color combination of dice. The Multicolored Dice is aligned with national (NGSS) standards (MS-ETS1.B – Developing Possible Solutions) and is compatible with state standards as well.
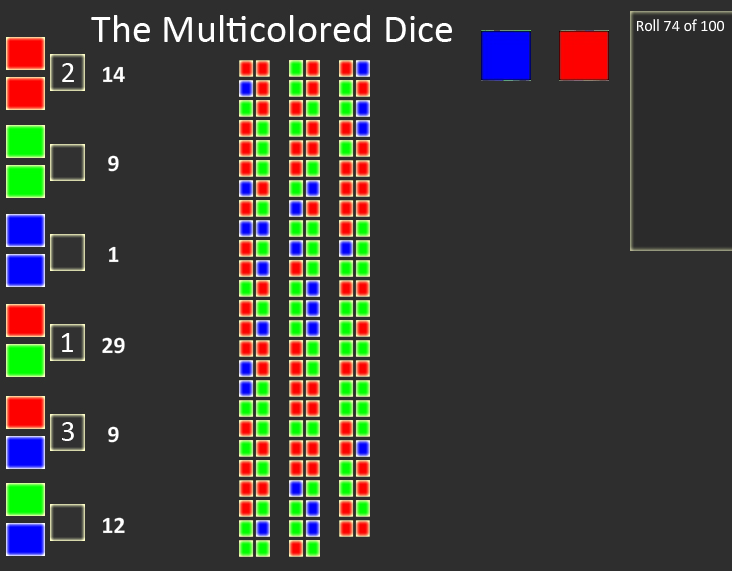
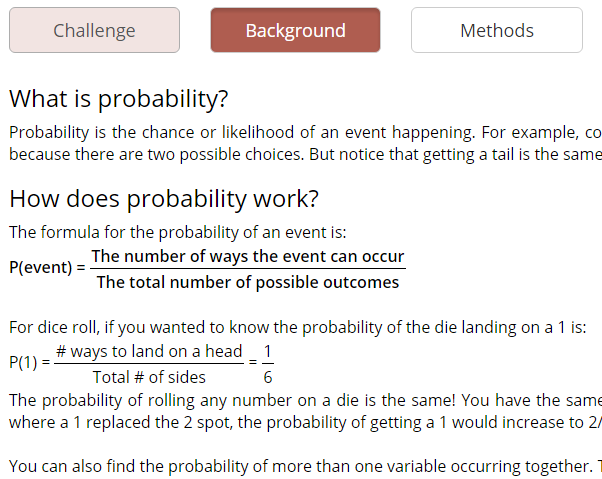
The simulation provides students with a brochure, a pre-assessment quiz , and introductory information about probability (see below). Another reason to consider using this activity is that it reinforces the connection between mathematics content and science content with and emphasis on the application of probability and statistics. Hence, this simulation enables science teachers introduce mathematics concepts that apply to scientific inquiry with probability as a foundation for prediction and analysis. Given the emphasis of integrating mathematics and science in the schools today, this simulation is an excellent opportunity to integrate concepts of mathematics that can help students to do science.
Brochure: https://stemsims.com/content/brochures/multicolored-dice-brochure.pdf?version=2017-01-19
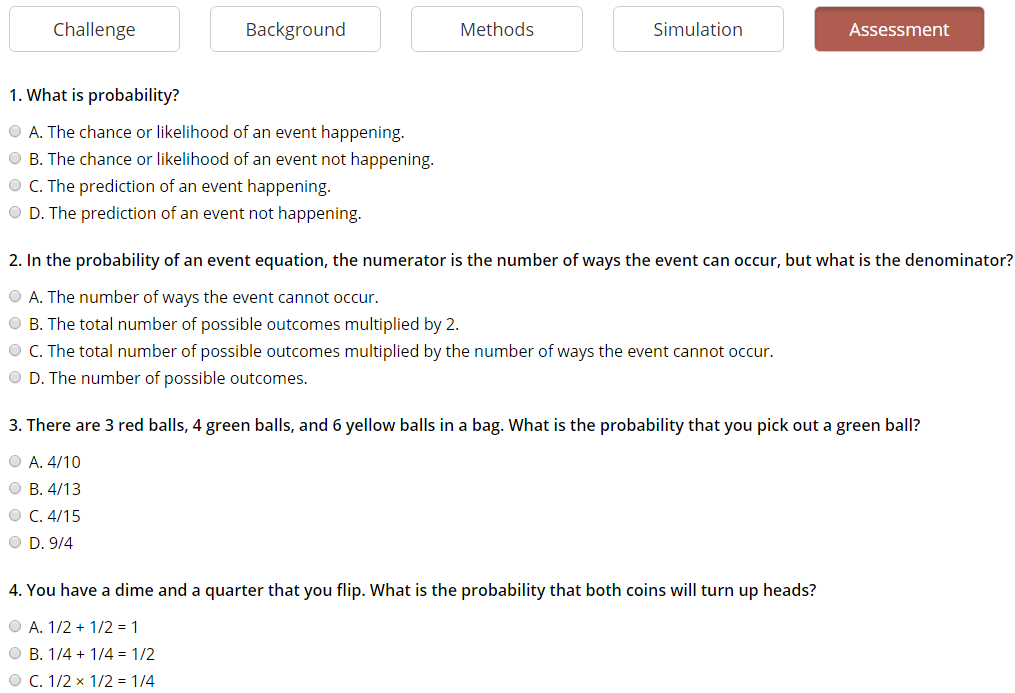
STEM Sims provides four separate lesson plans for this simulation (see links below). These lesson plans are very well-organized and fit the learning objectives and assess learning outcomes. As an example, we have included a Sample Assessment, which is a multiple-choice quiz that includes an answer guide for each lesson.
Sample Assessment
Sample Lessons
Lesson 1: https://stemsims.com/content/lessons/multicolored-dice-lesson-1.pdf?version=2017-01-10
Lesson 2: https://stemsims.com/content/lessons/multicolored-dice-lesson-2.pdf?version=2017-01-10
Lesson 3: https://stemsims.com/content/lessons/multicolored-dice-lesson-3.pdf?version=2017-01-10
Lesson 4: https://stemsims.com/content/lessons/multicolored-dice-lesson-4.pdf?version=2017-01-10
Conclusion
The Multicolored Dice offers teachers an opportunity to integrate mathematics and scientific concepts into a variety of subjects. Undoubtedly, this simulation will motivate students to formulate questions that will enrich their understanding of science. Consider signing-up for a free trial of this simulation to determine where this instructive learning tool fits into your classroom learning environment.
For a free trial, visit https://stemsims.com/account/sign-up
Recommended System Qualifications:
- Operating system: Windows XP or Mac OS X 10.7
- Browser: Chrome 40, Firefox 35, Internet Explorer 11, or Safari 7
- Java 7, Flash Player 13
Single classroom subscription: $169 for a 365-day subscription and includes access for 30 students and 100 simulations.
Product Site: https://stemsims.com/
Edwin P. Christmann is a professor and chairman of the secondary education department and graduate coordinator of the mathematics and science teaching program at Slippery Rock University in Slippery Rock, Pennsylvania. Anthony Balos is a graduate student and a research assistant in the secondary education program at Slippery Rock University in Slippery Rock, Pennsylvania
STEM Sims: The Multicolored Dice
Introduction
Only at NSTA's LA National Conference
By Lynn Petrinjak
Posted on 2017-03-30
 I think one of the hardest things about attending the NSTA National Conference is know just where to be—attending one of the numerous presentations, taking part in a field trip, checking out the exhibit hall, joining a networking event. I like to plan my schedule in advance—selecting sessions (try to make sure they’re not too far apart so I can get to them on time!) that just may lead to a future NSTA Reports’ article. But sometimes you just have to be flexible, like when you spot a familiar cartoon character in the exhibit hall or science teachers dropping Lego® astronauts from overhead to try to hit a target and you have to pause to take a picture.
Seeing people I haven’t seen since the last NSTA conference is always a highlight, as is meeting new folks. The NSTA Hub in the South Lobby has been a lot fun—I’ve talked to a lot new members, many long-term members, and quite a few who needed directions to the field trip buses or the registration area!
 If you haven’t visited the NSTA Hub, stop by during the conference, meet some of your NSTA Board and Council members, as well as some of the staff. And don’t forget to check out the walls around the Hub where NSTA members are expressing their love for science education!
More About the 2017 National Conference on Science Education
Browse the program preview, or check out more sessions and other events with the LA Session Browser/Personal Scheduler. Follow all our conference tweets using #NSTA17, and if you tweet, please feel free to tag us @NSTA so we see it!
The mission of NSTA is to promote excellence and innovation in science teaching and learning for all.
Future NSTA Conferences
2017 STEM Forum & Expo
Kissimmee/Orlando, July 12–14
2017 Area Conferences
Baltimore, October 5–7
Milwaukee, November 9–11
New Orleans, Nov. 30–Dec. 2
Follow NSTA
 I think one of the hardest things about attending the NSTA National Conference is know just where to be—attending one of the numerous presentations, taking part in a field trip, checking out the exhibit hall, joining a networking event.
California Dreaming… #NSTA17 Is Finally Here!
By Guest Blogger
Posted on 2017-03-30
I arrived in the City of Angels Wednesday afternoon to find a whole lot of equally enthusiastic #NSTA17 conference attendees. This is a HUGE deal, and we have a huge number of choices. I’m focusing on the engineering end of the spectrum—as an engineering educator who specializes in culture change through integrated STEM through engineering, I am always on the lookout for new, innovative, and fun ideas to engage teachers AND students in problem solving. And as a human, I cannot possibly get to every session that interests me. But even restricting my choices to those who indicate engineering is involved, I have a FULL dance card for every single slot—with many having three or more choices! What a terrific “problem” to have.
When I consider a new resource or idea for my practice, I look for particular things that truly and definitively teach engineering. For example, as an engineer and engineering educator, engineering is “create” not “build.” “Hands on” is simply that, and without constraints (limitations such as time, team, and materials) and criteria (what it must do; or how will we know we’re successful?). And for me (like many students who are kinesthetic learners), virtual or digital-only experiences are not sufficient to help me understand at the deepest level. So the ideal engineering learning opportunity is both hands-on and digital, which when done well takes learners from very local issues to connections to global challenges and in the end, synthesis at the highest level.
Teams, Not Groups
Collaboration is essential for implementing engineering in a meaningful way. One way to demonstrate this is to use teams instead of groups. It may seem to be semantics, but it’s critical to innovation to have teams. Teams are comprised of members who all have a vested interest (and responsibilities) in working toward a solution that will meet the constraints and criteria. Groups typically have some common identifier such as an ability or skill.
And while I’m part of the NSTA team this week, I’ll be looking for sessions that use the F word: failure. Engineers plan for failure. After all, how can we innovate if we know the answer before we start? Teachers aid in this objective greatly by not scaffolding for success, allowing teams time to iterate and ensuring they know they have—and teachers plan for—time to improve. Remember, engineers plan for failure, but honestly? We want to fail in teeny tiny scale—big failures tend to make the news. Seriously, innovation requires iteration. And iteration inspires deeper learning and the synthesis we all seek for our students.
I have filled up my calendar with so many wonderful sessions for Thursday. I’ll be going to as many as I can, stealing—wait, that’s such an ugly word…I mean borrowing to replicate as a sign of my admiration. So I’ll be learning from all of you, asking questions, getting advice, offering to collaborate, and making connections. After all, that’s what engineers do.
 Happy Thursday at NSTA!
Author Liz Parry is a guest blogger for NSTA for the 2017 National Conference; follow Liz on Twitter @STEMninjaneer.
More About the 2017 National Conference on Science Education
Browse the program preview, or check out more sessions and other events with the LA Session Browser/Personal Scheduler. Follow all our conference tweets using #NSTA17, and if you tweet, please feel free to tag us @NSTA so we see it!
The mission of NSTA is to promote excellence and innovation in science teaching and learning for all.
Future NSTA Conferences
2017 STEM Forum & Expo
Kissimmee/Orlando, July 12–14
2017 Area Conferences
Baltimore, October 5–7
Milwaukee, November 9–11
New Orleans, Nov. 30–Dec. 2
Follow NSTA
I arrived in the City of Angels Wednesday afternoon to find a whole lot of equally enthusiastic #NSTA17 conference attendees. This is a HUGE deal, and we have a huge number of choices. I’m focusing on the engineering end of the spectrum—as an engineering educator who specializes in culture change through integrated STEM through engineering, I am always on the lookout for new, innovative, and fun ideas to engage teachers AND students in problem solving.
Enhanced E-books Student Editions, Part 2: What Teachers Have to Say About Them
By Carole Hayward
Posted on 2017-03-29
NSTA recently launched e-Books+ Student Editions. In Part 1, we provided information on what the student editions include and the full range of topics available. In this post, we’ll share what teachers have to say about the new student editions and how they can help you in your school and classroom.
Adding to Your Curriculum
If you are looking for something that is more than just a digital textbook, consider these student editions as a visual and intellectual experience for your students.
“I implemented this e-book in my classroom, for the first time, this year. My students honestly love it. This book covers all of the content standards with life biology, your units are right there ready to go. The students are engaged and actually want to read! It has had a tremendous impact on test scores, and retention. My students are still able to recall what they learned, they recall images and video clips. It is a kinesthetic learning experience. I was so impressed with the first one that I purchased a second about cells, which is equally stunning. I can’t wait to get the complete set and neither can my students!”
Alicia H.

Engaging Resource for Your Students
These are great to use in a station environment. The outstanding graphics as well as the interactive modules and videos add an additional depth that really captures your students’ attention.
“The students love them and are extremely motivated to complete assignments using the e-book.”
Jennifer M.
Helping Your Struggling Students
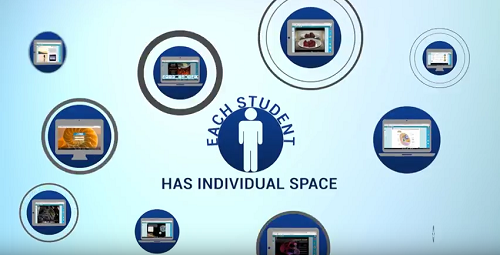
If you have students who are struggling with a particular topic or who have missed a lot of class time, these student editions can be a great resource.
“I am so happy I decided to purchase this e-book…it has turned out to be a great help for those that were struggling and allowing them to dig deeper into the subject matter and work independently.”
Sara G.
Contact and Ordering Information
All purchases of eBooks+ Student Editions must be completed through NSTA’s Customer Service Department. Order by phone (1-800-277-5300) between 9 a.m. and 5 p.m. ET) or fax (1-703-243-7177). Or email us at orders@nsta.org. Download an eBooks+ Student Edition order form.
Pricing information is available per e-book/student/year. For any other questions regarding NSTA’s eBooks+ Student Editions, please contact ebooks@nsta.org.
Follow NSTA
Save
NSTA recently launched e-Books+ Student Editions. In Part 1, we provided information on what the student editions include and the full range of topics available. In this post, we’ll share what teachers have to say about the new student editions and how they can help you in your school and classroom.
Teaching as an art form
By Mary Bigelow
Posted on 2017-03-28
 I’m preparing to be a chemistry teacher. In addition to chemistry and teacher prep classes, what else should I study to become an effective teacher? More math or physics? —T., Colorado
While math and physics are important (especially if you’re pursuing other certifications), you also could become familiar with another language and the special education requirements in your state. You could pursue a personal interest in history and geography, literature, or the arts to better connect science with other subjects.
As a teacher, you’ll be “on stage” every day. Many teacher prep classes don’t address how to communicate with students and share your enthusiasm and passion for chemistry. That’s where acting experience or a class may help. This doesn’t mean putting on a contrived show but rather using your voice and body language effectively.
After several teachers in my school were recruited into a community theatre group, our confidence and communications in the classroom improved in several areas:
- Enunciating clearly and reaching every corner of the room without shouting and straining your voice
- Incorporating humor and timing
- Improvising based on student interests and questions
- Dealing with distractions
- Showing interest in a student’s question or idea, even if we’d heard it several times before
- Being mindful of your position in the classroom and moving around
- Using strategies such as props and wait-time
- Choosing a well-aimed glare or a quiet whisper to stop some misbehaviors
Who knows what topics you could change from dull to interesting for students?
Online Resources:
- It’s not what you say, it’s how you say it
- Why Teachers Should Be Trained Like Actors
- Using Acting Skills in the Classroom
Photo: https://www.flickr.com/photos/spcummings/361167519/


